Create a Lookahead Schedule

Background

A Lookahead schedule provides a 1-to-6 week window into your project's master schedule. It gives field teams a dedicated space to build out detailed day-to-day work plans without altering the master schedule logic or shifting critical path dates.

When you import a Read-Only schedule, master activities appear locked in the Lookahead view. Field teams can use this baseline to add granular subtasks, assign company resources, and track immediate progress on the jobsite. Any subtasks or notes created in an active Lookahead will automatically carry over into future Lookaheads if their date ranges overlap.

Things to Consider

  • Required User Permissions:

    • To create a lookahead schedule, you need one of the following:

      • 'Admin' permissions on the project's Schedule tool.

      • 'Read Only' or 'Standard' level permissions on the Schedule tool with the 'Create Lookaheads' granular permission enabled on your permissions template.

  • Additional Information:

    • When you create a Lookahead in Procore, it will not show up on an integrated schedule in Procore (e.g. Microsoft Project, Primavera).

    • Lookaheads populate directly from the master schedule. To see changes made to the master schedule reflected on the lookahead you will need to re-upload the master schedule and create a new Lookahead schedule.

    • You can create multiple lookahead schedules within the same project.
      See Create Follow-up Lookahead.

Updating Existing Schedules

When updating an existing schedule file in your third-party scheduling software (e.g., Microsoft Project, Primavera P6, Phoenix):

  • Always use Save to update your file. This preserves the internal activity IDs needed to map existing Lookahead activities in Procore.

  • Do not use Save As. Using Save As creates a brand new schedule file with new internal IDs. Attempting to upload a Save As copy into Procore will trigger an error because it breaks the associations with your project's Lookahead activities.

Prerequisites

  • An Active Master Schedule: To create a Lookahead, you must have an active master schedule uploaded to the project's Scheduling tool. See Choose a Scheduling Path.

Steps

Create Your First Lookahead

  1. Navigate to the project's Schedule tool.

  2. Click the Lookaheads tab.

  3. Click +Create Lookahead.
    Clipboard E9b6c139a82d5b44ff35a5c42a1f9f3f7

  4. Fill out the following fields:

    • Start date: The date you want your lookahead to start.

    • Duration: Time frame you want the lookahead to show. You can select a minimum of one week and a maximum of six weeks.
      Note: If a task on your lookahead lasts longer than the duration of the lookahead, it will still be reflected.

  5. Click Create.

Create Follow-up Lookahead

  1. Navigate to the project's Schedule tool.

  2. Click the Lookaheads tab.

  3. Click +Create Lookahead.
    Clipboard E9b6c139a82d5b44ff35a5c42a1f9f3f7

  4. Do one of the following:

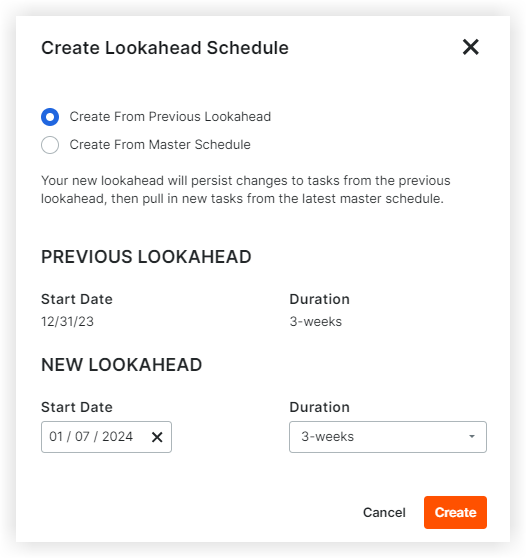
    • To create your follow-up lookahead from a previous lookahead, select Create from Previous Lookahead.
      Note: Your new lookahead will persist changes to tasks from the previous lookahead, then pull in new tasks from the latest master schedule.
      Create Previous Lookahead

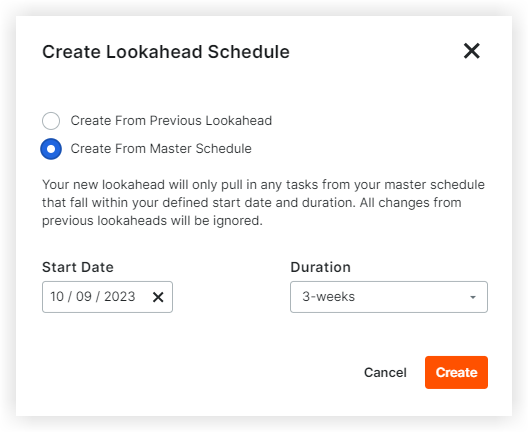
    • To create your follow-up lookahead from a master schedule, select Create From Master Schedule.
      Note: Your new lookahead will only pull in any tasks from your master schedule that fall within your defined start date and duration. All changes from the previous lookahead will be ignored.
      Create Lookahead Schedule

  5. Fill out the following fields:

    • Start date: The date you want your lookahead to start.

    • Duration: Time frame you want the lookahead to show. You can select a minimum of one week and a maximum of six weeks.
      Note: If the date ranges of your new Lookahead overlaps with the most previous Lookahead, the tasks and subtasks from the most previous Lookahead will carry over to the new Lookahead.

  6. Click Create.

See Also

Loading related articles...