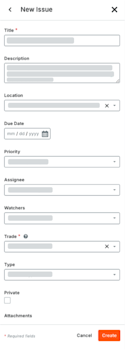
Create a Coordination Issue

Background

Identifying and recording model issues early is critical for saving time and budget. By resolving these conflicts upfront, you significantly reduce the volume of RFIs and Change Events required later in the project. You can create a coordination issue from these Procore tools and products: Coordination Issues, Drawings, or Models in the Procore Web application, with the Procore BIM Plugins in Autodesk® Navisworks®, when using the Navisworks® Clash Detective with Procore Clash Manager, or directly from the field using Augmented Reality for BIM on the Procore for Mobile iOS app.

Things to Consider

  • Required User Permissions:

    • All issue creators require ‘Standard’ or 'Admin' on the Coordination Issues tool.

    • Additional requirements by tool:

      • From the Model Viewer: The above, plus 'Admin' level permissions on the Models tool.

      • From a Drawing: The above, plus 'Standard' or 'Admin' level permissions on the Drawings tool.

  • Additional Information:

Prerrequisitos

  • To follow these steps from your Autodesk® design software using the Procore BIM Plugin:

    • The Procore BIM Plugin must be installed on your Windows® computer. See Download & Install.

    • Link your Navisworks® model to a Procore company and project. See Associate a Model with a Procore Project from Navisworks®.

    • Add locations that match your coordination schedule to the Procore project. See Add Locations to a Project. For example, if your schedule breaks the project down by building, level, and zone (e.g., Building A > Level 3 > North Corridor), make sure the locations in the Project Admin tool mirror this.

Video


Steps

Create an issue from your preferred platform:

To create an issue from Procore's Coordination Issues tool Show/Hide

  1. Navigate to the Coordination Issues tool.

  2. Click Create.

  3. Complete these fields:

    • Title*. Enter a clear, descriptive issue title for your collaborators.

    • Description. Describe the issue. The entry is also saved as a viewpoint comment on the final NWD file.

    • Location. Select the issue location. To add a location to this list, see Add Locations to a Project or Import Locations Using the Procore BIM Plugin for Revit® and Edit Tiered Locations.

    • Location. Select the specific project area where the issue is located. The available options in this list are managed in the locations utility in the Project Admin tool.

    • Assignee: Select the person who is responsible for resolving the issue. The person must have 'Standard' or 'Admin' permissions on the Coordination Issues tool to be selected as an assignee.

    • Due Date. The targeted deadline for the issue resolution.

    • Priority. The urgency level. The system's pre-defined options are Low, Medium, High, Critical.

    • Trade. The discipline involved. The available options in this list are managed in the Trades utility in the Company Admin tool.

    • Type. The category of the issue used for reporting purposes. The system's pre-defined options are Building Code, Clash, Client Feedback, Constructability, Coordination, Design Review, Existing Condition, Requirement Change, and Other.

    • Attachments. Up to 20 images, PDFs, or documents relevant to the issue.

  4. Click Create.

To create an issue from Procore's Drawings tool Show/Hide

You can attach coordination issues to a drawing in two ways: by placing a dedicated issue pin or by linking an issue to a (like a cloud or arrow).

Step 1: Open the Drawing in Markup View

Before adding an issue, open the drawing.

  1. Navigate to the project's Drawings tool.

  2. Find the drawing you want to work on and click Open.

  3. Click the Markup tab at the top of the viewer.

    markup-in-the-drawing-toolbar.jpg

Step 2: Choose Your Method to Add an Issue

Decide how to show the issue on the drawing.

Method A: Use a Coordination Issue Pin

This method places a specific icon on the drawing to represent the issue.

  1. Click the Pins icon on the markup toolbar.
    drawings-toolbar-pin.png

  2. If you don't see it, another pin type (like Photos or Punch Item) may be selected. Click that icon to expand the menu and find the Issue pin.
    drawings-toolbar-coordination-issues.png

  3. Click directly on the drawing where you want to place the pin.

  4. Proceed to Step 3.

Method B: Attach to a Markup Shape

This method is useful when you want to highlight a larger area with a shape (like a cloud) and then link an issue to it.

  1. Select a standard markup tool (e.g., Cloud, Arrow, Text).

  2. Draw the shape on the desired area of the drawing.

  3. With the shape still selected, click the paperclip icon-link-item.pngicon in the menu that appears and select Coordination Issue.

    link-coordination-issue.png
  4. Proceed to Step 3.

Step 3: Create a New Issue or Link an Existing One

After completing either method, you are prompted to choose an option.

To Create a New Issue

  1. Select Create New Coordination Issue.

  2. Fill out the information in the new issue form.

  3. Click Create.

To Link an Existing Issue

  1. Select Link to Existing Coordination Issue.

  2. Search for and select the issue from the list. You can double-click the search box to see all issues in the project.

Step 4: Publish Your Markups

Your markups and linked issues are only visible to you until they are published.

  1. Select the pin or markup shape on the drawing.

  2. Click Publish from the toolbar.

This makes the issue visible to other team members. Procore also generates a snapshot of the markup and attaches it to the issue.

To create an issue from Procore's Models tool Show/Hide

  1. Navigate to the project's Models tool.

  2. Click a model's tile to open it in the Model Viewer.

  3. Navigate to the area on the model where you want to create a coordination issue. For navigation tips, see View a Model.

  4. Click the Issues icon-issues.png icon to open the Coordination Issues side panel.

  5. Click the Plus icon at the top of the panel to create a new issue.

  6. Optional: To update the issue's snapshot, modify the model's field of view. Then, hover over the image in the side panel and click Update Snapshot.

    This is a partial SUI of the Coordination Issues tab showing a snapshot update on a new coordination issue.
  7. Complete these fields:

    • Title: Type a title for the issue. This is the first reference that collaborators see when reviewing an issue.

    • Description: Enter a description of the issue.

    • Location: Select the issue location.

    • Due Date: Set a due date on the calendar.

    • Priority: Select the issue priority. Options are: Low, Medium, High, Critical.

    • Assignee: Select the person who is responsible for resolving the issue. The person must have 'Standard' or 'Admin' permissions on the Coordination Issues tool to be selected as an assignee.

    • Watchers. Select the members to notify by email about issue updates. Watchers must have 'Read Only' level permissions or higher on the tool.

    • Trade: Select the relevant trade associated with the issue.

    • Type: Select the issue type. Options are: Building Code, Clash, Client Feedback, Constructability, Coordination, Design Review, Existing Condition, and Other.

    • Attachments: Click Attach Files or drag and drop a file to add an attachment.

  8. Click Create to add the new issue to the Coordination Issues tool. Once created, click icon-open-in-new-tab.png in the side panel to view it in the Coordination Issues tool.

To create an issue from Navisworks® with the Procore BIM Plugins Show/Hide

  1. Open a model in Navisworks® and find the conflict or issue that needs to be tracked.

  2. Click the Procore tab.

  3. In the Coordination Issues ribbon, click Coordination Issues, and then click New Issue.

     Note

    Clicking 'New Issue' captures your current view and any markups. This snapshot is live and automatically updates with any changes you make.

  4. Complete these fields:

    • Snapshot. A snapshot of the conflict to track as a coordination issue.

    • Title. A brief summary of the issue. This field is required (*).

    • Description. Detailed information about the issue to help the assignee understand the context.

    • Location. The specific project area where the issue is located. The available options in this list are managed in the locations utility in the Project Admin tool.

    • Assignee. The team member responsible for resolving the issue. The system limits this list to users with 'Read Only' level permissions or higher on the tool.

    • Due Date. The targeted deadline for the issue resolution.

    • Priority. The urgency level. The system's pre-defined options are Low, Medium, High, Critical.

    • Trade. The discipline involved. The available options in this list are managed in the Trades utility in the Company Admin tool.

    • Type. The category of the issue used for reporting purposes. The system's pre-defined options are Building Code, Clash, Client Feedback, Constructability, Coordination, Design Review, Existing Condition, Requirement Change, and Other.

    • Attachments. Up to 20 images, PDFs, or documents relevant to the issue.

  5. Click Create.

To create an issue from Navisworks® Clash Detective using Procore Clash Manager with the Procore BIM Plugins Show/Hide

  1. Select one or more clashes or clash groups in Navisworks® Clash Detective.

  2. Click Create CIs in Procore Clash Manager.

  3. Select the Assignee as the person responsible for resolving the issue.

  4. Select the Location for the project’s locations.

  5. Select the issue Type.

  6. Select the Priority for the issue.

  7. Enter a description of the coordination issue. You can select one or more of the following as part of the description:

    • Append clash comments

    • Append redline text

  8. Enter the due date.

  9. Click Create. Once the issue is created, the Procore logo appears next to the clash or clash group in Navisworks® Clash Detective. The issue displays in the Procore Coordination Issues panel in Navisworks® and in the Procore web application.

To create an issue from the Procore for Mobile (iOS) app using AR for BIM Models Show/Hide

  1. Navigate to the Models tool on your iOS device.

  2. Tap to open the relevant model.

  3. Tap the AR (Augmented Reality) button in the viewer toolbar.

  4. Once you've identified the clash or issue in AR view, tap Create > Coordination Issue.

  5. Complete these fields:

    • Title*. Enter a clear, descriptive issue title for your collaborators.

    • Description. Describe the issue. The entry is also saved as a viewpoint comment on the final NWD file.

    • Attachments: Creating an issue automatically attaches four (4) images (augmented reality, device camera, model only, and 2D view). You can add up to 20 files per issue.

    • Location. The specific project area where the issue is located. The available options in this list are managed in the locations utility in the Project Admin tool.

    • Assignee: Select the person who is responsible for resolving the issue. The person must have 'Standard' or 'Admin' permissions on the Coordination Issues tool to be selected as an assignee.

    • Due Date. The targeted deadline for the issue resolution.

    • Priority. The urgency level. The system's pre-defined options are Low, Medium, High, Critical.

    • Trade. The discipline involved. The available options in this list are managed in the Trades utility in the Company Admin tool.

    • Type. The category of the issue used for reporting purposes. The system's pre-defined options are Building Code, Clash, Client Feedback, Constructability, Coordination, Design Review, Existing Condition, Requirement Change, and Other.

    • Attachments. Procore automatically captures a photo of what you were looking at in AR. It also includes a screenshot of the 3D Model view, and a snapshot showing your pin location on the 2D floor plan.

  6. Tap Create.

See Also

Loading related articles...