Ce site Web n’est pas encore entièrement disponible dans votre région.
La seule page opérationnelle du site de support V2 dans votre région préférée est la page de la bibliothèque de vidéos. Le site Web complet sera bientôt lancé.
Vous recherchez d'autres contenus? Retournez au site de support V1.
Subcontracts can be awarded during both the preconstruction and construction phases of a project and are typically created and tracked in Procore by project management. After a prime contract award, the project manager creates purchase orders and subcontracts for specific trades to secure materials and subcontractor services for a project.
Things to Consider
Required User Permissions:
To create a subcontract and see/enter data on the Schedule of Values (SOV) tab:
Admin level permissions on the project's Commitments tool.
Standard level permissions on the project's Commitments tool and the Allow Users to See SOV Items setting must be enabled and your name must be selected in the Select a Person drop-down list.
To create a subcontract only, Read Only or Standard level permissions on the project's Commitments tool with the 'Create Work Order Contract' granular permission enabled on your permissions template.
For companies using theERP Integrations tool: Prerequisites, requirements, limitations, and specific considerations may be applicable, depending on the particular ERP system integrated with your Procore account.
To use the Procore + DocuSign® integration to request signatures, see DocuSign®.
Steps
Navigate to the project's Commitments tool.
On the Contracts tab, click the Create button and choose Subcontract from the drop-down list.
Continue with the next steps:
Update the General Information
Add Attachments
Attach Files
Update the Schedule of Values
Add Line Items to the Schedule of Values
Import Line Items to the Schedule of Values from a CSV File
Update Inclusions & Exclusions
Update the Contract Dates
Update Contract Privacy
Add General Information
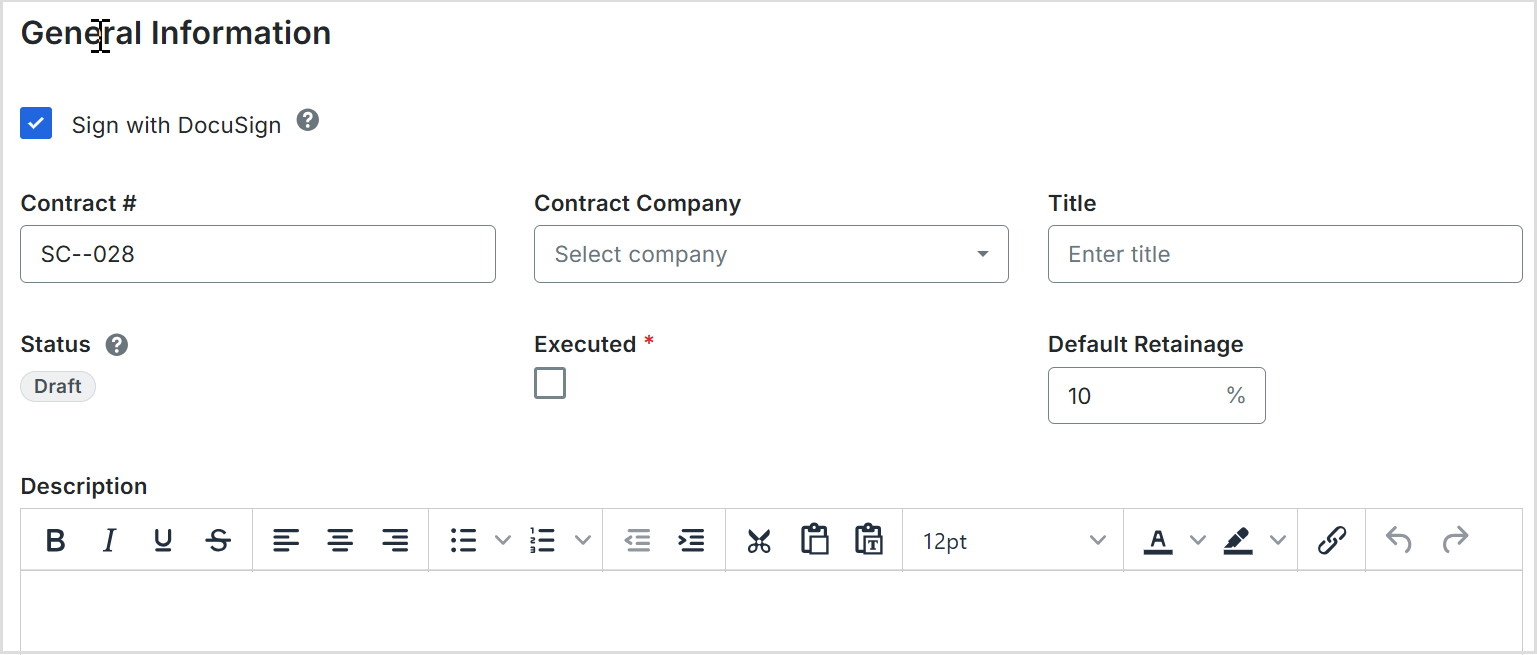
Update General information as follows:
Notes
There are no required fields when adding the basic information.
If you click the Create button without completing any data entry, Procore saves the contract, lists you as the creator, and automatically places it in the Draft status.
Optional:Sign with DocuSign® Place a check mark in this box if you want to request electronic signatures on this item using the Procore + DocuSign® integration. To learn how to activate the integration on your project, see Enable or Disable the DocuSign® Integration on a Procore Project.
Tip
How do you collect signatures with DocuSign? After the data entry for the item is complete, Procore recommends changing the item's status to 'Out for Signature' before clicking the Complete with DocuSign button to launch the DocuSign® application. If you have not previously signed in, you will be prompted to Log In to DocuSign®. Once you are signed in, you can prepare the DocuSign_®_ envelope for signatures. After the signature process is complete, Procore automatically changes the status of the item to 'Approved' and marks the item as 'Executed'. To learn more, see DocuSign®.
Contract Number To number your contract(s), choose from these options:
If you number your contracts using a sequential numbering system, you can enter any combination of alpha-numeric characters in this box. For subsequent contracts, Procore automatically applies consecutive numbering in ascending order.
Example
The examples below show you how Procore's ascending consecutive numbering works:
If the previous contract was 1, the next contracts are 2, 3, and so on.
If the previous contract was PC-0001, the next contracts are PC-0002, PC-0003, and so on.
If the previous contract was DCA00010-12-G-0001, the next contracts are DCA00010-12-G-0002, DCA00010-12-G-0003, and so on.
If you do NOT number your contracts using sequential numbering, you can manually enter a unique number for each prime contract. To do this, type over the existing entry in the Number box. Duplicate contract numbers are NOT permitted.
Contract Company Select the name of the project owner's or the project client's company from the drop-down list. This is the company that either owns the construction project or the client who has hired your company to oversee the project work. To appear as a list option, Add a Company to the Project Directory.
Title Type a descriptive name for the contract.
Status Procore automatically assigns contracts the Default status. To select a different status, choose one of the status labels from the drop-down list. Options include
Note
To create change orders and invoices, your contract's status must be set to Approved or Complete.
Executed Place a mark in this check box if the contract has been fully executed. A fully executed contract is a legally effective agreement that has been signed by authorized representatives for each party.
Default Retainage Enter a number to represent the percentage that will be withheld as retainage on the line items of the contract's Schedule of Values. For example, if you plan to withhold ten (10) percent of the line item's value, enter 10%.
Description Enter a more detailed description of the prime contract. You can apply the options in the formatting toolbar to your text.
Attachments
To add file attachments to the contract:
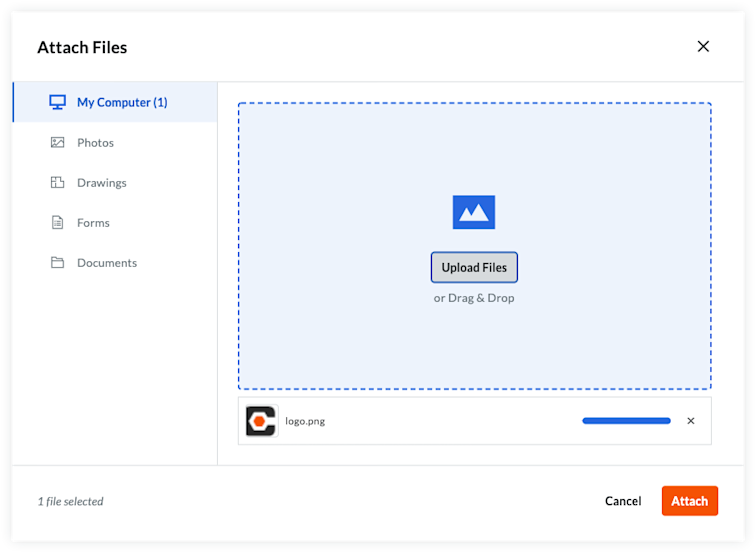
Click Attach Files.
In the Attach Files dialog box, highlight the location where the files to upload are stored. Options include:
My Computer. Click Upload Files to open your computer's finder. Select the files to upload and click Open.
Photos. If the Photos tool is active on the project, choose the location from the Select Album list and then search for the file(s) to upload.
Drawings. If the Drawings tool is active on the project, choose the area from the Select Area list and then search for the file(s) to upload.
Forms. If the Forms tool is active on the project, choose the template from the Select Template list and then search for the file(s) to upload.
Documents. If the Documents tool is active on the project, navigate to the folder storing the file(s) to upload and then highlight them.
Click Attach. A progress indicator shows you the status of the upload.
Click the Close (X) icon on the Attach Files dialog box.
Set the Accounting Method
The first step when updating a Schedule of Values is to define the accounting method for the contract. The method you choose also applies to all change orders and/or invoices for that contract. The accounting method can only be changed BEFORE you add line items to an SOV. Procore does NOT permit you to change a contract's accounting method after line items are added.
To change the accounting method to Unit/Quantity, click the Change to Unit/Quantity button.
To change the accounting method back to Amount-Based, click the Change to Amount Based button.
Update the Schedule of Values
There are two (2) methods for updating the subcontract's SOV:
Add Line Items to the Schedule of Values
Import Line Items to the Schedule of Values from a CSV File
Add Line Items to the Schedule of Values
By default, you can input line items on the subcontract's SOV at any time, as long as it is NOT in the Approved status.
Note
If your project team has turned the 'Enable Always Editable Schedule of Values' configuration setting ON in this tool, users with the required user permission to Edit Subcontracts can add line items to the Schedule of Values when a contract is in any status. To learn specific information about this setting, see What is the 'Enable Always Editable Schedule of Values' setting?
To manually add line items to the Schedule of Values:
Choose from these options:
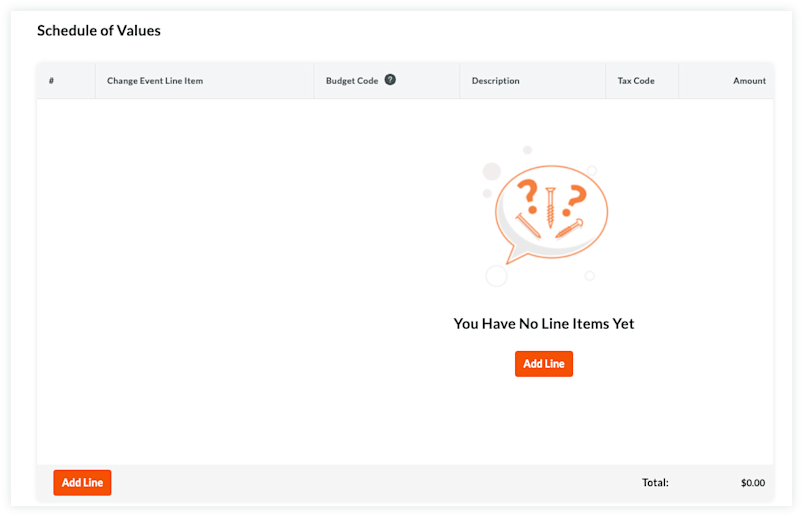
If the SOV is blank, click Add Line under You Have No Line Items Yet. OR
If you have existing line items, click Add Line. Procore creates new line items starting with the number 1. Subsequent lines are created in numerical order.
Designate a budget code for the new line item. You have these options:
To assign an existing budget code to the line item, start typing a code in the Search box and select the matching code from the list. OR
To create a new budget code for the line item, click the Create Budget Code button. Next, select the appropriate segment items from the drop-down list(s) to satisfy your project's budget code pattern requirements. Then, click Create.
Depending on the accounting method you are using, choose the appropriate steps for adding a line item:
For an Amount-Based contract: An Amount-Based SOV requires this data entry:
Budget Code Select a budget code or click Create Budget Code.
Description Enter a description for the line item. For example, type: Monthly Service Fee
Amount Enter the total amount for the line item.
Billed to Date Later, when you create invoices, this column will automatically show the amount that has already been billed to date.
Amount Remaining Later, when you create invoices, this column will automatically show the amount that has NOT yet been billed to date.
For a Unit/Quantity Based contract: A Unit/Quantity Based SOV requires this data entry:
Budget Code Select a budget code or click Create Budget Code.
Description Enter a description for the line item. For example, type: Monthly Service Fee
Qty Enter the number of units.
UOM Select the Unit of Measure (UOM) from the list.
Unit Cost Enter the Unit Cost in this box. You'll notice that the value in this column contains four (4) decimal points (for example, $0.0000) to allow you to enter the specific value required to calculate accurate pricing.
Example
If you are buying 50,000 units for $1,006,625.00, you would enter a unit price of $20.1325.
Amount The system automatically calculates the subtotal for you, based on the Qty, UOM, and Unit Cost entries.
Billed to Date Later, when you create invoices, this column will automatically show the amount that has already been billed to date.
Amount Remaining Later, when you create invoices, this column will automatically show the amount that has NOT yet been billed to date.
Optional: Repeat the steps above to add as many line items as needed.
Click Save. Procore saves the line items on the contract's SOV.
Import Line Items to the Schedule of Values from a CSV File
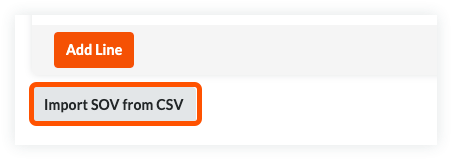
In the Schedule of Values card, click the Import SOV from CSV button.
Click the Download CSV Template button and choose one of these options:
Blank Template. Click this option to download a blank template.
Template with Existing Line Items. Click this option to download a template that includes any existing line item data from your project's budget.
Note
Procore downloads a CSV template file to your web browser's file download location.
The name of the file is: TBD
Open the template that you downloaded on your computer.
Enter the data that you want to upload directly into the template.
Important
Do NOT change or rearrange the Column Headings in the template file.
After entering your line item data, make sure to save your file updates in the Comma Separated Values file format.
Navigate back to Procore. Then, in the CSV File section, choose one of these options:
Click Upload File.
Use a drag-and-drop operation to move the template you just updated into the CSV File section.
Choose one of these options:
Add Additional Line Items. Choose this option if you want to create new line items using the data in your template.
Replace Existing Line Items. Choose this option if you want to erase any existing line items from the subcontract and replace them with data in your template.
Note
If the 'Enable Always Editable Schedule of Values' configuration setting is turned ON in the project's Commitments tool, the 'Replace Existing Line Items' option is grayed out and unavailable for use once an invoice is created and line items are billed. To learn more, see What is the 'Enable Always Editable Schedule of Values' setting?
Click Import.
Add the Scope of Work
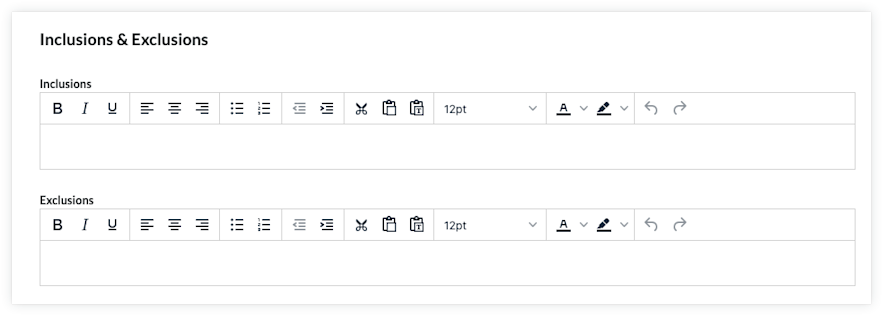
Contract inclusions and exclusions vary from project to project. However, the intent is to define exactly what is included and NOT included in the contract's price and scope of work. To update the contract's Inclusions and Exclusions card, do the following:
Inclusions Add the contract's inclusions in this box. You can apply the options in the formatting toolbar to your text.
Exclusions Add the contract's exclusions in this box. You can apply the options in the formatting toolbar to your text.
Update the Contract Dates
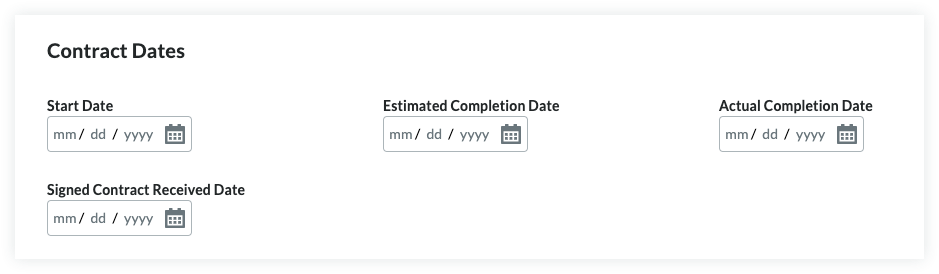
To update the contract with important dates, do the following:
Start Date Select the construction project's official start date.
Estimated Completion Select the construction project's estimated completion date from the calendar control.
In Beta
Note to users participating in the Field-Initiated Change Orders' limited release beta program. The information below details a configuration that is available to Procore users taking part in the Beta Participant Program for Field-Initiated Change Orders. For more information about this release, see Commitments: Allow Collaborators to Submit Field-Initiated Change Orders.
Actual Completion Select the construction project's actual completion date.
Signed Contract Received Select the date from the calendar control. The signed contract received represents the date that the executed contract was received.
Update the Contract Privacy
Using the privacy setting allows only project admins and the select non-admin users access. To change the contract's access permissions, do the following:
Check or Uncheck the Private box. Procore turns this setting ON by default.
Select an employee of the Contract Company from the Invoice Contact drop-down list.
Save the Contract
Note
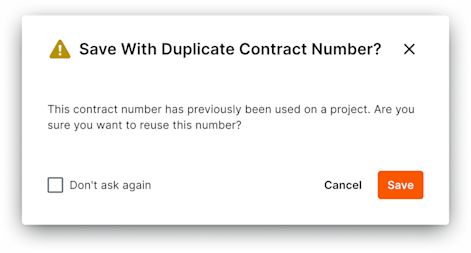
If the Contract # of the commitment you are creating has been previously used on any project within your company, a confirmation window will appear to ask how you would like to proceed. If you choose to ignore this message, click Save and the contract will be created. Additionally, if you do not want to receive this message when creating future commitments, you may check the box next to the text Don'at as again.
To save the contract, click one of the following buttons:
Create. Click this button to save the new contract and return to the General tab in view mode.
Create & Send with DocuSign®. Click this button to launch the Procore + DocuSign® integration and prepare the envelope for signature.
Cancel. Click Cancel to close the window and return to the Contracts tab page.
 ERP Integrations tool: Prerequisites, requirements, limitations, and specific considerations may be applicable, depending on the particular ERP system integrated with your Procore account.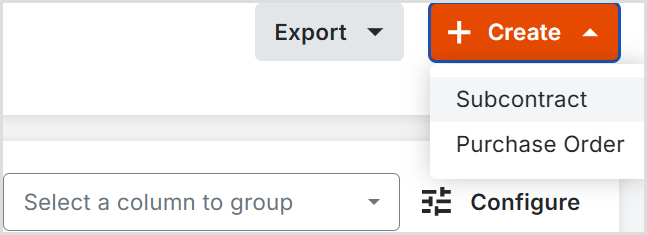
 If the Contract # of the commitment you are creating has been previously used on any project within your company, a confirmation window will appear to ask how you would like to proceed. If you choose to ignore this message, click Save and the contract will be created. Additionally, if you do not want to receive this message when creating future commitments, you may check the box next to the text Don'at as again.