Ajouter des codes de coût standard Viewpoint® Vista™ à un projet
Arrière-plan
Au cours d’un projet de construction, des engagements et des ordres de changement d’engagement sont créés. Dans ce cas, vous devrez peut-être ajouter de nouveaux codes de phase à Vue®. Vous devrez également ajouter ces codes de phase à votre projet Procore. Lorsque vous créez un nouveau code de phase dans Vue®, ces codes sont synchronisés avec votre Vue® liste de codes de coût standard dans l’outil Admin de Procore au niveau entreprise. Une fois les codes synchronisés, vous pouvez suivre les étapes ci-dessous pour copier la liste des codes de Vue® coût standard dans la liste Codes de coût du projet.
Éléments à prendre en compte
Autorisations utilisateur requises :
Autorisation de niveau « Admin » dans l’outil Intégrations ERP.
Prérequis:
L’outil Intégrations ERP doit être activé sur le projet.
Le projet du système ERP intégré doit être ajouté en tant que projet Procore.
Steps
Add Standard Cost Codes to a Project
Update the Cost Code Cost Type Assignments
Resend the Project Cost Codes to ERP
Add Standard Cost Codes to a Project
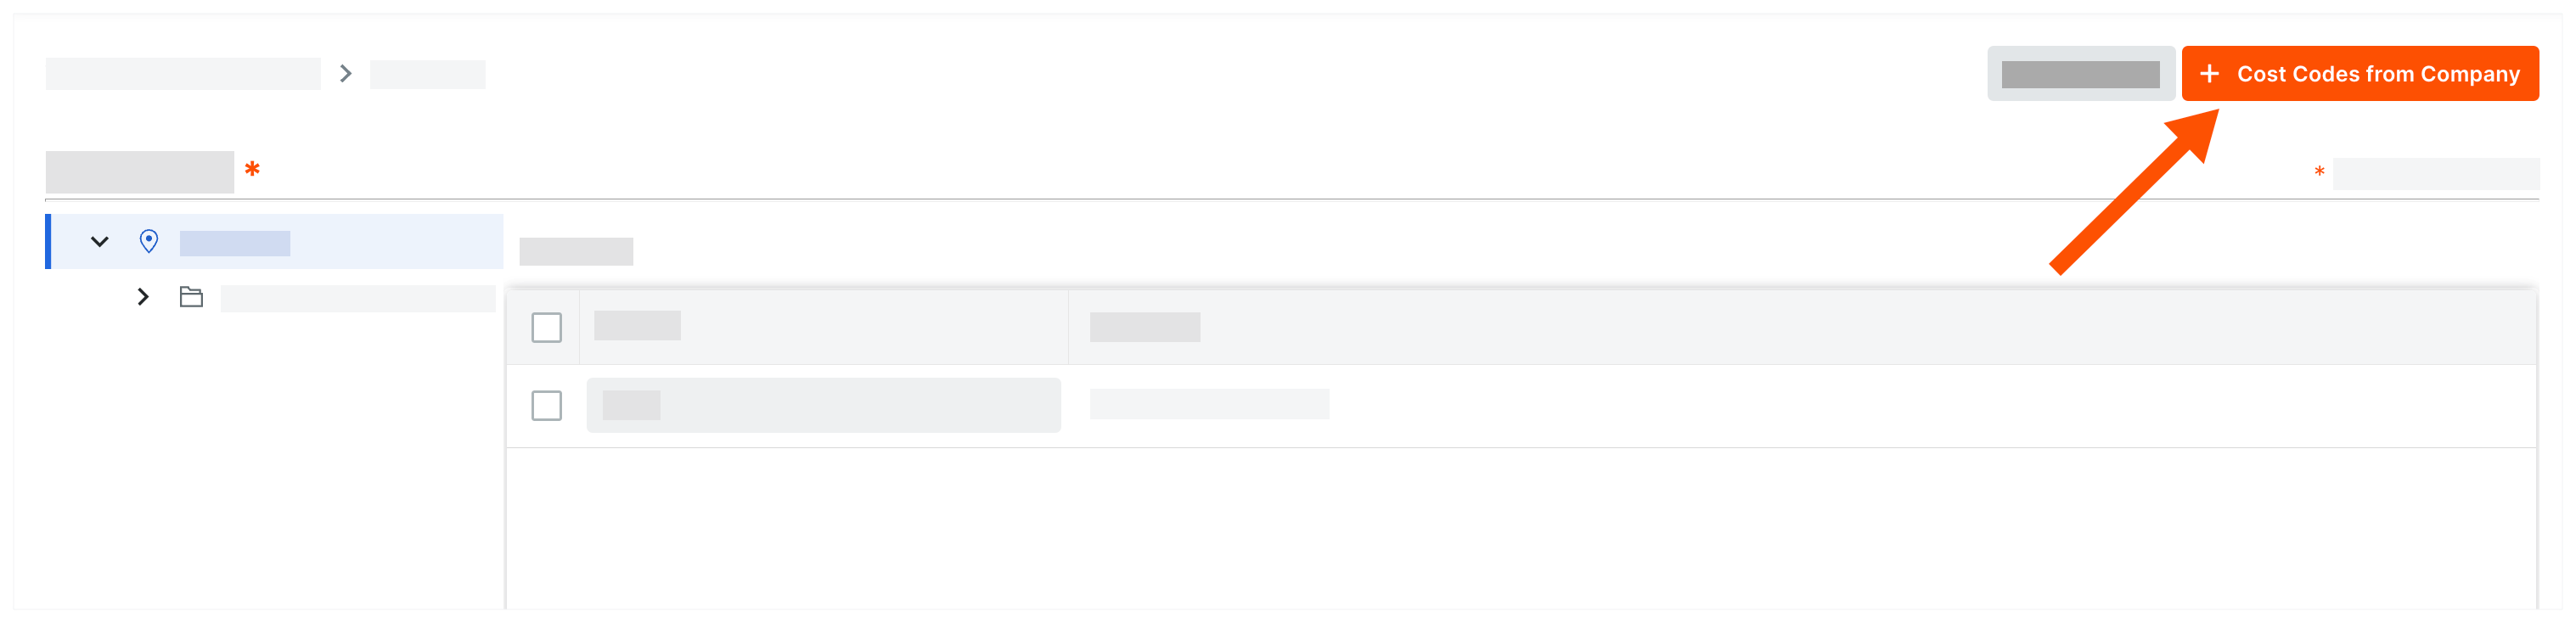
Navigate to the Project level Admin tool.
Under 'Project Settings', click the Work Breakdown Structure link.
In the 'Segments' list, click the Cost Codes link.
Click Cost Codes from Company.
In the 'Add Cost Codes to this Project' window, choose from these options:
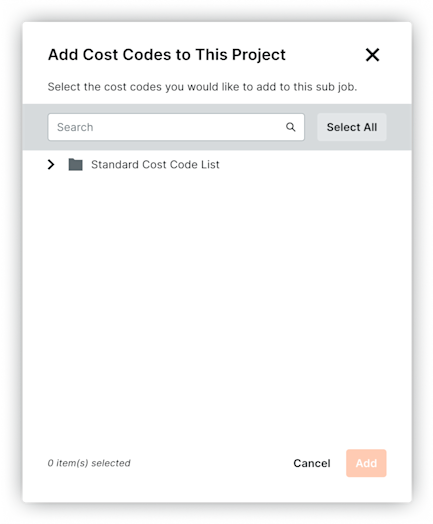
To copy all company cost codes to the project, click Select All.
To select specific cost codes, type a code in the Search Cost Codes box and highlight the codes to add.
To choose cost codes, expand the desired segment items and highlight the segment items to copy.
Click Add.
Update the Project Cost Code Cost Type Assignment
Navigate to the project's Admin tool. This reveals the 'General Project Information' page.
Under 'Project Settings', click Cost Code Cost Type Assignments. This reveals the 'Cost Code Cost Type Assignments' page.
For every cost code in your project's list, mark one or more checkboxes to assign the code to one or more cost types. Note: The cost type abbreviations in this list are populated with the abbreviations that have been imported from your Vue® system.
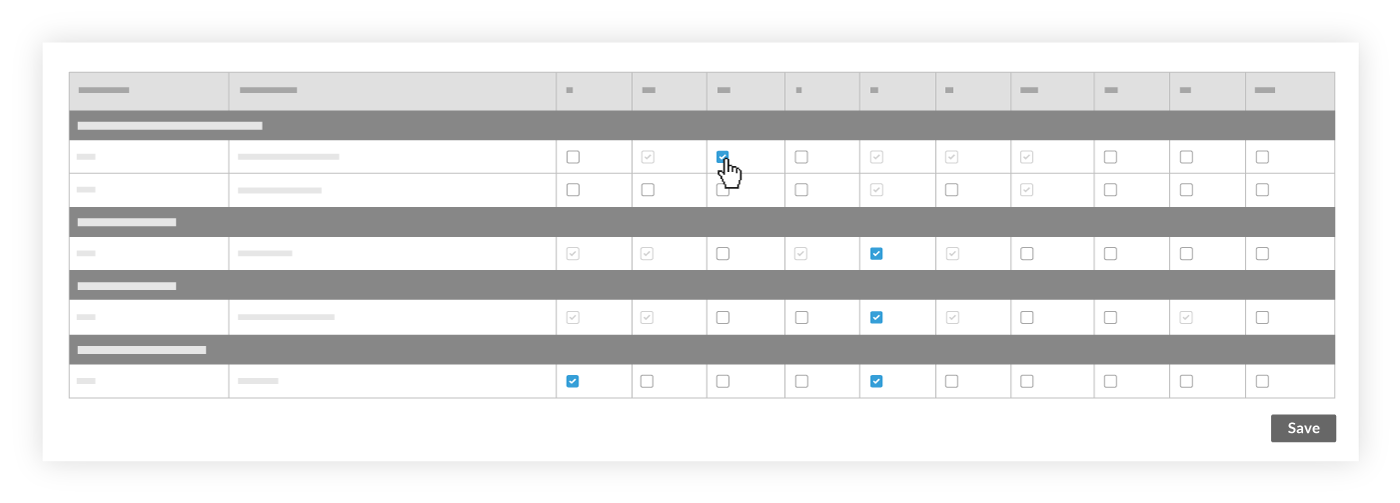
Click Save.
Continue with Resend the Project Cost Codes to ERP.

Resend the Project Cost Codes to ERP
Now that you've added the new cost code(s) and updated the cost type assignment(s) in the Admin tool, you'll need to send those changes to the ERP Integrations tool so they can be reviewed by an Dans Procore, un approbateur de comptabilité est une personne ayant l'autorité d'accepter et de rejeter les données Procore pour l'exportation vers un système ERP intégré. Les approbateurs de comptabilité peuvent dissocier plusieurs types d'éléments, tels que les engagements, les ordres de changement de l'engagement, les ordres de changement au contrat principal et les factures de sous-traitants, qui ont été synchronisés entre Procore et un système ERP intégré. Voir Quelles intégrations ERP sont prises en charge par Procore ?
Do one of the following:
Navigate to the project's Admin tool.
Under Project Settings, click General.
Under the 'Project Settings' menu in the right pane, click General. Note: A banner appears across the top of the page to notify you when a project has new cost codes or cost types that need to be synced with Integration by Procore.

Click Re-send to ERP. Note: If the Re-send to ERP button is grayed out and unavailable, hover your mouse cursor over the button to view a message with the reason.

Procore sends the new cost code and cost type data to the ERP Integrations tool. A banner appears across the top of the page to indicate that the project data in the Admin tool currently being reviewed by an accounting approver. While the project data is being reviewed, users cannot make changes in the Admin tool.


See Also
Loading related articles...