(Beta) Create a Custom Workflow Template for Correspondence Items
Background
In Procore, a workflow is a process that defines an approval path. A custom workflow is a process that defines a unique approval path that is specific to your organization and project(s). This tutorial summarizes the steps needed to create a custom workflow for use in the project level Correspondence tool.
Things to Consider
Required User Permissions:
To view, create, or edit a custom workflow at the company level:* 'Admin' level permissions on the Company level Workflows tool.
OR* 'Read Only' or 'Standard' level permissions on the Company level Workflows tool with the 'View Custom Workflows' and 'Create and Edit Workflow Templates' granular permission enabled on your permissions template.
Steps
Add a Custom Workflow
Navigate to the Company level Workflows tool.
Click the Create button.
In the 'Add a Workflow' dialog box, enter the following:
Name. Enter a name for your new workflow.
Tool. Select Correspondence/Custom Tools.
Correspondence/Custom Tools Type. Select the correspondence type the workflow will be associated with.
Click Create. Procore automatically opens the workflow builder and creates an 'Untitled' step for you.
Tip
How does the workflow builder automatically assign version numbers? To learn more see How are version numbers are updated in the Company level Workflows tool?
Update the Initial Standard Step in the Custom Workflow
The initial step in a custom workflow is always a standard step. For subsequent steps, you can choose between step types. To learn more, see What are the different types of steps in a custom workflow?
In the workflow builder, do one of the following to name your initial workflow step:
Click the pencil icon and then type over the 'Untitled' step title in the right pane. Then press the RETURN key.
Click into the text box and type over the 'Untitled' step in the right pane. Then press the RETURN key.
In the workflow step, update the 'Details' section as follows:
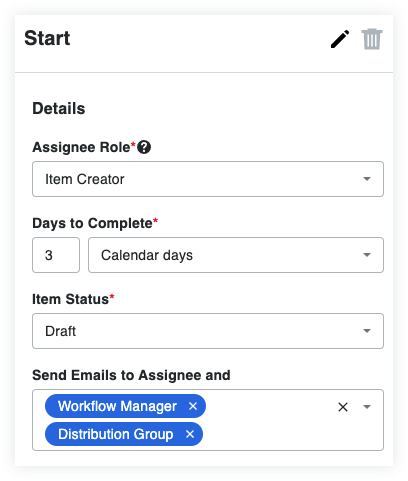
Example
For this example, we named the initial workflow step 'Start'. Next, you will complete the data entry in the 'Details' section pictured below.