View COMPASS when Leveling Bids
Navigate to the project's Bidding tool.
Click the name of the relevant bid package.
Click the bid form name.
Click the Bid Leveling tab.
Click the Leveled Bids view.
Take any of the following actions:
Edit Base Bid Line Items
Click a field you want to edit in the 'Base Bid' section.
The menu options adjust based on the 'Response Field Type' selected on the bid form.
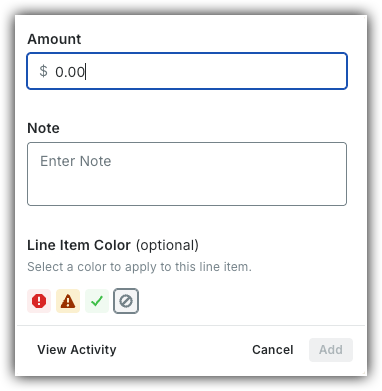
Amount:
Show/Hide Menu Options
Amount: Enter a new number here to manually adjust the bid-leveling total. This overrides the calculated total without changing the company's original submission.
Note: Type clarification details, internal reminders, or justification text in this box to explain your leveling adjustments.
Line Item Color: Choose a color to highlight or categorize this line item. Select the remove
 icon to clear it.
View Activity: Click this button to open a history log that displays all previous changes, timestamps, and user actions for that line item.
This button becomes active once history is available.
Include/Exclude:
Show/Hide Menu Options
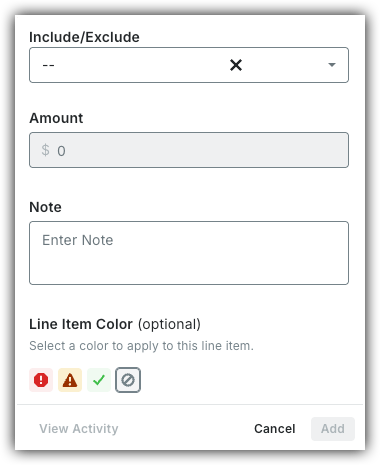
Include/Exclude: Decide whether a line item is active or inactive in the leveling process.
Include: Includes the line item's value in leveling calculations.
Exclude: Excludes the line item's value from leveling calculations but keeps the original submission data.
Amount: Enter a new number here to manually adjust the bid-leveling total. This overrides the calculated total without changing the company's original submission.
Note: Type clarification details, internal reminders, or justification text in this box to explain your leveling adjustments.
Line Item Color: Choose a color to highlight or categorize this line item. Select the remove
icon to clear it.View Activity: Click this button to open a history log that displays all previous changes, timestamps, and user actions for that line item.
This button becomes active once history is available.
Unit & Quantity:
Show/Hide Menu Options
Quantity: Enter a number to manually change the total units for a line item.
Unit Cost: Enter the specific cost per individual item, hour, or unit of measurement.
Unit Type: Select a predetermined unit of measurement from the drop-down menu to clarify how the quantity is measured.
Total: The system automatically calculates this value by multiplying the Quantity by the Unit Cost.
Note: Type clarification details, internal reminders, or justification text in this box to explain your leveling adjustments.
Line Item Color: Choose a color to highlight or categorize this line item. Select the remove
icon to clear it.View Activity: Click this button to open a history log that displays all previous changes, timestamps, and user actions for that line item.
This button becomes active once history is available.
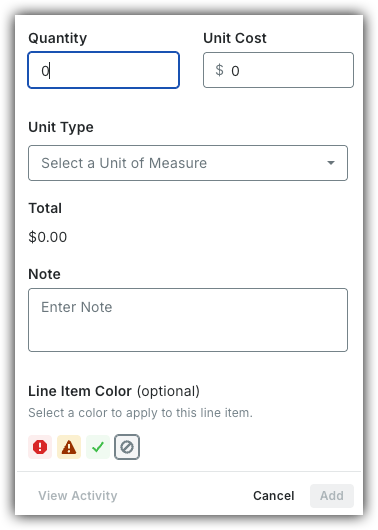
Click Add to save changes.


Add Private Line Items
Click the Add
 icon.
icon.See Create a Bid Form to learn how to add Sections and Line Items.
When finished, click Save.
Alternates
Move the toggles
 ON to show alternates.
OR
Move the toggles OFF to hide alternates.