Configure IdP-Initiated SSO for Microsoft Azure AD (Entra ID)

Azure Active Directory est désormais l’ID Microsoft Entra

Microsoft a renommé Azure Active Directory en Microsoft Entra ID. Les directives de cette documentation ne sont pas affectées par le changement de nom.

 Note

Si votre organisation utilise les produits Gestion financière du portefeuille et Planification des immobilisations dans Procore, vous devez contacter votre Procore point of contact ou l’équipe de support technique pour configurer votre authentification unique Azure AD.

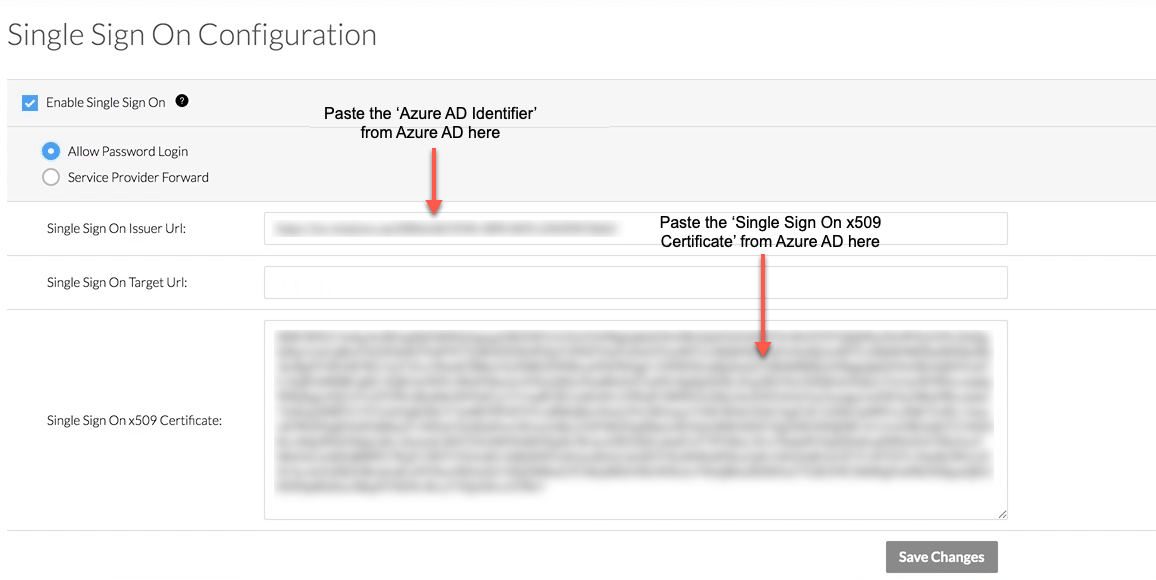
Vous devrez fournir les informations suivantes lors de la demande de configuration : URL émettrice de l’authentification unique, URL cible de l’authentification unique (facultatif pour l’authentification unique initiée par l’IdP) et certificat x509 d’authentification unique.

Arrière-plan

Si votre entreprise gère vos utilisateurs avec Azure AD, vous pouvez tirer parti de ses fonctionnalités d’authentification unique. Cela donne à vos utilisateurs finaux la possibilité d’authentifier leur identité pour l’application Procore à l’aide de leur compte Azure AD. Grâce à cette intégration SSO, vous pouvez :

  • Tirez parti d’Azure, AD pour l’accès SSO à Procore.

  • Simplifiez l’ensemble du processus de gestion des mots de passe de votre organisation.

  • Évitez la gestion problématique des mots de passe des utilisateurs.

Éléments à prendre en compte

  • Protocole d’authentification:

    • Vous pouvez intégrer l’application Procore à Azure AD à l’aide du Security Assertion Markup Language (SAML 2.0).

  • Exigences:

    • Azure AD

  • Autorisations requises:

    • Droits d’administrateur général sur Azure AD.

    • Autorisations de niveau « Admin » dans l’outil Admin au niveau entreprise de Procore.

Steps

Important!

For a successful SSO authentication, ensure that the user’s primary email address in Microsoft Azure/Entra matches their Procore login email exactly.

If you need to update a user's primary email or change their alias to match Procore, please refer to Microsoft’s documentation:

  • Step 1: Add Procore as a New Enterprise Application in Azure Active Directory

  • Step 2: Configure the Procore Enterprise Application's SSO Settings

  • Step 3: Assign Users and Groups to the Procore Enterprise Application

  • Step 4: Add the Azure AD Settings to Procore

Step 1: Add Procore as a New Enterprise Application in Azure Active Directory

  1. Connectez-vous au portail Azure AD en tant qu’administrateur général : http://portal.azure.com
    Demo Azure Add Procore

  2. Sous Favoris, cliquez sur Azure Active Directory.

  3. Sous Gérer, cliquez sur Applications d’entreprise.

  4. Cliquez sur +Nouvelle application.

  5. Sous Ajouter depuis la galerie, tapez ce qui suit dans la zone Entrer un nom : Procore

  6. Cliquez sur l’application correspondante nommée Procore.
    Un nouveau volet s’affiche.

  7. Dans la zone Nom , saisissez un nom pour votre application.
    Remarque: dans l’exemple ci-dessus, nous avons nommé notre application : Procore (Demo)

  8. Cliquez sur Ajouter.
    Un message s’affiche pour confirmer que l’application a été ajoutée. Vous devriez maintenant afficher la page de présentation de votre nouvelle application d’entreprise Procore.

Step 2: Configure the Procore Enterprise Application's SSO Settings

  1. Dans la page de vue d’ensemble de votre nouvelle application d’entreprise, sous Gérer, cliquez sur Single Sign-On.
    Demo Basic Saml Config

  2. Dans la page Mode d’authentification unique , cliquez sur SAML.
    Ceci ouvre la page Configurer l’authentification unique avec SAML - Preview.

  3. Sous Configuration SAML de base, cliquez sur Modifier.
    Ceci ouvre la fenêtre Configuration SAML de base.

  4. Sur la page Configuration SAML de base, procédez comme suit :

    • Identifiant (ID de l’entité)
      remplacez la valeur par : <https://app.procore.com> à : <https://login.procore.com>
      Remarque : Si vous utilisez Gestion financière du portefeuille et Planification des immobilisations, saisissez plutôt la valeur suivante :[https://www.honestbuildings.com/pfcp/app/#!/login](https://login.procore.com « https://login.procore.com »)

      Réutilisation de contenu SSO

       Optional - Unique Entity ID

      When configuring SSO for a single Procore instance, you should NOT check this box.

      If your company licenses more than one Procore instance, and you want to configure unique Procore enterprise applications within your IdP tenant for each instance, you can by enabling Unique Entity ID. If enabled, you are still limited to one (1) enterprise application per Procore company instance.

      Important: SSO for Procore targets users by email domain. An email domain can only be targeted once in all of Procore, so if you're considering setting up SSO with Unique Entity IDs across multiple Procore instances, remember that you can only target an email domain once, in a single instance.

      To generate a Unique Entity ID for an enterprise application, check the Enable Unique Entity ID box in the Procore Admin tool's SSO configuration page for the Procore instance you want to specify on an enterprise application. Checking this box will generate a unique Entity ID URL in the field below, which you will then copy and paste into the appropriate Entity ID field in your IdP's configuration page.

      Notes: You must save your configuration with the box checked to generate the Unique Entity ID. Enabling this feature does not impact user membership or access to a given instance. Access to a company in Procore is determined by a user's presence in the Directory tool, and their configured permissions within Procore. Auto-provisioning with SSO is not supported at this time.

      Sso Unique Entity Id

    • URL de connexion
      laissez ce champ vide. Vous n’avez PAS besoin d’entrer une valeur dans ce champ.

    • URL de réponse (URL du service consommateur d’assertion)
      saisissez les informations suivantes : <https://login.procore.com/saml/consume>

  5. Cliquez sur Enregistrer.
    Un message s’affiche pour confirmer que vos paramètres ont été enregistrés.

  6. Cliquez sur le « x » pour fermer la page de configuration SAML de base.

  7. Sous SAML Signing Certificate (Certificat de signature SAML), cliquez sur le lien Télécharger du fichier Certificate (Base64).
    Remarques:

    • Ceci télécharge un fichier nommé PublicCertificate.cer dans la zone de téléchargement spécifiée par votre navigateur.

    • Ouvrez le fichier dans un éditeur de texte et laissez-le ouvert sur votre ordinateur. Par la suite, vous copierez le code qui apparaît entre les balises ---BEGIN CERTIFICATE--- et ---END CERTIFICATE-- dans Procore.

      Certificate Base64

Step 3: Assign Users and Groups to the Procore Enterprise Application

Note: This step is only required if the 'User Assignment Required' setting is enabled in the Procore Enterprise Application under Manage > Properties. This setting is disabled by default in the Procore application.

  1. In the Overview page for your new enterprise application, under Manage, click Users and Groups.

  2. Click Add User.

  3. Select the users to whom you will grant access to Procore.
    The users names appear under the Selected Members list.

  4. Click Select at the bottom right of the page.
    Note: If you want to test the Azure Active Directory SSO integration before deploying it to your end users, add only your user account. Then, after completing the configuration steps and testing the integration, come back and assign the rest of your company's users to Procore.
    The system displays a message to confirm that you want to grant access to these users.

  5. Click Yes to confirm that you want to grant the selected users access.
    A Yes will appear for each user in the 'Access' column.

Step 4: Add the Azure AD Settings to Procore

  1. Log into the Procore application.
    Important: You must log into Procore with an account that has been granted 'Admin' level permissions to the Company level Admin tool.

  2. Navigate to the company's Admin tool.

  3. Under Company Settings, click Single Sign On Configuration.

  4. Enter the following information:

    • Allow Password Login
      Choose this option to enable IdP-initiated SSO.

    • Single Sign On Issuer URL (Required)
      Paste the 'Azure AD Identifier' that you obtained from Azure Active Directory in this field.

    • Single Sign On Target URL (Optional for IdP-Initiated SSO)
      Paste the 'SAML Single Sign-On Service URL' into this field.
      Note: Although this is an optional field for IdP-Initiated SSO, Procore recommends completing the data entry in this field now to make any future transition from IdP- to SP-initiated SSO smoother.

    • Single Sign On x509 Certificate (Required)
      Paste the information from the certificate that you downloaded from Azure Active Directory.
      Important! When copying the certificate information from , do NOT copy the "------------BEGIN CERTIFICATE------------" and "------------END CERTIFICATE------------" markers. You only want to copy the text that resides between these markers.

      Sso Azure Idp Settings

  5. Scroll to the bottom of the page, and click Save Changes.

  6. Next, reach out to your company's Procore point of contact or Contact Support to request that they enter the domain(s) you want to target for authentication via SSO. Procore must enter these domains on your behalf.

  7. Once the domain(s) have been entered by Procore, take the final steps to enable SSO for your company:

    1. Mark the Enable Single Sign On box in Procore's SSO configuration settings.

    2. Select Allow Password Login to enable an IdP-initiated flow.

    3. Click Save.

Authentication via the configured SSO method will become active immediately after saving the final completed configuration.

See Also

Loading related articles...