Ajouter des entrées d’appels téléphoniques (iOS)
Éléments à prendre en compte
Required User Permissions:
To create entries:
'Standard' or 'Admin' level permissions on the project's Daily Log tool.
To create pending entries as a collaborator:
'Read Only' or 'Standard' permissions to the Daily Log tool with the 'Collaborator Entry Only' granular permission enabled on your permissions template.
See Create Daily Log Entries as a Collaborator.
Informations complémentaires :
Les utilisateurs peuvent également enregistrer automatiquement les informations d’un appel dans le registre des appels téléphoniques à partir de l’outil Annuaire.
Voir Ajouter une entrée de registre des appels téléphoniques à partir de l’annuaire (iOS).Vous pouvez configurer les éléments créés à l’aide de l’icône de création
 rapide, voir Configurer les paramètres de création rapide.
Steps
Open the Procore app on an iOS mobile device and select a project.
Note: This loads the Tools screen for the project.Tap the date you want to create a new entry for.
Do one of the following:
Tap the quick create
icon and select Call Log. Tap the Daily Log tool and tap Phone Calls. Then tap the create
icon.
Tap into the following fields to enter information:
Pièces jointes: appuyez sur les options suivantes pour ajouter des pièces jointes photo ou un fichier à l’entrée :
Caméra: Utilisez l’appareil photo de votre appareil mobile pour prendre une photo qui est automatiquement ajoutée à l’entrée une fois que vous quittez l’appareil photo.
Prenez une photo sans annotation.
Appuyez sur l’obturateur pour prendre une photo.
Appuyez sur Terminé pour le joindre à l’entrée.
Prenez une photo avec annotation.
Appuyez sur l’icône d’annotation
 pour prendre la photo et l’annoter immédiatement.
Appuyez sur l’obturateur pour prendre une photo.
Si vous souhaitez enregistrer à la fois la photo d’origine et la photo annotée, cochez l’option Enregistrer comme nouvelle photo , puis appuyez sur Enregistrer.
OU
Si vous souhaitez uniquement enregistrer votre photo annotée, décochez l’option Enregistrer comme nouvelle photo , puis appuyez sur Remplacer.Appuyez sur Terminé pour le joindre à l’entrée.
Photos: Appuyez pour sélectionner des photos dans la galerie de votre appareil OU dans l’outil Photos de Procore dans le projet.
Ajouter depuis Procore
Appuyez sur Photos Procore.
Appuyez sur l’album.
Appuyez sur les photos.
Appuyez sur Terminé pour le joindre à l’entrée.
Ajouter à partir de l’appareil
Appuyez sur Charger des photos.
Appuyez sur les photos.
Appuyez sur Ajouter pour le joindre à l’entrée.
Fichiers: Sélectionnez un fichier enregistré sur votre appareil mobile pour l’ajouter à l’entrée.
Appuyez sur le fichier pour le joindre automatiquement à l’entrée.
Call From: Select or enter the name of the person who called.
If the person has a user profile in the project, tap the name of the person to add them to the entry.
OR
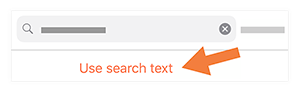
If the person is not listed:Type the name of the person.
Tap the Use search text... link to add the contact's name to the entry.
Call To: Select or enter the name of the person who received the call.
If the person has a user profile in the project, tap the name of the person to add them to the entry.
OR
If the person is not listed:Type the name of the person.
Tap the Use search text... link to add the contact's name to the entry.
Start Time: Select the hours and minutes from the menus.
End Time: Select the hours and minutes from the menus.
Commentaires: Veuillez saisir tout commentaire qui pourrait être nécessaire pour mieux décrire l'entrée.
Tap Create.
Pourboire
Cliquez sur Corriger les erreurs pour accéder au premier champ vide, si les champs obligatoires sont vides.
Cliquez sur Champ suivant ou Champ précédent pour afficher d’autres champs obligatoires vides.
Une fois les champs obligatoires saisis, vous pourrez créer ou enregistrer le formulaire.