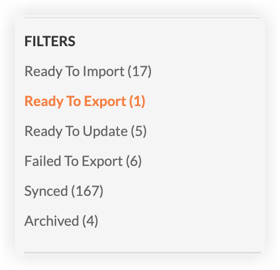
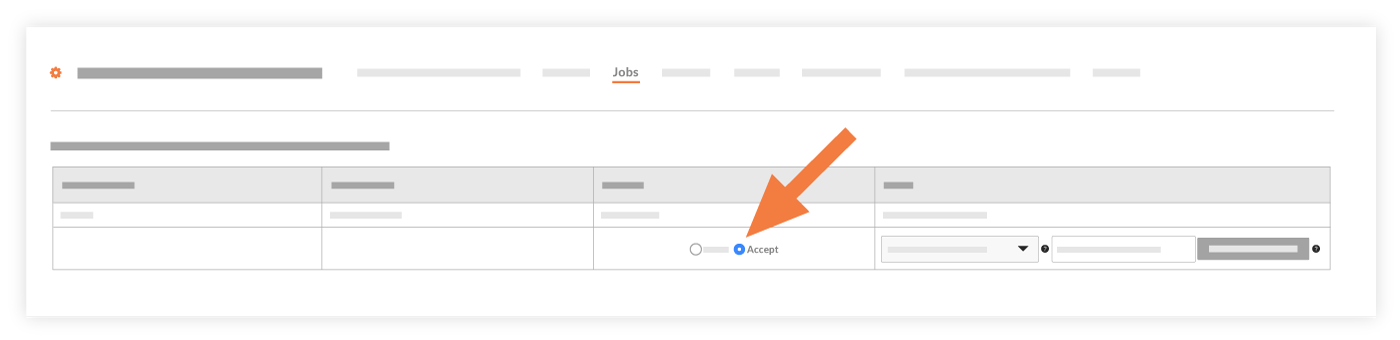
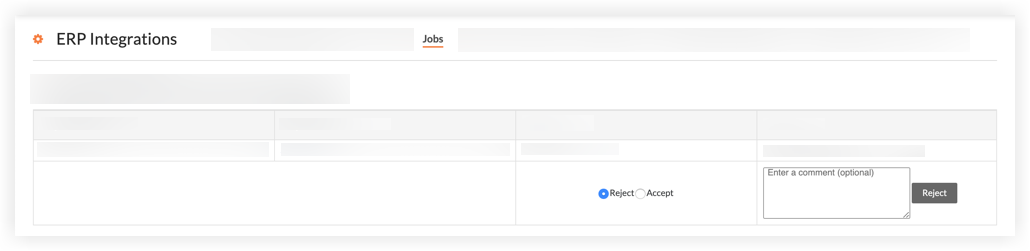
Accept or Reject a Project for Export to ERP

ERP DOCUMENTATION

Each Procore-built ERP integration offers its own unique feature set. Your integration might not support the action described on this page.

To learn about your integration and its supported features, see Which ERP integrations are supported by Procore?

Background

Once you send a project to the ERP Integrations tool, an Accounting Approver must accept it before it can export to your accounting system.

Things to Consider

  • Required User Permissions:

    • 'Standard' or 'Admin' on the company's ERP Integrations tool.
      AND

    • The person's account must be granted the 'Can Push to Accounting' privilege in the Company Directory. See Grant Accounting Approver Privileges.

Prerequisites

Steps

  1. Navigate to the company's ERP Integrations tool.
    Notes:

  2. Click the Jobs tab.

  3. Under Filters, click Ready to Export.

    Filter menu showing options: Ready To Import, Ready To Export highlighted in orange, Ready To Update, Failed To Export, Synced, Archived.

  4. Continue with one of the following:

    • ​Accept the Project

    • Reject the Project

Accept the Project

  1. Review the project information in the Jobs tab.
    Note: To view the project information in more detail, click the hyperlink in the 'Project Name' field. You must have access permission to the project in order to use this hyperlink.
    A UI screenshot of a Jobs tab with an orange arrow pointing to an Accept toggle button in a data table row.

  2. Click Accept.

  3. Complete any additional entries required for your integration. If additional entries are required, fields will appear when you click Accept.
    Note: Examples of additional fields that might be required by some ERP integrations include:

    • ERP Integration Job ID

    • Subaccount ID

    • Template ID

    • Company Reference ID

  4. Click Export to ERP.

    • If the export process is successful, the system moves the project(s) to the 'Synced Projects' list. To view this list, click Synced in the 'Filters' menu.

    • If the export fails, an error message will appear and the system will move the project to the Failed to Export list. To view this list, click Failed To Export in the 'Filters' menu.


Reject the Project

  1. Review the project information in the Jobs tab.
    Note: To view the project information in more detail, click the hyperlink in the 'Project Name' field. You must have access permission to the project in order to use this hyperlink.

  2. Choose Reject.

  3. Enter a brief comment to explain why the project was rejected in the Enter a Comment (Optional) field.

    ERP Integrations page showing a Jobs tab with a data table and a Reject/Accept option with a comment field.

  4. Click Reject.

    • The system sends an 'ERP Project Rejection Notification' email to the project creator and the project's Accounting Approvers.

    • Procore removes the project from the Ready to Export list and makes it editable in the project's Admin tool. The user can then correct the project and resend it to the ERP Integrations tool for approval.

See Also

Loading related articles...