Create or Link Coordination Issues on a Drawing
When you create a coordination issue on a drawing in Procore, the system automatically adds a snapshot and a link to that spot. This link gives your project team the context they need to learn about and fix the issue.
Things to Consider
Additional Information:
Creating a new issue or linking an existing one automatically adds the markup to the drawing for anyone with access to the Drawings tool.
When you create a coordination issue, it automatically includes a snapshot and a link to the original drawing. This helps users easily reference the drawing from the Coordination Issues tool.
When using the Pin method, the color of the pin indicates the status of the linked issue:
Blue: Open or Released
Yellow: Ready for Review
Red: Elevated to an RFI
Gray: Closed
Steps
Navigate to the project's Drawings tool.
Find the drawing to markup. If your team is using Drawing Areas, you may need to open the area first.
Click the Drawing No. link to open it.
In the top navigation, click the Markup icon. This opens the markup toolbar.
Continue as follows:
To pin coordination issues to a drawing:
Click Pins
 in the markup toolbar.
 Tip
Don't see the Pins icon? If Pins isn't visible, another pin type (like Photos or Punch) might be active. Click that icon to expand the menu and then click Issues. See Mark Up a Drawing.
Click the area on the drawing where you want the pin to appear. A shortcut menu appears.
To create a pin and link it to a new issue:
Choose Create New Coordination Issue to open the side panel.
Complete the issue's required fields. Learn about each field in Create Coordination Issues on a Drawing.
Click Create.
Procore pins the issue to the drawing and adds it to the Coordination Issues tool. Click Publish to share the pin with other users. Once published, the system automatically creates a snapshot.
To link a pin to an existing issue:
Choose Link to Existing Coordination Issue to open the side panel.
Search for and select the issue you want in the selection box. You can double-click this box to reveal a full list of your project's coordination issues.
(Optional) To share the pin with others, click Publish.
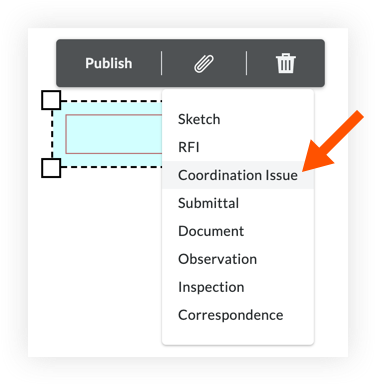
To add or link a coordination issue to another markup type:
Click an icon on the markup toolbar (such as Cloud, Arrow, or Text).
Click the area on the drawing where you want the markup to appear.
Click the Paperclip
 icon and choose Coordination Issue from the shortcut menu.
To create a new coordination issue for the selected markup type:
Choose Create New Coordination Issue to open the side panel.
Complete the issue's required fields. Learn about each field in Create Coordination Issues on a Drawing.
Click Create.
Procore pins the issue to the drawing and adds it to the Coordination Issues tool. Click Publish to share the pin with other users. Once published, the system automatically creates a snapshot.
To link an existing coordination issue to the selected markup type:
Choose Link to Existing Coordination Issue to open the side panel.
Search for and select the issue you want in the selection box. You can double-click this box to reveal a full list of your project's coordination issues.
Click the coordination issue to link it to the drawing markup.
(Optional) To share the pin with others, click Publish.