Compare and Manage Schedule Versions
Background
Our versioning engine helps your team easily track schedule changes and timeline shifts. By reviewing automatic snapshots and past versions, you can keep your project on track and quickly fix mistakes if needed.
Things to Consider
Required Permissions:
'Standard' or 'Admin' level permissions on the project's Scheduling tool.
Additional Information:
Rollback Behavior: Restoring a previous version applies historical activity parameters directly against your current project rules, active calendars, and Work Breakdown Structure (WBS) groupings. The restored layout may vary slightly from the historical original baseline.
Prerequisites
Baseline Visibility: Confirm that a master schedule file has been successfully imported to activate the historical tracking stack.
Steps
Navigate to the Scheduling tool.
Open either the project schedule view or the Lookahead tab.
Click the Versions icon on the left-side navigation to open the Version history panel.
Note: Procore automatically captures a baseline version during every file import, as well as every four hours when manual changes are detected during live editing.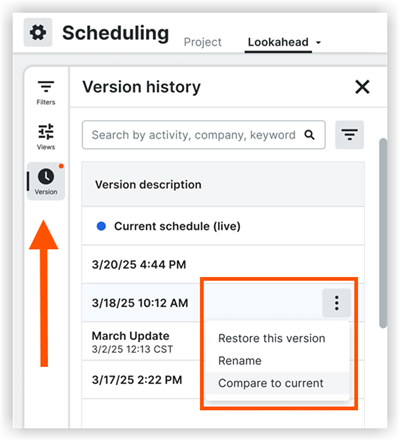
Locate the past timeline version you want to evaluate within the panel.
Click the vertical ellipsis menu next to that version string and select Compare to current.
Review the blue visual comparison bars on the Gantt chart and look over the dynamic tracking fields in the table grid.
Click Close Compare Mode or Exit Compare Mode in the top bar to return to the active live schedule view.
Evaluate historical data variations by completing the following sub-steps:
Capture a customized baseline snapshot by completing the following sub-steps:
Open the Version history panel.
Select the Current schedule (live) entry at the top of the stack.
Enter a distinct custom title into the text field.
Click away from the input box text area to save your designated baseline entry.
Recover a previous schedule state by completing the following sub-steps:
Open the Version history panel.
Click the vertical ellipsis
 icon menu next to your target historical version state.
Select Restore this version.
Review the warning modal detailing your rollback parameters.
Click Confirm to complete the recovery process and reload the schedule view.

See Also
Loading related articles...