Request a Multi-tiered Locations Import
IMPORTANT! In order to protect the integrity of your company’s data, Procore Employees are restricted from modifying the data that clients submit in all Procore Import Templates. This restriction applies to all data modifications, including correcting typographical errors. If Procore determines that errors are present in any Procore Import Template that you submit to Procore, it will be returned to you for correction. Please note that the import process may take up to 72 hours to process.
Background
At the beginning of a project, you can perform your own or request your locations hierarchy be bulk-added to the Admin tool of your project. This will add as many multi-tiered locations to your project as you need without having to manually add each location and sub-location in Procore.
Things to Consider
Required User Permissions:
'Admin' level permissions on the Project level Admin tool, OR
'Admin' level permissions on the project's Locations tool.
Additional Information:
There is no way to undo this import. Please carefully review your data before submitting your import request to Procore.
Imports can only be used to add locations. Your import will not edit or delete existing locations in your project.
Note: Once the locations are imported, users can edit or modify locations in the Locations tool (Web). See Edit Locations.Any duplicate locations on your import will be ignored. Note that duplicate codes within your import file are invalid and will cause the import to be flagged and returned.
You can expedite the import process by performing your own location import using the Procore Imports app. See Import Locations into your Project Level Locations Tool (Procore Imports) for more information.
Steps
You can download Procore Imports or Procore Imports Template directly from the Locations tool (Web). The updated template includes columns for Tier 1 through Tier 6, Code, GIS Coordinates, Type, and Description. See Import Locations Using Procore Imports or Template
Download the import template: import-locations.xlsx.
Note: You can also download the template from the Project level Admin tool's Locations page under Project Settings in the Procore web application.Complete the import template.
Tier 1 - Tier 6: You must work from largest to smallest when creating your locations. Start with the first tier location (for example, "Building 1") and then add each sub-location until each tier is written out (for example, "Floor 1, Unit 101, Master Bedroom").
Code: (Optional) Enter an alphanumeric code for each location (for example, A, L1, 101, 101-BED). Codes must be unique across the project and cannot contain duplicate values. Location codes integrate with Document Management naming standards.
GIS Coordinates: (Optional) Enter geographic coordinates for mapping locations. Coordinates must be formatted in GeoJSON and accept standard geometry types: Point, LineString (paths), or Polygon. Polygons must form closed coordinate loops. See GeoJSON Formatting Guide for Locations (Beta) for syntax details and examples.
Type: (Optional) Specify a single-select category for the location. You can enter one of Procore's predefined types (Building, Level, Unit, Room) or enter a custom value, which will automatically create that type in the project's Locations tool.
Description: (Optional) Enter a plain-text description or note for the location.
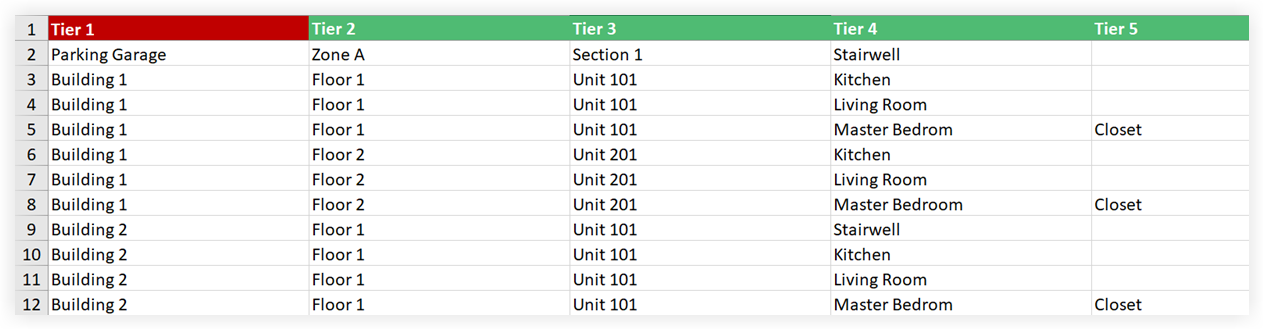
See the below considerations when filling out the template.
Make sure you begin with the first tier, then add the first tier with the second tier, and then add the first tier with the second tier and the third tier, etc.
Make sure there are no blank rows.
Make sure no additional empty columns were added. More tiers columns can be added with headers, but no columns can be completely blank to the right or left.
Check for special/hidden characters. Many users will copy/paste their information from Microsoft Word into Excel. The interpretation of the symbols listed below are different between the two applications and will cause import errors. It's important to correct any incorrect symbols before importing. Hidden characters can be found and corrected (in most cases) by copying all data, pasting the text into Notepad, and then copying from Notepad and pasting it into the .xlsx. Be sure to note the correct placement of the information.
, (comma)
- (dash)
/ (dash)
1/2 (forward slash)
" (double quote)
' (single quote)
` (grave accent)
Important! Do not include ">" in any one tier's location title (for example, "Floor>1" or "Floor 1>bathroom"). These tiers will be translated as tier separator and will cause the import to fail.
See the below considerations when filling out the template:
Make sure you begin with the first tier, then add the first tier with the second tier, and then add each subsequent sub-tier (up to Tier 6) row by row.
Refer to the Sample Data tab in the template for examples of how to structure tiered paths, Codes, GIS coordinates, Types, and Descriptions. Enter your actual project data into the Add Data Here tab.
Make sure there are no blank rows.
Do not rename or remove the default column headers (Tier 1 through Tier 6, Code, GIS Coordinates, Type, Description).
Check for special/hidden characters. If copying/pasting from word processors or external software, paste text into a plain-text editor like Notepad first to strip hidden formatting before pasting into the spreadsheet.
Important! Do not include the > symbol within any tier's location title (for example, "Floor>1" or "Floor 1>bathroom"). Procore interprets > as a tier separator, which will cause the import validation to fail.
Next Steps
See Also
Loading related articles...