Exporter des fichiers Revit® vers l’outil Documents
Vous pouvez exporter des fichiers d’Autodesk® Revit® vers Procore à l’aide du plug-in Procore BIM. Cela permet aux utilisateurs de charger les versions actuelles du modèle directement dans l’outil Documents sans quitter l’environnement Revit®. Vous pouvez également utiliser ce processus pour exporter des fichiers à partir d’AutoCAD®.
Éléments à prendre en compte
Autorisations utilisateur requises :
Autorisations de niveau « Standard » ou « Admin » dans l’outil Documents du projet.
Informations complémentaires :
Exportations AutoCAD® .dwg fichiers nativement et n’exporte pas le .rvt Fichiers.
Les exportations de fichiers se comportent différemment selon le type de fichier sélectionné :
.dwg natif ou .rvt : Exporte l’intégralité du fichier.
.ifc ou .nwc : Respecte la vue 3D active
Steps
Open Revit® on your Windows® computer.
In Revit®, navigate to a 3D view and click the Procore tab to access the Procore BIM Plugin.
Click the Export button to open the Export As window.
At the bottom of the window, do the following:
Enter a File Name.
Select the desired file format from the File Type menu:
Revit Project File (RVT)
IFC File (IFC)
Navisworks Cache File (NWC)
If you choose the IFC or NWC file type, you have additional settings options.Afficher/Masquer
When exporting an IFC or NWC file, you can specify these additional settings:
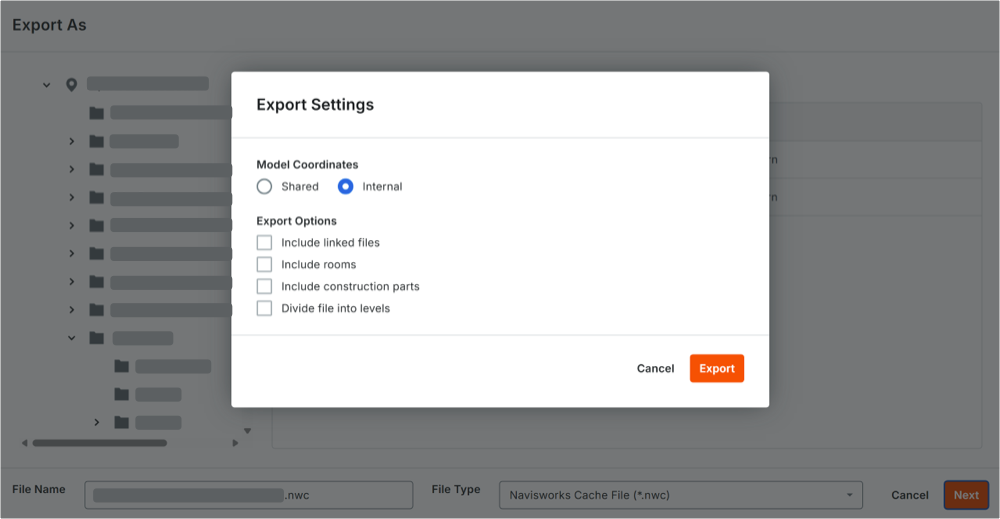
Under Model Coordination, select how your model's positioning data should be handled:
Shared: Select this option if your Revit® project uses a shared coordinate system across multiple files.
Internal: Select this option to use the model's native origin point.
Under Export Options, check the boxes to specify any additional data to include:
Include linked files: Includes geometry from linked models.
Include rooms: Includes spatial and room data.
Include construction parts: Preserves divided building components.
Divide file into levels: Separates and organizes the model structure by building story heights.
Procore remembers your preferences and automatically applies these settings to your next export. You can change them as needed.
Click Export.