Set Up a Budget View for Custom Reporting

Background

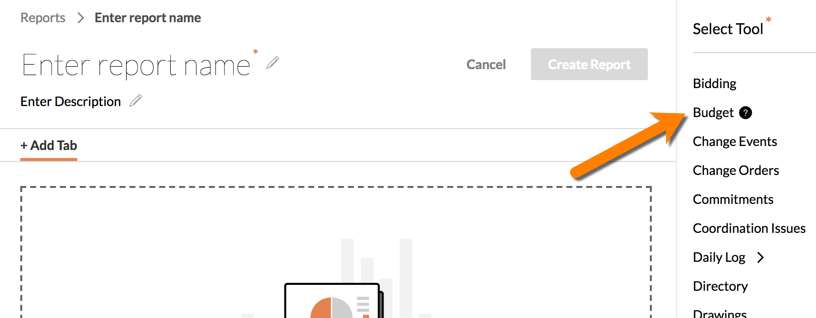
Using the budget view feature in Procore's Company Admin tool, you can create a budget view that can then be used as a source for creating custom budget reports with the Reports tool. Using this approach will help you generate meaningful custom reports that you can adapt to fit your company's specific business needs.

Things to Consider

  • Required User Permission:

    • To create custom budget report and access a project's budget data, you need both:

      • 'Admin' on the Company Admin tool

      • 'Standard' or higher on the project's Budget tool.

    • To run a custom budget report and a view a project's budget data:

      • 'Admin' on the Company Admin tool.

  • Additional Information:

    • As detailed below, you must first set up a new budget view to use with custom reporting. For easy recognition, it is recommended that you add 'Custom Reporting View' to your budget view's title.

    • If you rename your custom view, look for the tool tip next to the View name in the Budget Views list. The tool tip will display this message when you hover your mouse cursor over it: "Budget Custom Reporting will use columns from this view. The columns can be configured as needed."

    • Your 'Custom Reporting View' can then be used to create your custom budget reports. It is recommended that you use your custom view, instead of the Financial Line Item Summary report.

  • Limitations:

    • You can only create one (1) custom reporting view per Procore company account.

    • For non-ERP integrated projects, a Direct Costs source column pulls data from the Direct Costs tool when that tool has been turned on, and it pulls data from in-line editable Direct Costs when the Direct Costs tool is off. Please note that the report will only pull in Direct Costs values for a project based on the current Direct Costs configuration for that particular project.

    • If the Custom Reporting View is using the “Percent” format for a column, those values will not be summed up in the custom report.

  • For companies using the ERP Integrations tool:

    • If your company has enabled the ERP Integrations tool, follow the steps in Set Up New Budget View for Custom Reporting with ERP Integrations below.

Conditions préalables

Steps

  • Set Up a New Budget View for Use with Custom Reporting

  • Set Up a New Budget View for Custom Reporting with ERP Integrations

Set Up a New Budget View for Use with Custom Reporting

  1. Navigate to the Company Admin tool.

  2. Under Tool Settings, click Budget.

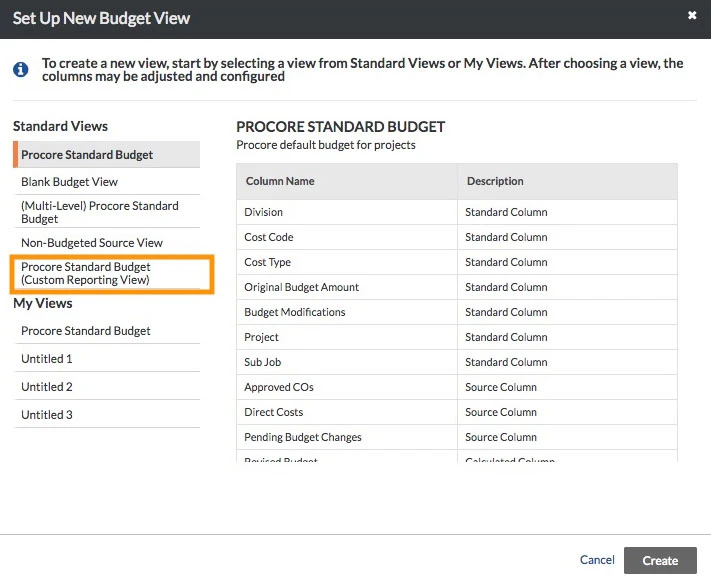
  3. Click Set Up New Budget View.

  4. Under Standard Views, select the Procore Standard Budget (Custom Reporting View).

     Notes
    • Par défaut, les colonnes disponibles dans le « Budget standard Procore (vue des rapports personnalisés) » correspondent exactement à celles de la « Vue standard Procore » par défaut.

    • Les modifications que vous apportez dans une vue ne sont PAS automatiquement reflétées dans l’autre. Par exemple, si vous modifiez le « Budget standard Procore (vue des rapports personnalisés) », ces modifications ne sont PAS automatiquement reflétées dans la vue « Budget standard Procore ».

    set-up-budget-view.jpeg

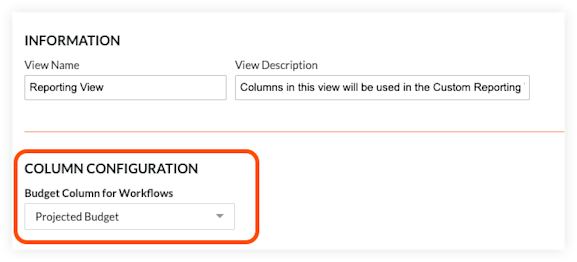
  5. Edit the 'Procore Standard Budget (Custom Reporting View)' as needed.

     Notes
    • Pour en savoir plus sur les options dont vous disposez lors de la modification d’une vue du budget, voir Configurer une nouvelle vue du budget.

    • Toutes les colonnes ajoutées à une vue du budget sont disponibles lors de la création d’un rapport personnalisé. Cela inclut les colonnes qui sont à la fois masquées, visibles et masquées. Il est courant que les colonnes soient masquées lorsque la valeur associée à la colonne est requise pour effectuer une opération définie dans une colonne calculée visible.

  6. Click Done.
    This makes any changes you made to the 'Procore Standard Budget (Custom Reporting View)' immediately available for use in the Reports tool.

    Exemple

    L’illustration ci-dessous vous montre où vous pouvez trouver les colonnes de données pour votre « Budget standard Procore (vue des rapports personnalisés) » dans l’outil Rapports.

    custom-budget-report.png

Beta Set a Budget Column for Workflows

The selected column will be used to by custom workflows to determine whether a conditional step is true or false when compared to the budget. See What are the different types of steps in a custom workflow?

  1. Navigate to the Custom Reporting Budget View.

  2. Under Column Configuration, choose a Budget Column for Workflows.
    Note: A column must be added to the Custom Reporting Budget View before it will appear as an option.
    budget-view-workflow-column.png

Set Up New Budget View for Custom Reporting with ERP Integrations

Use the steps below to set up a new budget view for custom reporting when your company's Procore account is using the ERP Intergrations tool. Keep in mind that the steps that you use below depends upon whether all or some of projects in your company's portfolio are using the ERP Integrations tool to sync Procore's data with an integrated ERP system.

  • For accounts where all projects use ERP integration, see Custom Reporting View with All ERP Projects.

  • For accounts where some projects use ERP integration and some do not, see Custom Reporting View with Mixed ERP Projects.

Custom Reporting View with All ERP Projects

Use these steps when all of the contruction project's in your company's Procore account sync with an integrated ERP system. If you have a mix of synced and non-synced projects, see Custom Reporting View with Mixed ERP Projects instead.

  1. Complete the steps in Set Up a Custom Reporting Budget View.

     Note

    Avant de pouvoir créer les colonnes calculées présentées dans ce tutoriel, vous devez d’abord ajouter les colonnes source ERP. Pour plus d’informations, voir Créer une colonne source.

  2. Configure the following columns:

    • ERP Job to Date Costs

    • ERP Commitment Invoiced

    • ERP Direct Costs

    • Projected Costs

    • Optional. Delete the Non-ERP Columns

    • Optional. Rearrange the Budget View Columns

ERP Job to Date Costs

This adds a calculated column named 'ERP Job to Date Costs'.

Procédure à partir de la fenêtre Configurer les colonnes...

Paramètres de la colonne

  1. Click Create Calculated Column.

  2. Under New Calculated Column, do the following:

    • Column Name. Enter the name: ERP Job to Date Costs

    • Column Format. Currency

    • Column Calculation. See the Settings column.

  3. Place a checkmark in the ERP Job to Date Costs box.

  4. Click Create.

Détail des coûts directs ERP (+) Ajouter Factures de sous-traitants

ERP Commitment Invoiced

This adds a source column named 'ERP Commitment Invoiced'.

Procédure à partir de la fenêtre Configurer les colonnes...

Paramètres

  1. Click Create Source Column.

  2. Under New Source Column, do the following:

    • Column Name. Enter the name: ERP Commitment Invoiced

    • Column Source. ERP Job Costs

  3. Place a checkmark in the ERP Commitment Invoiced box.

  4. Click Create.

N/A

ERP Direct Costs

This adds a calculated column named 'ERP Direct Costs'.

Procédure à partir de la fenêtre Configurer les colonnes...

Paramètres

  1. Click Create Calculated Column.

  2. Under New Calculated Column, do the following:

    • Column Name. Enter the name: ERP Direct Costs

    • Column Format. Currency

    • Column Calculation. See the Settings column.

  3. Click Create.

Coûts du projet ERP à ce jour (-) Moins Engagement ERP facturé

Projected Costs

This adds a calculated column named 'Projected Costs'.

Procédure à partir de la fenêtre Configurer les colonnes...

Paramètres

  1. Click Create Calculated Column.

  2. Under New Calculated Column, do the following:

    • Column Name. Enter the name: Projected Costs

    • Column Format. Currency

    • Column Calculation. See the Settings column.

  3. Click Create.

Coûts engagés (+) Ajouter Détail des coûts directs ERP (+) Ajouter Changements de coûts en attente

Optional. Delete the Non-ERP Columns

Next, delete the non-ERP columns:

  • From the sidebar, select (non-ERP) Job to Date Costs and click Delete.

  • From the sidebar, select (non-ERP) Direct Costs and click Delete
    Note: If you cannot delete this column initially, first close the budget view by clicking Done. Once you reopen the Custom Reporting View and go into “Configure Columns”, this column can be deleted.

  • From the sidebar, select (non-ERP) Subcontractor Invoices and click Delete.

Optional. Rearrange the Budget View Columns

You can then rearrange the columns as you want using a drag-and-drop operation on the budget view's columns. When finished configuring your budget view, be sure to click Done. You can now use your new 'ERP Budget View (Custom Reporting View)' when you create a custom report using the Budget tool as a data source. See Create a Custom Company Report.

Custom Reporting View with Mixed ERP Projects

If, during the life of a project, direct costs were created in Procore, and then the project was decided to be integrated and the Direct Costs tool disabled, there may still appear values from both sources for the given project.

  1. Complete the steps in Set Up a Custom Reporting Budget View.

  2. Configure the following columns:

    • ERP Job to Date Costs

    • ERP Commitment Invoiced

    • ERP Direct Costs

    • Projected Costs

    • Optional. Delete the Non-ERP Columns

    • Optional. Rearrange the Budget View Columns

ERP Job to Date Costs

This adds a calculated column named 'ERP Job to Date Costs'.

Procédure à partir de la fenêtre Configurer les colonnes...

Paramètres de la colonne

  1. Click Create Calculated Column.

  2. Under New Calculated Column, do the following:

    • Column Name. Enter the name: ERP Job to Date Costs

    • Column Format. Currency

    • Column Calculation. See the Settings column.

  3. Place a checkmark in the ERP Job to Date Costs box.

  4. Click Create.

Détail des coûts directs ERP (+) Ajouter Factures de sous-traitants

ERP Commitment Invoiced

This adds a source column named 'ERP Commitment Invoiced'. If you want to match the naming of the non-ERP version of this column, name it ERP Subcontractor Invoice.

Procédure à partir de la fenêtre Configurer les colonnes...

Paramètres

  1. Click Create Source Column.

  2. Under New Source Column, do the following:

    • Column Name. Enter the name: ERP Commitment Invoiced

    • Column Source. ERP Job Costs

  3. Place a checkmark in the ERP Commitment Invoiced box.

  4. Click Create.

N/A

ERP Direct Costs

This adds a calculated column named 'ERP Direct Costs'.

Procédure à partir de la fenêtre Configurer les colonnes...

Paramètres

  1. Click Create Calculated Column.

  2. Under New Calculated Column, do the following:

    • Column Name. Enter the name: ERP Direct Costs

    • Column Format. Currency

    • Column Calculation. See the Settings column.

  3. Click Create.

Coûts du projet ERP à ce jour (-) Moins Engagement ERP facturé

Projected Costs

This adds a calculated column named 'Projected Costs'.

Procédure à partir de la fenêtre Configurer les colonnes...

Paramètres

  1. Click Create Calculated Column.

  2. Under New Calculated Column, do the following:

    • Column Name. Enter the name: Projected Costs

    • Column Format. Currency

    • Column Calculation. See the Settings column.

  3. Click Create.

Coûts engagés (+) Ajouter Coûts directs ERP (+) Ajouter Changements de coûts en attente

Optional. Rename the Non-ERP Columns

If you want to further distinguish the non-ERP columns from the similar ERP versions, rename the non-ERP columns:

  • From the sidebar, select (non-ERP) Job to Date Costs, click Edit, re-name to Non-ERP Job to Date Costs, click Update.

  • From the sidebar, select (non-ERP) Direct Costs, click Edit, re-name to Non-ERP Direct Costs, click Update.

  • From the sidebar, select (non-ERP) Subcontractor Invoices, click Edit, re-name to Non-ERP Subcontractor Invoices, click Update.

Optional. Rearrange the Budget View Columns

You can then rearrange the columns as you want using a drag-and-drop operation on the budget view's columns. When finished configuring your budget view, be sure to click Done. You can now use your new 'ERP Budget View (Custom Reporting View)' when you create a custom report using the Budget tool as a data source. See Create a Custom Company Report.

See Also

Loading related articles...