Annoter un plan
Éléments à prendre en compte
Autorisations utilisateur requises :
Pour ajouter des annotations personnelles à un plan, Autorisations « Lecture seule » ou supérieures dans l’outil Plans.
Pour publier des annotations, Autorisations « Standard » ou « Admin » dans l’outil Plans.
Informations complémentaires :
Toutes les annotations que vous ajoutez seront automatiquement ajoutées à votre couche personnelle. Pour que les annotations soient visibles par tout utilisateur autorisé à afficher les plans du projet, vous devez publier vos annotations personnelles sur la couche publiée. Les utilisateurs disposant d’autorisations « Standard » ou « Admin » peuvent publier leurs annotations personnelles.
Si vous avez précédemment ajouté des annotations à un plan existant dans Procore, puis chargé une révision plus récente de ce même plan, toutes les annotations (à l’exception des croquis) de la révision précédente seront conservées et héritées par le nouveau plan. Vous devriez voir automatiquement toutes les mêmes annotations personnelles et publiées en haut de la nouvelle révision.
Vidéo
Escalier
Accédez à l’outil Plans .
Cliquez sur Ouvrir à côté du plan que vous allez annoter.
Cliquez sur l’icône Annotation en haut à droite de la page.
Pointe! Assurez-vous de montrer votre couche personnelle ! Cliquez sur Filter (Filtrer ) et assurez-vous que la couche Personnel est visible.
Annotez le plan à l’aide des outils de la barre d’outils (détaillés ci-dessous) et à l’aide des fonctions de copie, de duplication et de liaison, accessibles après avoir cliqué sur l’annotation.
Lorsque vous avez finalisé une annotation et que vous êtes prêt à la rendre visible pour votre équipe, publiez les annotations en cliquant sur l’annotation et en choisissant Publier dans le menu qui apparaît.
Note: Après la publication, certaines annotations ne sont pas modifiables. Si vous souhaitez rétablir une annotation publiée, vous devez supprimer l’annotation et l’ajouter à nouveau.
Toolbar
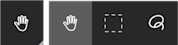
Sélectionner / Multi / Lasso : Effectuez un panoramique autour du plan en cliquant et en faisant glisser sur une image avec l’outil Sélectionner . Sélectionnez plusieurs annotations à publier, à modifier, à redimensionner ou à supprimer à l’aide des outils Sélection multiple ou Lasso .
Stylo / Surligner : Dessinez des formes à main levée sur le plan à l’aide d’un stylo ou surligner. Vous pouvez modifier la couleur et l’épaisseur de la ligne à l’aide des options Couleur et Largeur de ligne de la barre d’outils.
Conseil! Maintenez la touche MAJ de votre clavier enfoncée si vous souhaitez dessiner une ligne droite.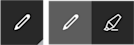
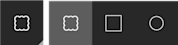
Nuage / Boîte / Ellipse : Dessinez une forme pour mettre en évidence une zone ou lier un élément. Voir Lier des éléments liés sur un plan. Vous pouvez modifier la couleur, l’épaisseur et l’opacité d’une forme à partir des options Couleur, Largeur de ligne et Remplissage de la barre d’outils.
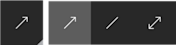
Flèche / Ligne / Flèche double : Tracez une ligne ou une flèche pointant vers une zone ou reliant un élément. Vous pouvez modifier la couleur et l’épaisseur de la ligne ou de la flèche à partir des options Couleur et Largeur de ligne de la barre d’outils. Voir Lier des éléments liés sur un plan.
SMS: Ajouter une zone de texte pour ajouter des informations ou des commentaires. Cliquez à l’intérieur du cadre pour commencer votre saisie. Vous pouvez ajuster la taille de la police en sélectionnant un numéro de taille dans le menu déroulant ou modifier la couleur à partir de l’option Couleur de la barre d’outils. Cliquez sur les coins de la zone de texte et faites-les glisser si vous souhaitez ajuster la taille de la zone.

Distance / Superficie / À main levée / Calibrer : Après avoir ajouté un calibrage à votre plan à l’aide de l’outil Calibrage , utilisez les autres outils de mesure pour mesurer une distance, une surface ou une forme courbe ou poly. Voir Ajouter des mesures à un plan.
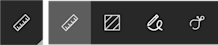
Dessin: Ajoutez un carré ou un cercle pour ajouter un lien vers une autre feuille de plan.
Conseil! Pour tracer un cercle sur la zone souhaitée, partez de l’angle supérieur gauche où se rejoindront les bords des côtés gauche et supérieur du cercle. Maintenez la touche MAJ enfoncée (pour créer un cercle symétrique), cliquez du bouton gauche et faites glisser la souris vers l’angle inférieur droit du cercle, puis relâchez le clic gauche.
Broches: Cliquez pour sélectionner différentes annotations d’épingle afin de lier des éléments à des zones spécifiques du plan.
Note: Vous ne verrez que les options d’annotation d’épingle pour les outils actuellement activés dans le projet. Par exemple, si votre organisation n’utilise pas l’outil Problèmes de coordination, vous ne verrez pas l’épingle « Problème » dans la barre d’outils d’annotation.
Cliquez sur l’épingle Photos pour lier une photo à une zone du plan. Voir Ajouter des photos à un plan.

Cliquez sur l’épingle Réserve pour lier un élément de réserve à une zone du plan. Voir Ajouter des éléments de la liste de réserves à un plan.

Cliquez sur l’épingle Problème pour lier un problème de coordination à une zone du plan. Voir Ajouter des problèmes de coordination à un plan.

Cliquez sur l’épingle Obs pour lier une observation à une zone du plan. Voir Ajouter des observations à un plan.

Couleur: Cet outil supplémentaire s’affiche lorsque vous sélectionnez un outil d’annotation de plan qui vous permet de modifier la couleur. Sélectionnez la couleur à utiliser sur une annotation dans ce menu.

Remplir: Cet outil supplémentaire s’affiche lorsque vous sélectionnez un outil d’annotation de plan qui vous permet de modifier le remplissage. Sélectionnez la transparence de remplissage souhaitée d’une annotation.
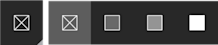
Largeur de ligne : Cet outil supplémentaire s’affiche lorsque vous sélectionnez un outil d’annotation de plan qui vous permet de modifier la largeur. Spécifiez la largeur d’une seule ligne ou bordure d’une forme.

Prochaines étapes
See Also
Loading related articles...