Ce site Web n'est pas encore complètement disponible dans votre langue
La seule page du site de support V2 disponible dans vos paramètres régionaux est celle de la bibliothèque vidéo. Le lancement complet du site Web arrivera prochainement.
Vous recherchez d'autres contenus ? Retournez sur le site de support V1.
(Beta) Create a Custom Workflow Template for Commitments
In Beta
This page details functionality that is not available in Procore's production environment. Access to the features documented here is limited to specific Procore customers who have signed the required agreement to participate in Procore's Company level Workflows Tool Beta Program. The content on this page is for informational purposes only and all information and content on this page is subject to change without any prior notice. To learn more, see About the Workflows Beta Program.
Contexte
Dans Procore, un flux de travail est un processus qui définit un chemin d’approbation. Un personnalisé flux de travail est un processus qui définit un chemin d'approbation unique, spécifique à votre organisation et à votre/vos projet(s). Vous pouvez ajouter un personnalisé flux de travail à l’outil Niveau entreprise Flux de travail pour l’utiliser sur le Niveau projet Outil Engagements.
Éléments à prendre en compte
Autorisations utilisateur requises :
Pour afficher, créer ou modifier un personnalisé flux de travail au niveau Entrepriseautorisations de niveau :* 'Admin' dans l’outil Niveau entreprise Flux de travail. OU* autorisations de niveau « Lecture seule » ou « Standard » dans l’outil Niveau entreprise Flux de travail avec les options « Afficher Personnalisé Flux de travail » et « Créer et modifier » L’autorisation granulaire des modèles de flux de travail est activée sur votre modèle d’autorisation.
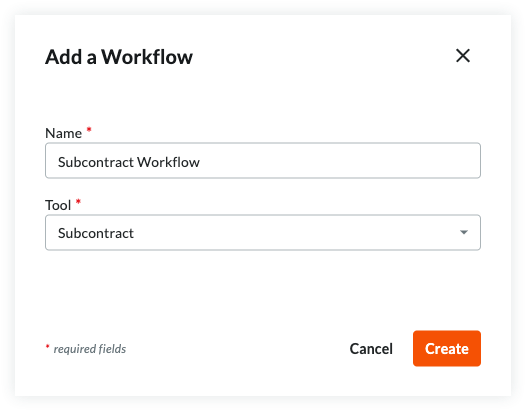
In the 'Add a Workflow' dialog box, do the following:
Name *. Enter a name for your new workflow.
Tool *. Select the tool and item for which you are creating the new workflow.
Exemple
Dans cet exemple, nous allons créer un nouveau flux de travail nommé ' Contrat de sous-traitance Flux de travail ' pour l’option Contrat de sous-traitance.
Click Create. Procore automatically opens the workflow builder and creates an 'Untitled' step for you.
In the workflow builder, do one of the following to name your initial workflow step:
Click the pencil icon and then type over the 'Untitled' step title in the right pane. Then press the RETURN key.
Click into the text box and type over the 'Untitled' step in the right pane. Then press the RETURN key.
In the workflow step, update the 'Details' section as follows:
Exemple
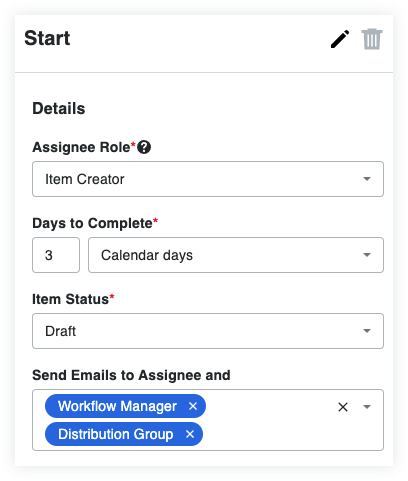
Pour cet exemple, nous avons nommé l’étape initiale du flux de travail « Démarrage ». Ensuite, vous terminerez la saisie de données dans la section « Détails » illustrée ci-dessous.
Remarque
Un astérisque (*) ci-dessous indique un champ obligatoire.
Assignee Role*. Select a role or group from the drop-down list. By default, 'Item Creator' is the only available option. For commitments, an 'Item Creator' is the person who created a commitment on a project.
Pointe
Vous ne voyez pas le rôle que vous voulez ? Vous pouvez créer un nouveau rôle dans la liste déroulante Rôle de la personne assignée. Cliquez sur le bouton Ajouter assigné au rôle du projet en bas de la liste et entrez un nom pour le groupe dans la case Nouveau assigné au rôle du projet . Lorsque vous êtes prêt à créer votre nouveau rôle, cliquez sur Créer un rôle. Par la suite, lors de la configuration du personnalisé flux de travail dans le(s) projet(s) auquel il est affecté(s), vous pouvez affecter des membres au groupe.
Days to Complete*. Enter a number in the first box. Then select Calendar Days of Business Days from the drop-down list. Procore's default option is Calendar Days. This defines the number of days the 'Assignee Role' has to complete the workflow step. Once the number of days passes, Procore sends an automated reminder once per day until the step is completed.
Item Status*. Select the status that the item must be in from the drop-down list. This defines the status the contract must be in before the step can be performed in the custom workflow. Your choices for this initial step are:
Draft
Out For Bidding
Out For Signature
Optional:Send Emails to the Assignee and _. Select the groups or roles that should receive an automated notification when the workflow step is NOT completed within the number of days specified above. The default groups include:
Workflow Manager. A workflow manager is a Procore user who must be designated on a project.
Item Creator. An item creator is a Procore user who created the commitment on a project.
Distribution Group. This is a default group for this custom workflow in the Workflows tool. After you publish this workflow and assign it to a project, you can define different group members when configuring the custom workflow in the Project level commitments tools.
Choose from the following options to add the next step(s) to your custom workflow:
Add a Conditional Step to a Custom Workflow
Add a Standard Step to a Custom Workflow
Add a Finish Step to a Custom Workflow
Add a Termination Step to a Custom Workflow
Add a Conditional Step to a Custom Workflow
Your organization's approval policy may require your workflow to be routed differently depending on certain conditions.
Highlight an existing step in the custom workflow or click the icon on a step in the workflow builder and choose 'Conditional'.
In the 'Responses' section, click Add to add a response.
In the 'Responses' section in the right pane, do the following:
If Response Is. Select the desired response from the drop-down list. These options correspond to the actions performed by the 'Assignee Role' assigned to the workflow step.
Go to Step. Select the type of step that you want to create.
Click Add Step. Note: If you have already created the conditional step you want to use, you can select it from the 'Go to Step' drop-down list instead of clicking Add Step.
Choose Conditional from the list of step types and name the step.
Click Create new step.
After creating the conditional step, click on it in the workflow builder to begin defining the conditions:
When. Select the first part of the hypothesis in the conditional statement. Choose from the following:
Condition
Définition
Exemple
Montant du contrat d’origine
Montant total de la ventilation des coûts du contrat approuvé.
Un flux de travail doit suivre différents chemins d’approbation en fonction du montant du contrat approuvé.
Montant total des objets de coûts approuvés
Le montant total de la ventilation des coûts des engagements « approuvés », des ordres de changement de l’engagement et des coûts directs du projet. Le montant de la ventilation des coûts de l’élément de flux de travail est inclus dans le total.
Formule...Afficher/Masquer
Engagements approuvés + OCE approuvés + coûts directs approuvés = montant total des objets de coûts approuvés
Acheminez le chemin d’approbation du flux de travail lorsque le montant total des autres contrats, ordres de changement et coûts directs approuvés est supérieur ou inférieur à un montant spécifié.
Montant total de tous les objets de coûts
Le montant total de la ventilation des coûts de tous les engagements « approuvés » et « en attente », des ordres de changement de l’engagement et des coûts directs sur le projet. Le montant de la ventilation des coûts de l’élément de flux de travail est inclus dans le total.
Formule...Afficher/Masquer
Engagements approuvés et en attente + OCE approuvés et en attente + Coûts directs approuvés et en attente = Montant total de tous les objets de coûts
Acheminez le chemin d’approbation du flux de travail lorsque le montant total des autres contrats en attente ou approuvés, des ordres de changement et des coûts directs de tout statut est supérieur ou inférieur à un montant spécifié
Montant dépassant le budget des supports de coûts approuvés
Le montant du budget total du projet est soustrait du montant total combiné de tous les engagements approuvés, ordres de changement de l'engagement et coûts directs.
Formule...Afficher/Masquer
Engagements approuvés + OCE approuvés + Coûts directs approuvés - Montant total du budget = Montant supérieur au budget sur les objets de coûts approuvés
Acheminez le chemin d’approbation du flux de travail si le contrat en cours d’approbation et d’autres contrats déjà approuvés, les ordres de changement et les coûts directs vont dépasser le budget de votre projet d’un montant spécifique.*
Montant supérieur au Budget pour tous les supports de coûts
Le montant du budget total du projet est soustrait du montant total combiné de tous les engagements « approuvés » et « en attente », des ordres de changement de l’engagement et des coûts directs.
Formule...Afficher/Masquer
Engagements approuvés et en attente + OCE approuvés et en attente + Coûts directs approuvés et en attente - Montant total du budget = Montant supérieur au budget sur tous les supports de coûts
Acheminez le chemin d’approbation du flux de travail si le contrat en cours d’approbation et d’autres contrats en attente ou approuvés, les ordres de changement et les coûts directs vont dépasser le budget de votre projet d’un montant spécifique.*
% du budget alloué aux supports de coûts approuvés
Le pourcentage du montant total du budget du projet utilisé par le montant total combiné des engagements « approuvés », des ordres de changement de l’engagement et des coûts directs.
Formule...Afficher/Masquer
(engagements approuvés + OCE approuvés + coûts directs approuvés) ÷ Montant total du budget = % du budget alloué aux objets de coûts approuvés
Acheminez le chemin d’approbation du flux de travail si le contrat en cours d’approbation et d’autres contrats déjà approuvés, les ordres de changement et les coûts directs vont dépasser le budget de votre projet d’un pourcentage spécifique. *
% du budget alloué à tous les supports de coûts
Le pourcentage du montant du budget total du projet utilisé par le montant total combiné de tous les engagements « approuvés » et « en attente », des ordres de changement de l’engagement et des coûts directs.
Formule...Afficher/Masquer
(Approuvé et en attente Engagements + OCE approuvés et en attente + Approuvé et en attente Coûts directs ) ÷ montant total de Budget = % de Budget alloué à tous les objets de coûts
Acheminez le chemin d’approbation du flux de travail si le contrat en cours d’approbation et d’autres contrats en attente ou approuvés, les ordres de changement et les coûts directs vont dépasser le budget de votre projet d’un pourcentage spécifique.*
*Conditional statements linked to the project’s budget are based on the total amount of the budget column selected on the Custom Reporting Budget View located in the company level Admin tool. See Set Up a Budget View for Custom Reporting.
Is. Select the hypothesis for the conditional step.
Greater than. If your organization requires additional signatures for amounts greater than or equal to a specified amount, you will want to choose this option and enter an amount in the field to the right.
Less than. If you want the step to function when the hypothesis is less than a specified number.
Then. Select a step from the drop-down list or create a new one by clicking the Add Step button.
Otherwise. Select a step from the drop-down list or create a new one by clicking the Add Step button. This is the step that will be next if the 'Original Contract Amount' does not meet the conditions you have set.
Add a Standard Step to a Custom Workflow
Click the icon attached to an existing step in the workflow builder and choose Step.
Pointe
De nouvelles étapes peuvent également être créées lors de la création de réponses pour des étapes existantes. Dans la liste déroulante « Aller à l’étape », choisissez Ajouter une étape.
Optional: Change the name of the workflow step as desired:
Click the pencil icon and then type over the existing step title in the right pane. OR
Click the text box on the right pane and type a title.
In the workflow step, update the 'Details' section as follows:
Remarque
Un astérisque (*) ci-dessous indique un champ obligatoire.
Assignee Role*. Select a role or group from the drop-down list. By default, 'Item Creator' is the only available option. For commitments, an 'Item Creator' is the person who created a commitment on a project.
Pointe
Vous ne voyez pas le rôle que vous voulez ? Vous pouvez créer un nouveau rôle dans la liste déroulante Rôle de la personne assignée. Cliquez sur le bouton Ajouter assigné au rôle du projet en bas de la liste et entrez un nom pour le groupe dans la case Nouveau assigné au rôle du projet . Lorsque vous êtes prêt à créer votre nouveau rôle, cliquez sur Créer un rôle. Par la suite, lors de la configuration du personnalisé flux de travail dans le(s) projet(s) auquel il est affecté(s), vous pouvez affecter des membres au groupe.
Days to Complete*. Enter a number in the first box. Then select Calendar Days of Business Days from the drop-down list. Procore's default option is Calendar Days. This defines the number of days the 'Responsible Group' has to complete the workflow step. Once the number of days passes, Procore sends a reminder until the step is completed.
Item Status*. Select the status that the item must be in to trigger the step in the workflow.
Optional:Send Emails to the Assignee and _. Select the groups or roles that should receive an automated notification when the workflow step is NOT completed within the number of days specified above. The recipients named here will also receive an email when the workflow step is completed. The default groups include:
Workflow Manager. A workflow manager is a Procore user who must be designated on a project.
Item Creator. An item creator is a Procore user who created the commitment on a project.
Distribution Group. This is a default group for this custom workflow in the Workflows tool. After you publish this workflow and assign it to a project, you can define different group members when configuring the custom workflow in the Project level commitments tools.
Add a Finish Step to a Custom Workflow
A finish step defines the end of a workflow. For example, in your commitment workflow, you would add a finish step to indicate that a subcontract or purchase order has been approved and that all of the conditions have been satisfied. A finish step indicates the custom workflow is complete.
Click the icon attached to an existing step in the workflow builder and choose FinishStep.
Optional: Do one of the following to change the name of the workflow step as desired:
Click the pencil icon and then type over the existing step title in the right pane.
Click the text box on the right pane and type a title.
In the right pane, update the 'Details' section as follows:
Item Status*.* Approved* Complete
Optional:Send Emails to the Assignee and _. Select the groups or roles that should receive an automated notification when the workflow step is completed. The default groups include:
Workflow Manager. A workflow manager is a Procore user who must be designated on a project.
Item Creator. An item creator is a Procore user who created the commitment on a project.
Distribution Group. This is a default group for this custom workflow in the Workflows tool. After you publish this workflow and assign it to a project, you can define different group members when configuring the custom workflow in the Project level commitments tools.
Choose from these options:
Save as Draft. Click this button to save a numbered 'Draft' version. Choose this option when you are still working on your custom workflow.
Save and Publish. Click this button to create a newly published version. Choose this option when you are ready to assign your workflow to a project.
Add a Termination Step to a Custom Workflow
Click the icon attached to an existing step in the workflow builder and choose FinishStep.
Optional: Change the name of the workflow step as desired:* Click the pencil icon and then type over the existing step title in the right pane. OR* Click the text box on the right pane and type a title.
In the right pane, update the 'Details' section as follows:
Item Status.
Optional:Send Emails to the Assignee and _. Select the groups or roles that should receive an automated notification when the workflow step is completed. The default groups include:
Workflow Manager. A workflow manager is a Procore user who must be designated on a project.
Item Creator. An item creator is a Procore user who created the commitment on a project.
Distribution Group. This is a default group for this custom workflow in the Workflows tool. After you publish this workflow and assign it to a project, you can define different group members when configuring the custom workflow in the Project level commitments tools.
Choose from these options:
Save as Draft. Click this button to save a numbered 'Draft' version. Choose this option when you are still working on your custom workflow.
Save and Publish. Click this button to create a newly published version. Choose this option when you are ready to assign your workflow to a project.
 icon on a step in the workflow builder and choose 'Conditional'.