Set Up the Procore Labor Productivity Cost Budget View

Background

The 'Procore Labor Productivity Cost' budget view provides project teams with the ability to include production quantities on the project's budget. See What are 'production quantities'? Building off the Real-Time Labor Costing feature, the 'Procore Labor Productivity Cost' budget view is designed to provide self-performing and specialty contractors with the ability to gain greater insight into your project's production rates to make better decisions that maximize profit margins. With this release, you can:

  • Add and import production units to a project's budget in Procore's Financial Management tools: Budget, Change Events, and Change Orders.

  • Collect production units from field personnel with Timecard Entries in the Daily Log and both the Timecards and Timesheets tools.

  • Track and compare budgeted production units to installed production units using Procore's Budget and Reports tools.

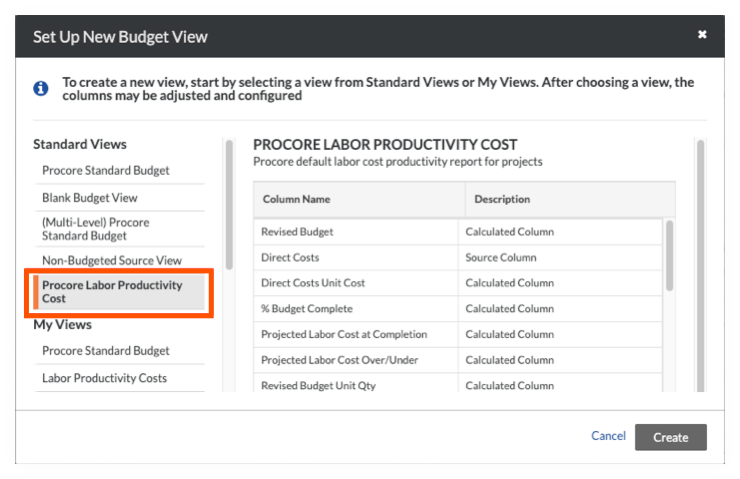
By default, Procore provides its users with a standard 'Procore Labor Productivity Cost' budget view, which is available to your company's Procore Administrator in the Company level Admin tool.

Example

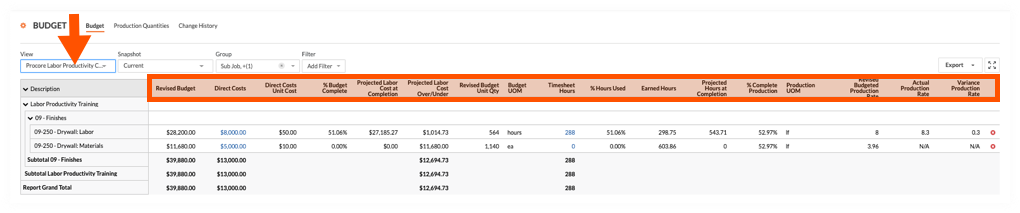
Procore Labor Productivity Cost Budget View in the Budget Tool

The illustration below shows you the recommended layout for the 'Procore Labor Productivity Cost' budget view, as it will look when applied to your project's Budget tool.

budget-procore-labor-prod-cost-view.png

Things to Consider

Prerequisites

  • Verify that the Timesheets tool is active in your company's Procore account.
    Note: To do this, navigate to the Company Admin tool. Under Company Settings, click Account Information. Under Resource Management, verify that Timesheets is 'Licensed.'

  • Assign the Default Cost Type for timecard entries in the Company level Timesheets tool. See Configure Settings: Company Level Timesheets.

  • Add the following tools to the Project Tools menu. See Add and Remove Project Tools.

    • Direct Costs

    • Prime Contracts

    • Optional : Timecards

    • Timesheets

    • Budget

Steps

  • Step 1: Create a New Budget View

  • Step 2: Optional: Customize the Budget View

  • Step 3: Preview the Budget View

  • Step 4: Assign the Budget View to a Procore Project

Step 1: Create a New Budget View

  1. Navigate to the Company Admin tool.

  2. Under Tool Settings, click Budget.

  3. Click Set Up New Budget View.
    set-up-new-budget-view.png

  4. Under Standard Views, highlight Procore Labor Productivity Cost.
    procore-labor-productivity-cost-view.png

  5. Click Create.

  6. Name your view as follows:

    • View Name. Enter a name for your new view. In this example, we named it: Labor Productivity Cost

    • View Description. Enter a description for your view. In this example, we entered: Recommended view for labor cost productivity report

  7. Click Configure Columns.
    This opens the Configure Columns window pictured below. From this point, continue with Step 2: (Optional) Customize the Budget View.

Step 2: Optional: Customize the Budget View

If you want to customize the Procore Labor Productivity Cost budget view, you can click the Configure Columns button. This opens the Configure Columns window, which allows you to edit the budget view. To learn about your editing options, see Configure the Columns for a Budget View in the Set Up a New Budget View tutorial. When you are finished, click the 'x' in the Configure Columns window to close it.

Step 3: Preview the Budget View

After closing the Configure Columns window, the system returns you to the new budget view's window. Under Column Configuration, you can get an idea of how your budget view will look in Procore by selecting a project from the Preview with Project drop-down list.

Step 4: Assign the Budget View to a Procore Project

  1. In the 'Procore Labor Productivity Cost' view window, place checkmarks next to project boxes of your choice in the Assign to Projects list.

    assign-to-projects.png

    • To assign the budget view to all of your company's Procore projects, place a checkmark in the All Projects Selected box.
      Notes:* For companies using the ERP Integrations tool, you will see the 'All Project Using ERP Direct Costs' checkbox.* You may also see the 'All Projects Using Procore Direct Costs' checkbox. However, it only appears when the Direct Costs tool is enabled on the project.

    • To assign the budget view to one (1) or more projects, place a checkmark next to the desired projects.

  2. Click Done.

 Tip

After completing all of the above steps, you can provide your project teams with instructions for applying the budget view to their project budgets. For details, see Apply the View, Snapshot, Group, and Filter Options on a Budget View.

See Also

Loading related articles...