Import Assets from BIM
Background
Customers with 3D BIM models in Document Management or Project Documents tools can extract model data to generate asset records directly in the Project level Assets tool.
This integration pulls model objects into your Assets tool to create a single source of truth for tracking assets across their lifecycle. During extraction, you can filter for specific model objects, visually validate them in the 3D Viewer, map model properties to your standardized Asset Types, and bulk import them directly into your Assets tool.
Things to Consider
Assets created in the Project level Assets tool are also added to the Company level Assets tool.
Fields vary based on the asset type.
Supported file formats include rvt, ifc, nwc, and nwd.
Model files must be uploaded to the Project Documents or Document Management tools.
Required properties must be selected. These are based on the configurable fieldset for the asset type.
After you import assets, a summary will appear displaying the following information:
Count of successfully extracted assets.
Count of failures.
Specific error messages explaining any failures.
Prerequisites
Models must be configured in the Asset tool settings before they can be selected for extraction.
Steps
Navigate to the Project level Assets tool.
Click the model
 view.
Select the model from the drop-down menu.

Click Import from BIM.
Identify Assets.
Select the Asset Type to be identified and created.
Under 'Filter Conditions', select properties to identify the assets.
Select a property. (Example: Ifcclass, Object Type...)
Select your parameters (Example: Contains, Greater Than, Less Than...).
Enter a value. (Example: AHU)
ExampleThe following filter criteria would identify doors larger than 4 feet.
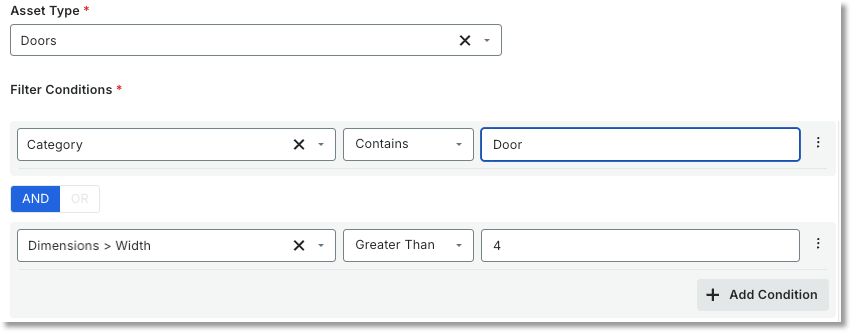

Optional: Click Add Condition to include additional conditions and properties.
Click Run Search to see a list of identified objects.
You can mark a single checkbox to verify the asset in the model.