Set Up Agent Automations
Background
Bring workflow logic to your AI workspace with Automations. An automation defines how and when an AI agent runs on its own — either on a recurring schedule or in response to a project event, such as the creation of an RFI. Once configured, your automation runs in the background to assist with tasks like scanning document text, generating preliminary drafts, or flagging items for review based on your criteria. Instead of auditing project updates line by line, your agent pre-processes the data automatically so you can focus on the build. This tutorial helps you set up an agent automation in Procore AI or Datagrid.
Things to Consider
Prerequisites:
An Enterprise subscription is required through Datagrid or Procore's Digital Coworker offerings in order to customize agents, including adding automations.
Procore customers: A Company Admin must enable the project where the agent you want to automate will live and they must assign you a role.
Choose an agent (custom or pre-built) in Procore or Datagrid that you want to automate.
Digital Coworker Pro: Accounts with this package get two pre-built triggered agents as described in Manage Agent Automations.
Visibility for Procore customers: If your account has Procore AI, changes made to an agent's automations in Datagrid are reflected in Procore AI, and vis versa.
Trigger sources: At this time, only Procore events can be set up to trigger agents in Procore AI or Datagrid. Other trigger sources may be added in the future.
Trust but verify: Because AI operations are non-deterministic, AI tasks from configured automations are intended to provide starting recommendations that should always be verified by a user.
Steps
Log in to Procore or Datagrid.
Navigate to the agent:
In Procore:
Click the AI
 icon on the right.
Click the expand
 arrows for the full screen view.
In the left pane, click on the agent you want to modify.
In Datagrid: In the left panel, click on the agent you want to modify.
If the agent has never responded to you before, ask it a simple question so you can see its response. (If you're in Datagrid, you can hover over an agent in the left navigation to get to its Configuration, instead.)
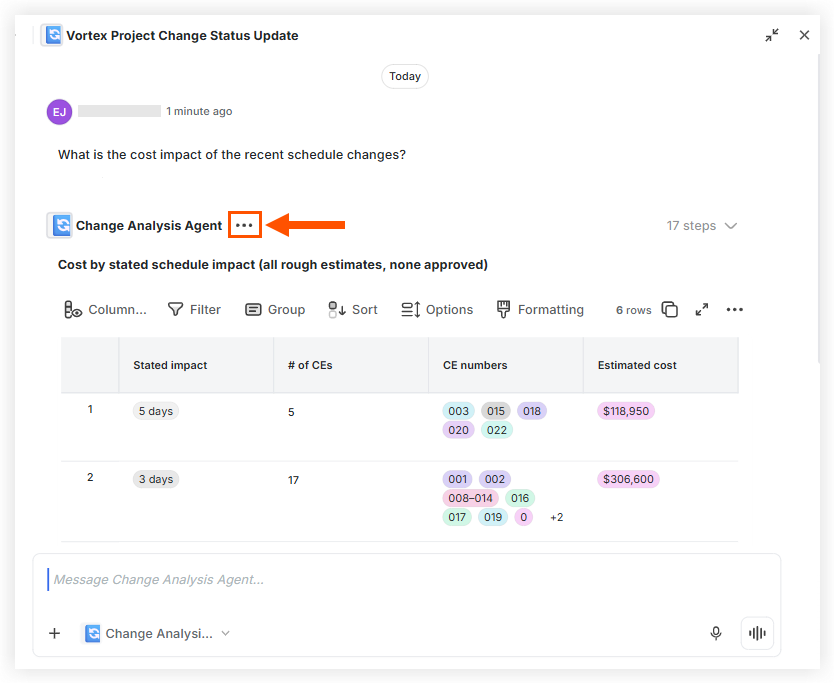
Click the
 more menu at the top of the agent's response within your chat thread.
Click Go to Configuration.
Click Automations
Click + New Automation
Under Trigger Type, choose how the automation starts:
Scheduled — run the agent on a recurring frequency. Continue with Configure a Scheduled Automation.
App Event — run the agent when a Procore event occurs. Continue with Configure an App Event Automation.

Configure a Scheduled Automation
Set your agent to run automatically at a recurring frequency — no project event required.
Note: The automation will not be active until it is toggled to 'Active' and saved.
With Trigger Type set to Scheduled, add an optional Description to identify what this automation does.
Under Schedule, open the Run menu and select a frequency: Everyday, Weekdays, Weekly, Monthly (By Date) such as the 15th of each month, or Monthly (By Day) such as the second Monday of each month.
Under Delivery, choose where the automation's output appears:
Destination: where results are posted (such as direct message with the agent or post to a channel).
Placement: how results are organized (such as a new message each run or continue in same conversation).
Optional: Under Additional Delivery, select to deliver results via email. Leave as None if not needed.
An automation will not run until it is toggled to Active and Saved.
Click Save Changes.
Configure an App Event Automation
Define the Procore event that causes your agent to run automatically.
Note: The automation will not be active until it is toggled to 'Active' and saved.
Set Trigger Type to App Event.
Under Trigger Source, select the connected platform that provides the trigger event (for example, Procore).
Enter a Name for the automation. (Required)
Add a Description of what this automation does. (Optional)
Under Trigger, select the project event that will cause the agent to initiate, such as the following:
RFI Created: the agent runs when a new RFI is created in a project.
Submittal Updated: the agent runs when a submittal is edited.
Daily Log Completed: the agent runs when a daily log is marked as complete.
Optional: Add trigger filters. After you select a trigger event, an Add Trigger Filters field appears so you can describe your execution rules in plain language. This narrows the scenarios that run the agent, aligning with your goal and avoiding unnecessary events and credit usage. Consider referencing Procore fields (such as Status, Assignee, Due Date) and field options (such as Draft, Open, Closed), such as these:
Change Orders: only run when the event has a Cost Impact of Yes or Unknown.
RFIs: only run when the RFI Status is Open and Ball in Court is assigned to the Architect.
Continue to Test an Automation and Activate an Automation below.
Note: An automation will not run until it is toggled to Active and Saved.
Test an Automation
Run a simulation to preview results before you activate. The process described below is for the App Event automation type only. Note: A test does not use credits and cannot modify Procore items or take actions such as sending notifications.
App Event automations: In the Test Trigger section, select an existing Procore item (for example, select a specific RFI or change event) from the drop-down or by searching, then run the test.
Note: If your project contains no items of the selected event type, you can still activate and save the automation, but a test cannot run until such an item exists.
Review the results within your active chat thread to confirm the configuration works as intended. This models where the output may require human approval. If needed, adjust the agent's instructions or automation settings and test again.
Set the Automation as Active or Inactive
Click the toggle
 to change the automation to Active or Inactive.
Note: Setting an automation to 'Inactive' disables the background automation while preserving your configurations for future use.To confirm your selection, read the prompt and click Activate Automation or Set to Inactive. The automation is not live until you've also saved your changes as described in the next step.
Click the Save Changes button at the top of the agent configuration panel.
ImportantCredits: When an active automation runs, the system deducts credits from your project balance. Live app events are processed in 1 to 5-minute batches to optimize credit consumption. Learn more in the How App Event Automations are Batched section below.
Review: Consistently review the accuracy of live automated results. A successful test does not replace ongoing human verification.
System Limit: The system automatically pauses automations when activity rate limits are exceeded, to protect your credit balance. See Error Handling below.
How Automation Events are Batched
Procore intelligently batches frequent project changes together using rolling event windows.
1-minute window: When the first project event arrives, a 1-minute timer starts. If another event occurs during that minute, the timer resets to bundle the new data into the same batch.
5-minute cap: The collection window keeps growing as long as new updates keep arriving, up to a maximum of 5 minutes from the time of the first event. Once 5 minutes pass, the system stops waiting and runs the agent once to process all gathered updates.
Duplicate filtering: Any exact duplicate events captured during the batching window are automatically filtered out to ensure clean data processing.
Next batch cycles: Any new project updates that occur after the 5-minute window closes will automatically initiate a brand-new batch and restart the timer sequence.
Error Handling
Procore may notify you about agent activity and potential issues — for example, when an agent runs more than 20 times in one minute. The system pauses the automation and its background tasks to avoid excessive credit usage.
Where to find error notifications
Procore AI - In the agent's chat history, locate and click on the chat thread marked with a red status icon.
Datagrid - Open your Inbox, go to the System tab, and click on the chat thread marked with a red status icon.
How to reactivate a paused trigger
Once you are inside the chat thread of the agent with the paused trigger, follow these steps to resolve the issue:
Click on the Review Configuration button to open the automation settings in the agent configuration panel.
Review and modify the automation settings or conditions as needed to optimize performance and prevent rapid loops. You can also review and modify other agent settings and instructions.
Click the toggle
to change the status back to Active.Click Save Changes.
Rather than visiting the configuration panel of each agent, you may want to see and manage all agent automations from a central location. If your account has the Pro version of the AI product, this is the only way to manage your included triggered agents. See Manage Agent Automations to learn how.