Avis important pour les clients intégrés au système ERP :
L’adresse e-mail erpsupport@procore.com sera retirée le 8 avril 2026. Nous vous recommandons d’utiliser notre formulaire Web, notre téléphone ou notre chat améliorés pour une assistance plus rapide sur les nouvelles demandes.
This website has not been fully launched in your preferred locale yet
The only operational page on the V2 Support Site in your preferred locale is the video library page. The full website launch is coming soon.
Looking to find any other content? Return to the V1 Support Site.
Ajouter une vue du budget Productivité de la main-d’œuvre en temps réel
Arrière-plan
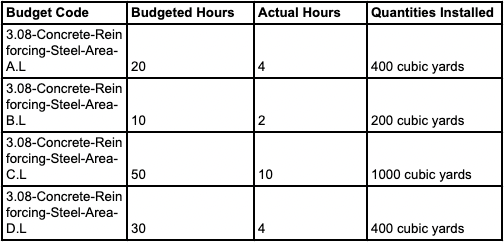
Vous pouvez tirer parti d’une structure de découpage du projet (SDP) flexible lors de la budgétisation des heures de ressources et des coûts associés, ainsi que d’un plan de production basé sur les unités à installer pour les quantités produites. La SDP flexible permet à votre équipe de budgétiser, de suivre le temps et les unités installées dans les feuilles horaires, et de générer des rapports au bon niveau de granularité, pour une vue du budget améliorée en temps réel des coûts de productivité de la main-d’œuvre.
Example
With Flexible WBS:
Without Flexible WBS:
Ce guide vous montre comment configurer une vue du budget Productivité de la main-d’œuvre en temps réel qui s’intègre aux outils de suivi des ressources de Procore. Cette vue permet à l’outil Budget du projet d’exploiter instantanément les heures d’entrée de pointage soumises par le personnel de terrain de votre projet dans les outils Pointage, Feuilles horaires, Mes horaires (Android) et Mes horaires (iOS) et de mettre à jour la vue du budget du projet immédiatement après l’envoi des entrées d’heures de pointage.
Pour les chefs de projet, il n’est donc plus nécessaire d’attendre que les données de pointage soient saisies manuellement dans un budget. Cette fonctionnalité est particulièrement utile pour les entrepreneurs autonomes qui souhaitent obtenir un aperçu en temps réel des coûts de main-d’œuvre réels d’un projet et peut aider à minimiser le risque de dépassement de main-d’œuvre sur un projet.
Exemple
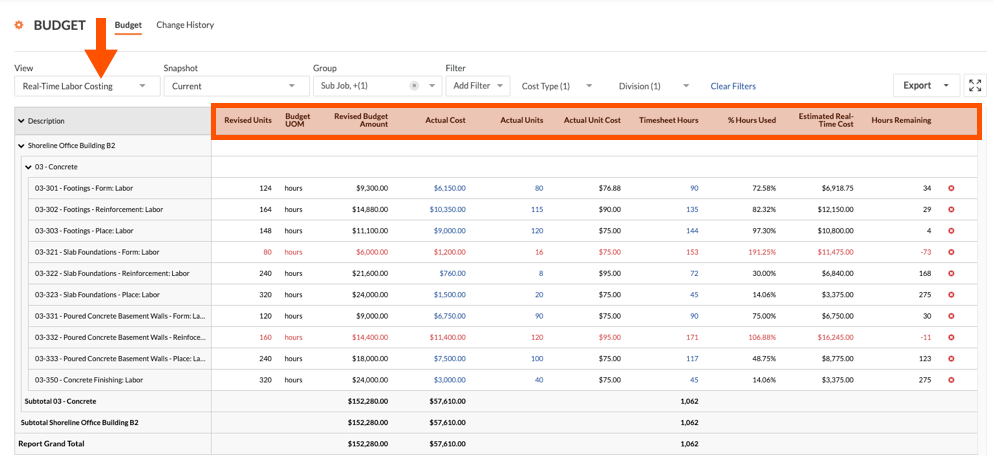
Vue du budget Productivité de la main-d’œuvre en temps réel dans l’outil Budget
L’illustration ci-dessous vous montre la disposition recommandée pour la vue du budget « Productivité de la main-d’œuvre en temps réel », telle qu’elle apparaîtra lorsqu’elle sera appliquée à l’outil Budget de votre projet.
Éléments à prendre en compte
Autorisation utilisateur requise:
Pour ajouter une nouvelle vue du budget, cliquez sur « Admin » dans l’outil Admin de l’entreprise
Informations supplémentaires: Votre équipe de chantier peut soumettre des heures de saisie de pointages à l’aide de ces outils de projet :
Restrictions: si vous utilisez cette vue du budget dans votre projet Procore :
Pour les entreprises qui utilisent l’outil Intégrations ERP, il n’est PAS possible d’ajouter les colonnes « Coût réel » ou « Unités réelles » sans exécuter les étapes de configuration supplémentaires indiquées ci-dessous.
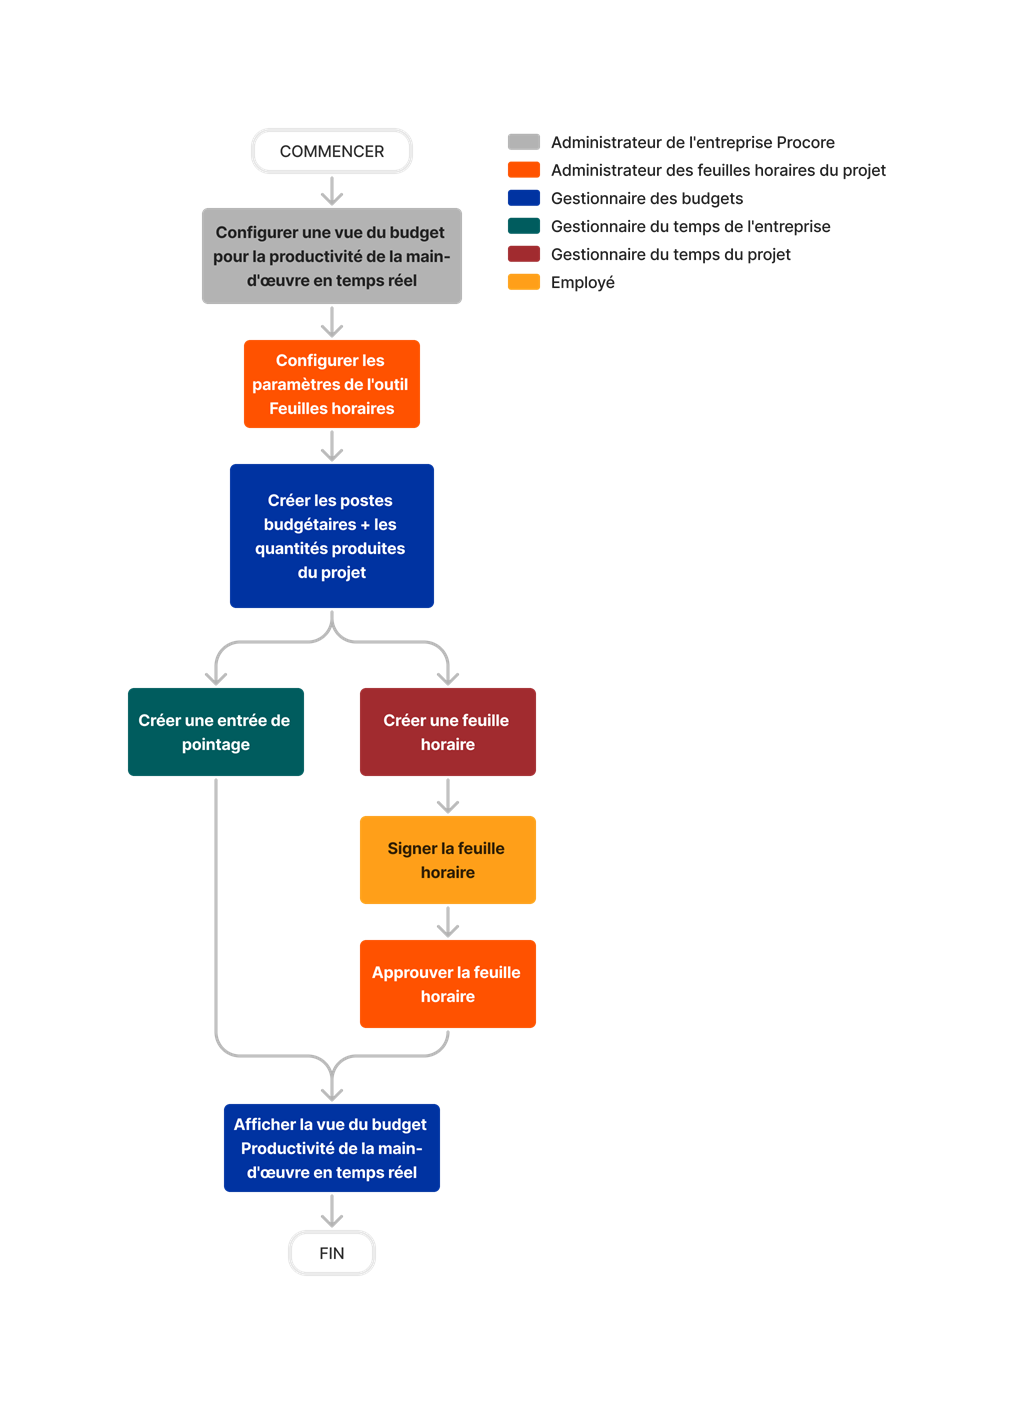
This workflow shows the setup instructions as well as the time entries needed to see that information in the budget view. Afficher/Masquer
Escalier
Étape 1 : créer une nouvelle vue du budget
Étape 2 : ajouter les colonnes recommandées
Pas. 3 : (facultatif) masquer les colonnes vides inutilisées de la vue du budget
Étape 4 : assigner la vue du budget à un projet Procore
Créer une nouvelle vue du budget
Accédez à l’outil Admin de l’entreprise.
Sous Paramètres des outils, cliquez sur Budget.
Cliquez sur Configurer une nouvelle vue du budget.
Sous Vues standard, sélectionnez Coût de productivité du travail Procore.
Cliquez sur Créer.
Nommez votre vue comme suit :
Nom de l’affichage. Saisissez un nom pour votre nouvelle vue. Dans cet exemple, nous l’avons nommé : Productivité de la main-d’œuvre en temps réel
Voir la description. Saisissez une description pour votre vue. Dans cet exemple, nous avons saisi : Vue recommandée pour la productivité de la main-d’œuvre en temps réel
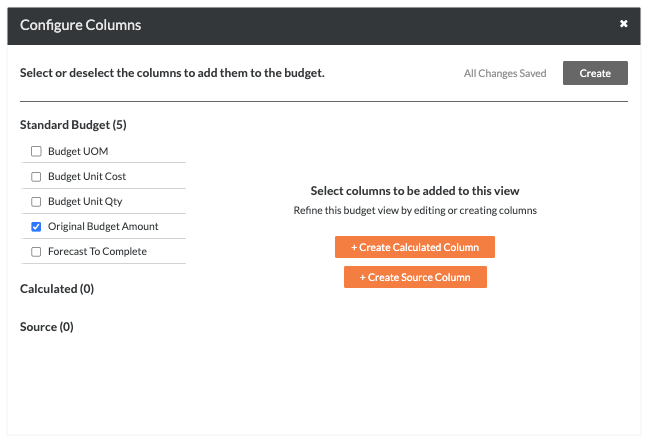
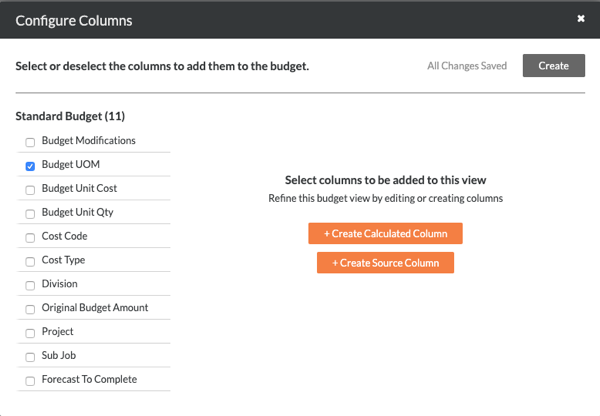
Cliquez sur Configurer les colonnes. Ceci ouvre la fenêtre Configurer les colonnes illustrée ci-dessous. À partir de ce point, passez à l’étape suivante pour ajouter des colonnes recommandées.
Ajouter les colonnes recommandées
Important
Il s’agit d’une vue du budget recommandée. L’administrateur Procore de votre entreprise crée les vues du budget utilisées pour vos projets, de sorte que les paramètres des colonnes présentés ci-dessous peuvent être différents dans votre environnement. Pour d’autres recommandations concernant les vues du budget, voir Quelles vues du budget dois-je ajouter à mon projet Procore ?
Voici les paramètres de colonne recommandés pour la vue du budget Productivité de la main-d’œuvre en temps réel :
Nom de la colonne
Type de colonne
Format de colonne
Description
Montant des OC approuvés
Source
Monnaie
Il s’agit d’une colonne cachée que vous créez pour effectuer un calcul sur les valeurs apparaissant dans la colonne « Montant du budget révisé ».
Quantité unitaire des OC approuvés
Source
Nombre
Il s’agit d’une colonne cachée que vous créez pour effectuer un calcul sur les valeurs apparaissant dans la colonne « Unités révisées ».
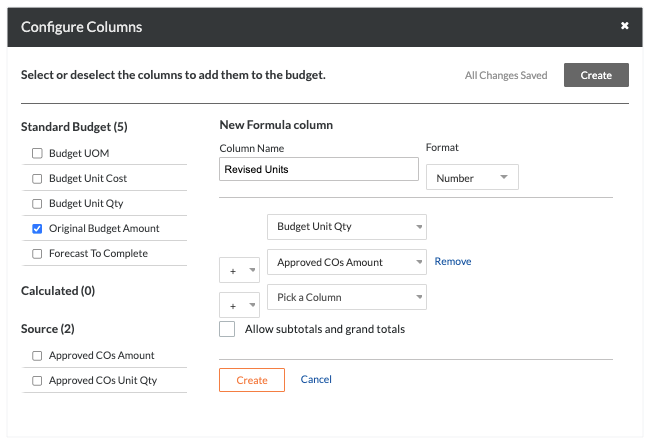
Unités révisées
Calculé
Nombre
Ceci montre la quantité d’unités du budget initiale + la quantité unitaire des OC approuvés.
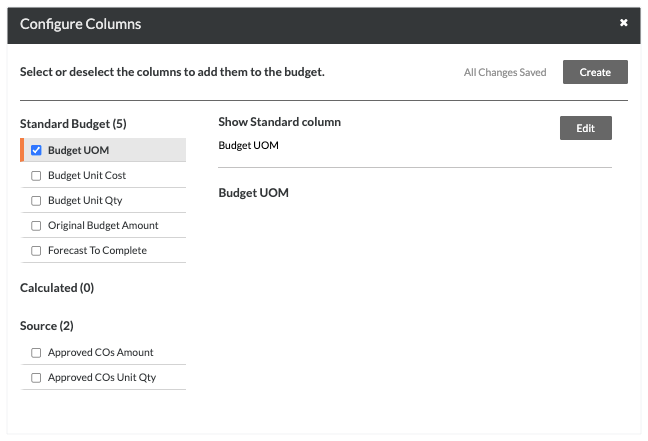
Unité de mesure du budget
Standard
N/A
Ceci montre l’unité de mesure (UdM) pour le poste budgétaire.
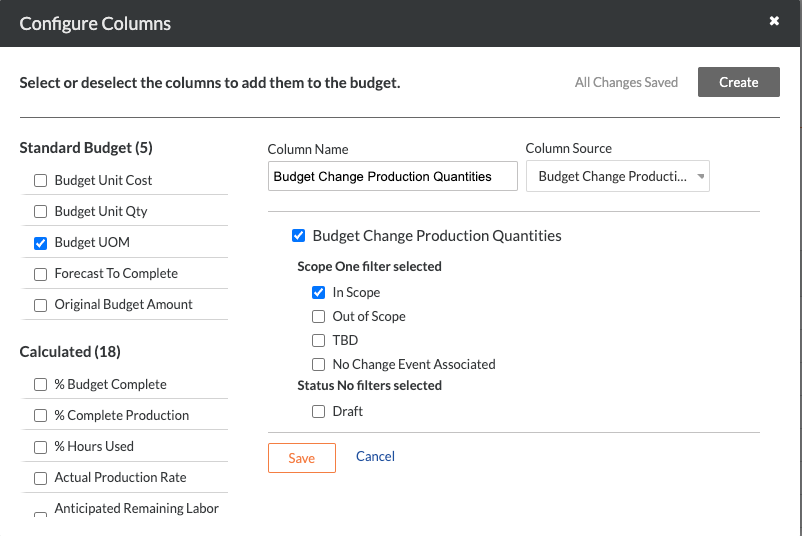
Modification du budget Quantité produite
Source
Nombre
Représente les modifications internes des quantités produites budgétées à installer (sorties). Il comprend la quantité unitaire et l’unité de mesure.
Quantité unitaire de modification budgétaire
Source
Nombre
Ceci montre la quantité unitaire et le montant des unités de mesure d’une modification budgétaire.
Budget révisé - Quantité produite
Calculé
Nombre
Affiche la quantité de production budgétée initiale + la quantité de production d’OC approuvée + la quantité de production de modifications budgétaires approuvées.
Quantité unitaire du budget révisée
Calculé
Nombre
Affiche la quantité d’unités du budget initiale + les unités d’OC approuvées + la quantité d’unités des modifications budgétaires approuvées.
Montant du budget révisé
Calculé
Monnaie
Ceci montre le montant du budget initial + le montant des OC approuvés.
Coût réel
Source
Monnaie
Ceci montre le montant des coûts directs.
Unités réelles
Source
Nombre
Ceci montre la quantité d’unités des coûts directs.
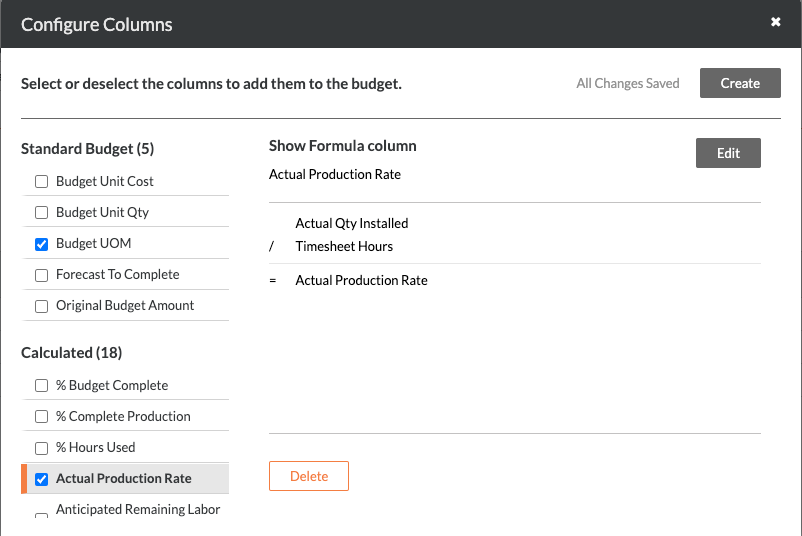
Coût unitaire réel
Calculé
Monnaie
Ceci montre le coût réel/les unités réelles
Heures de la feuille horaire
Source
Nombre
Ceci montre toutes les heures d’entrée de pointage
% d’heures utilisées
Calculé
Pour cent
Ceci affiche les heures de la feuille horaire/les unités révisées.
Estimation du coût en temps réel
Calculé
Monnaie
Ceci affiche le coût unitaire réel multiplié par les heures de la feuille horaire.
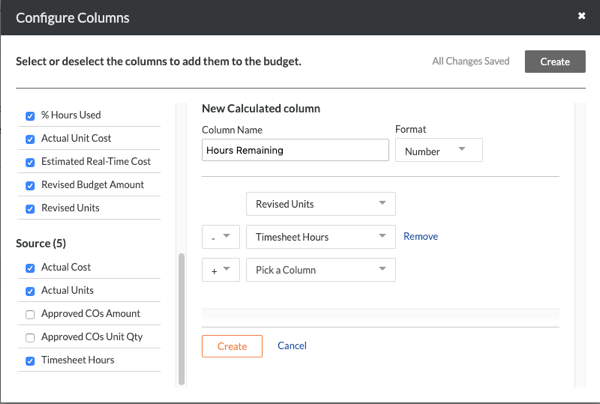
Heures restantes
Calculé
Nombre
Ceci affiche les unités révisées - Heures de la feuille horaire.
Montant des OC approuvés
Note: Vous devez ajouter cette colonne avant de pouvoir ajouter une colonne calculée nommée « Montant du budget révisé ».
Procédure à partir de la fenêtre Configurer les colonnes...
Paramètres
Cliquez sur le bouton Créer et choisissez Source dans la liste déroulante.
Sous « Nouvelle colonne source », procédez comme suit :
Nom de la colonne. Entrez le nom : Montant des OC approuvés
Source de la colonne. Sélectionnez Contrat principal.
Cochez la case Ordres de changement.
Sous « Statut », cochez la case Approuvé.
Cliquez sur Créer.
Sous Source à gauche, masquez la colonne de la vue du budget en décochant la case Montant des OC approuvés .
Qté unitaire des OC approuvés
Note: Vous devez ajouter cette colonne avant de pouvoir ajouter une colonne calculée nommée « Unités révisées ».
Procédure à partir de la fenêtre Configurer les colonnes...
Paramètres
Cliquez sur Créer et choisissez Source.
Sous « Nouvelle colonne source », procédez comme suit :
Nom de la colonne. Entrez le nom : Qté unitaire des OC approuvés
Source de la colonne. Sélectionnez Qté d’unités principales.
Cochez la case Quantité unitaire des ordres de changement.
Sous « Statut », cochez la case Approuvé.
Cliquez sur Créer.
Sous la liste Source , masquez la case de la vue du budget en décochant la case de la Qté unitaire des OC approuvés.
Procédure à partir de la fenêtre Configurer les colonnes...
Paramètres
Cliquez sur Créer et choisissez Calculé.
Sous « Nouvelle colonne de formule », procédez comme suit :
Nom de la colonne. Saisissez le nom : Unités révisées
Le format. Sélectionnez Numéro.
Sélectionnez ces paramètres de calcul comme indiqué dans les listes déroulantes :
Qté d’unités budgétaires
Signe plus (+)
Qté unitaire des OC approuvés
Optionnel: Si vous souhaitez afficher les sous-totaux et les totaux généraux dans cette colonne dans l’outil Budget au niveau projet, cochez la case Autoriser les sous-totaux et les totaux généraux .
Cliquez sur Créer.
Unité de mesure du budget
Note: Vous devez également supprimer toutes les autres colonnes sous Budget standard.
Procédure à partir de la fenêtre Configurer les colonnes...
Paramètres
Sous Budget standard à gauche, cochez la case Unité de mesure du budget .
Décochez toutes les autres colonnes de la section « Budget standard ».
Modification du budget Quantité produite
Note: Ceci ajoute une colonne source nommée « Modifications budgétaires : quantités produites ». Vous devez ajouter cette colonne avant de pouvoir ajouter une colonne calculée nommée « Quantité de production du budget révisé ».
Procédure à partir de la fenêtre Configurer les colonnes...
Paramètres
Cliquez sur Créer et choisissez Source.
Sous « Nouvelle colonne source », procédez comme suit :
Nom de la colonne. Saisissez le nom : Modification du budget Quantités produites
Source de la colonne. Sélectionnez Modification du budget : Quantité produite.
Cochez la case Modifications budgétaires : Quantités produites.
Sous « Portée », cochez la case Dans la portée.
Sous « Statut », cochez la case Approuvé.
Cliquez sur Créer.
Quantité unitaire de modification budgétaire
Note: Ceci ajoute une colonne source nommée « Quantités unitaires de modification budgétaire ». Vous devez ajouter cette colonne avant de pouvoir ajouter une colonne calculée nommée « Quantité unitaire du budget révisée ».
Procédure à partir de la fenêtre Configurer les colonnes...
Paramètres
Cliquez sur Créer et choisissez Source.
Sous « Nouvelle colonne source », procédez comme suit :
Nom de la colonne. Saisissez le nom : Quantité unitaire de modification budgétaire
Source de la colonne. Sélectionnez Quantité d’unités de changement budgétaire.
Cochez la case Quantités unitaires de modification du budget.
Sous « Statut », cochez la case Approuvé.
Cliquez sur Créer.
Budget révisé - Quantité produite
Note: Vous devez d’abord créer la colonne Modification du budget : Quantité produite. Voir Modification du budget Quantité produite.
Procédure à partir de la fenêtre Configurer les colonnes...
Paramètres
Cliquez sur Créer et choisissez Calculé.
Sous « Nouvelle colonne de formule », procédez comme suit :
Nom de la colonne. Entrez le nom : Quantité produite du budget révisé
Le format. Sélectionnez Numéro.
Sélectionnez ces paramètres de calcul comme indiqué dans les listes déroulantes :
Quantité produite budgétée
Signe plus (+)
Quantité de production de CO approuvée
Signe plus (+)
Modification du budget Quantité produite
Optionnel: Si vous souhaitez afficher les sous-totaux et les totaux généraux dans cette colonne dans l’outil Budget au niveau projet, cochez la case Autoriser les sous-totaux et les totaux généraux .
Cliquez sur Créer.
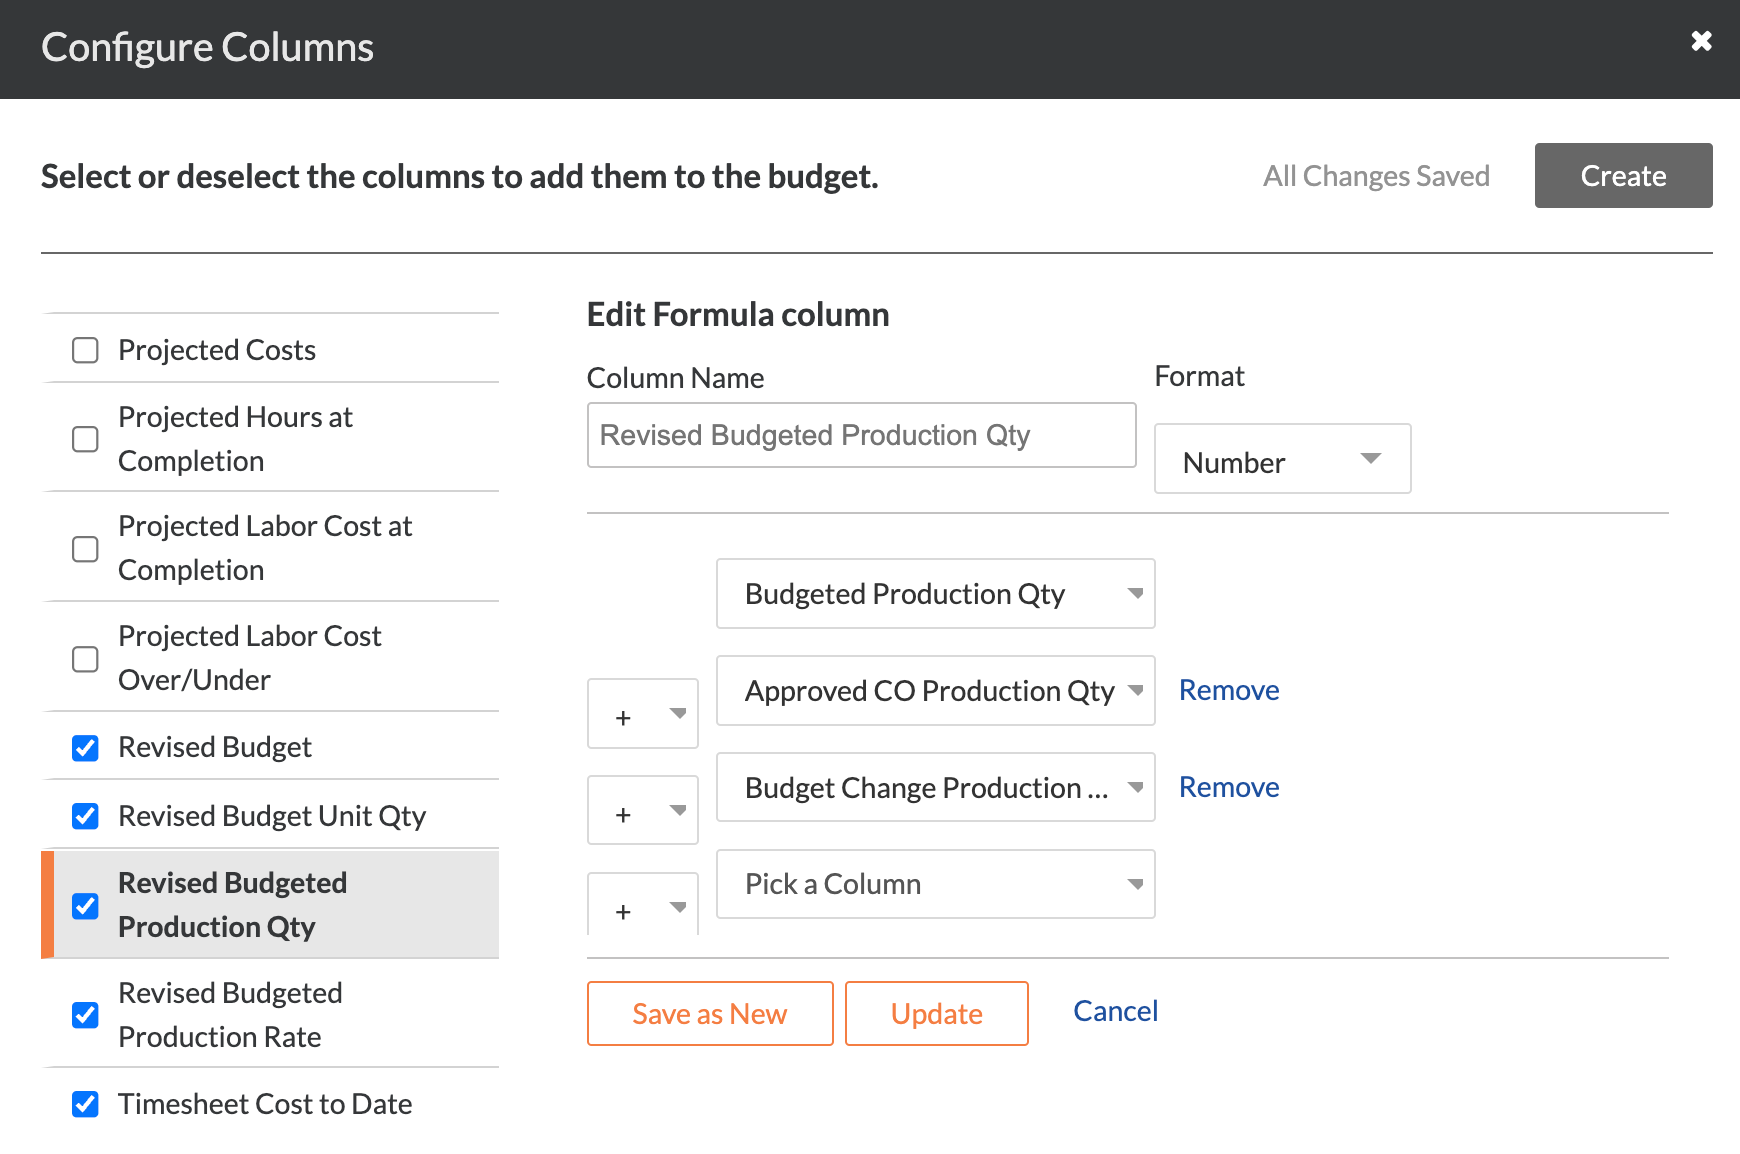
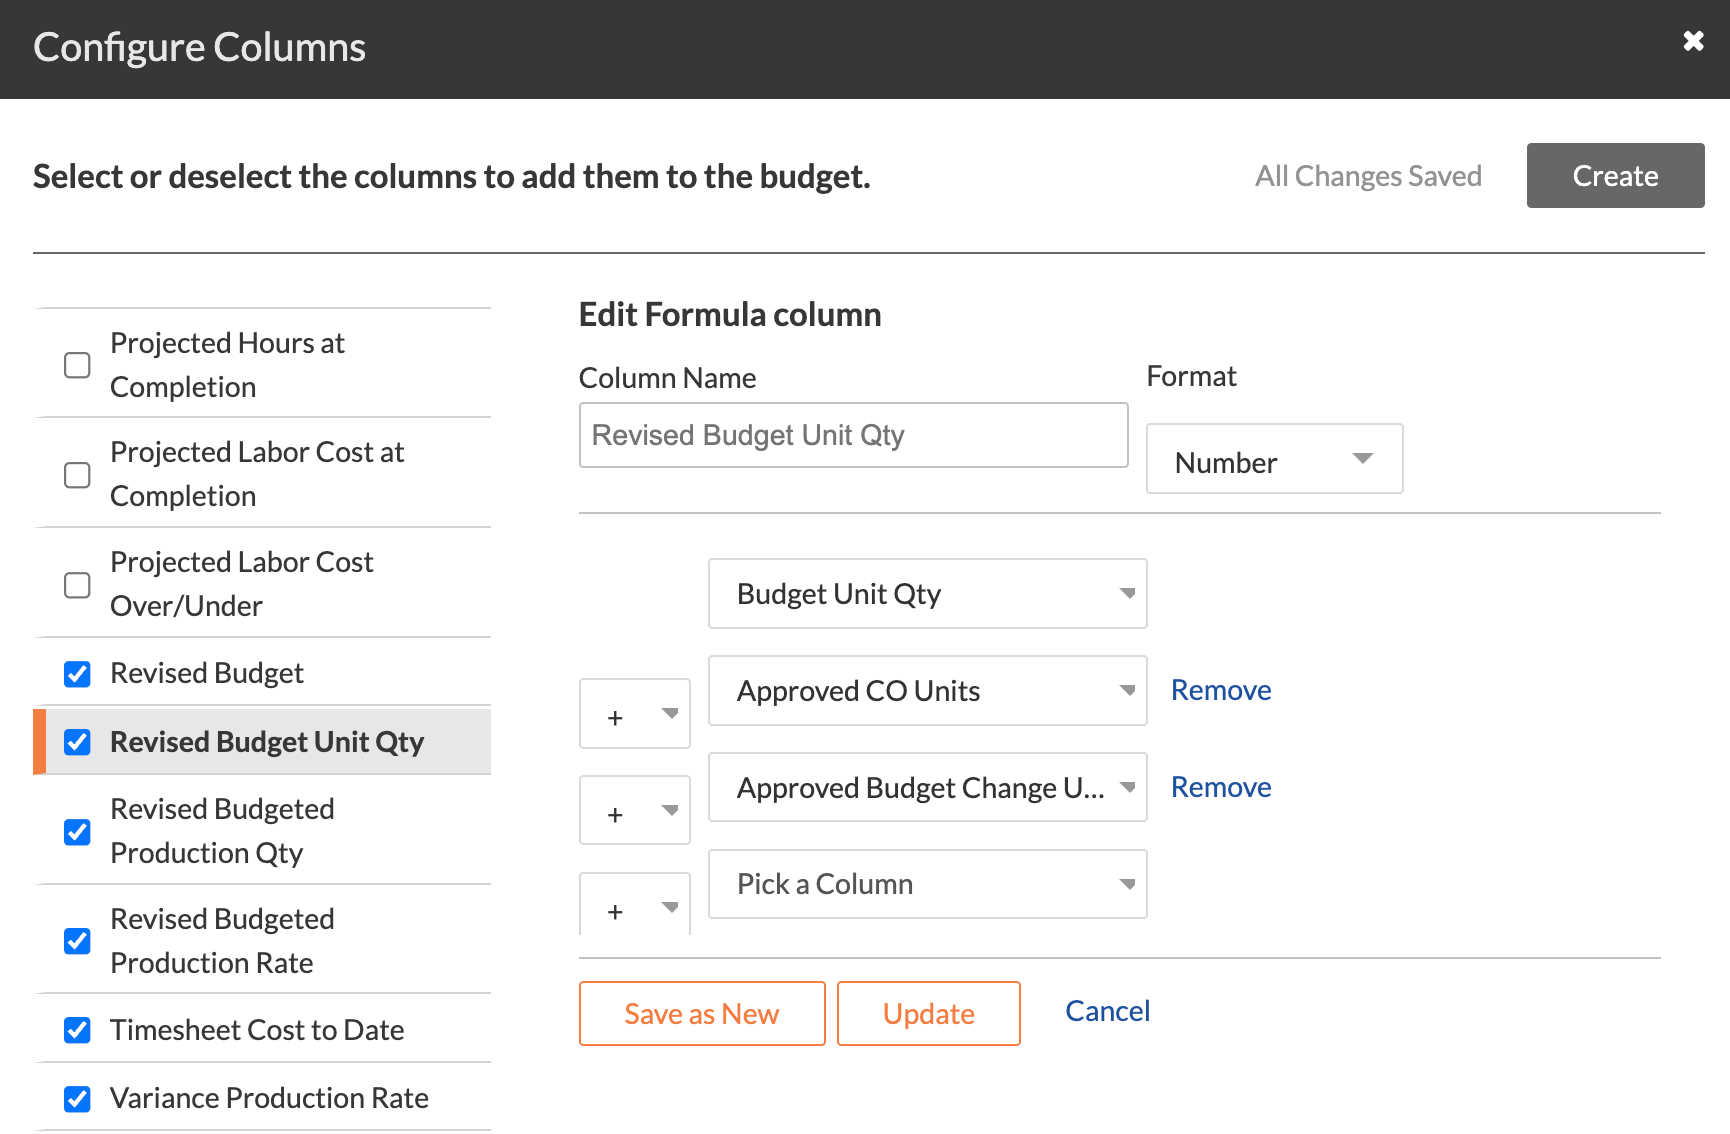
Quantité unitaire budgétée révisée
Note: Vous devez d’abord créer la colonne Quantité unitaire de changement budgétaire. Voir Quantité d’unités de modification budgétaire.
Procédure à partir de la fenêtre Configurer les colonnes...
Paramètres
Cliquez sur Créer et choisissez Calculé.
Sous « Nouvelle colonne de formule », procédez comme suit :
Nom de la colonne. Saisissez le nom : Quantité unitaire du budget révisée
Le format. Sélectionnez Numéro.
Sélectionnez ces paramètres de calcul comme indiqué dans les listes déroulantes :
Quantité unitaire budgétée
Signe plus (+)
Unités de CO approuvées
Signe plus (+)
Quantité d’unités de modification budgétaire approuvée
Optionnel: Si vous souhaitez afficher les sous-totaux et les totaux généraux dans cette colonne dans l’outil Budget au niveau projet, cochez la case Autoriser les sous-totaux et les totaux généraux .
Cliquez sur Créer.
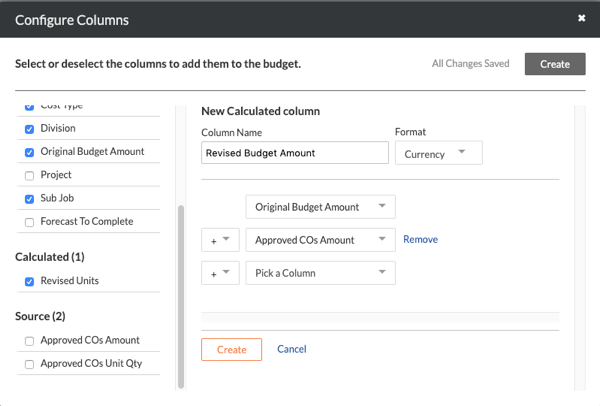
Montant du budget révisé
Procédure à partir de la fenêtre Configurer les colonnes...
Paramètres
Cliquez sur Créer et choisissez Calculé.
Sous « Nouvelle colonne de formule », procédez comme suit :
Nom de la colonne. Entrez le nom : Montant du budget révisé
Le format. Sélectionnez Devise.
Sélectionnez ces paramètres de calcul comme indiqué dans les listes déroulantes :
Montant du budget initial
Signe plus (+)
Montant des OC approuvés
Cliquez sur Créer.
Coût réel
Note
Pour les entreprises utilisant l’outil Intégrations ERP :
Sage 300 CRE® ne peut ajouter cette colonne que si l’outil Coûts directs est activé.
Pour les autres intégrations ERP (Vue®, Spectre® du point de vue® ou Sage 100 Sous-traitant®), la colonne Source ci-dessous doit être définie sur la colonne « Coûts ERP du projet à ce jour » (au lieu de « Coûts directs »).
Procédure à partir de la fenêtre Configurer les colonnes...
Paramètres
Cliquez sur Créer et choisissez Source.
Sous « Nouvelle colonne source », procédez comme suit :
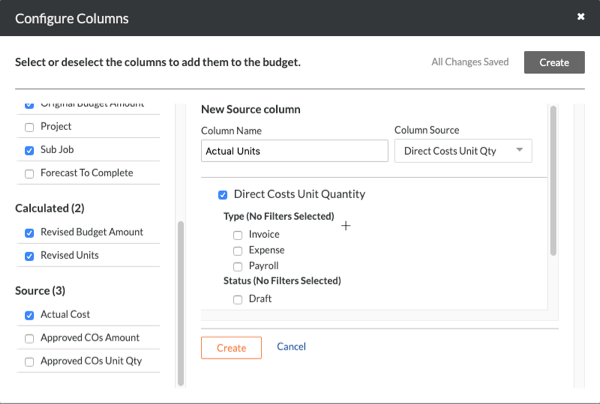
Procédure à partir de la fenêtre Configurer les colonnes...
Paramètres
Cliquez sur Créer et choisissez Source.
Sous « Nouvelle colonne source », procédez comme suit :
Nom de la colonne. Entrez le nom : Unités réelles
Source de la colonne. Sélectionnez Qté d’unités des coûts directs.
Cochez la case Qté d’unités des coûts directs .
Cliquez sur Créer.
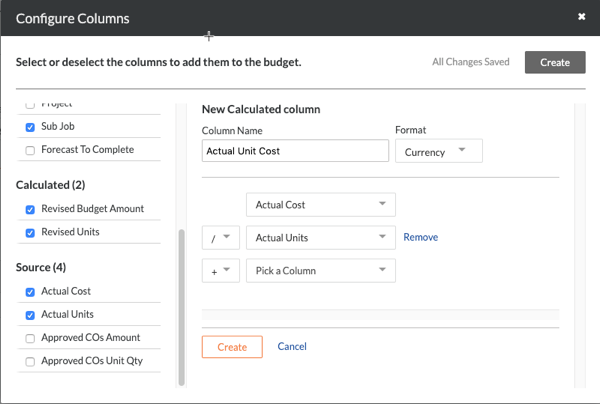
Coût unitaire réel
Procédure à partir de la fenêtre Configurer les colonnes...
Paramètres
Cliquez sur Créer et choisissez Calculé.
Sous « Nouvelle colonne de formule », procédez comme suit :
Nom de la colonne. Entrez le nom : Coût unitaire réel
Le format. Sélectionnez Devise.
Sélectionnez ces paramètres de calcul comme indiqué dans les listes déroulantes :
Coût réel
Signe de division (/)
Unités réelles
Cliquez sur Créer.
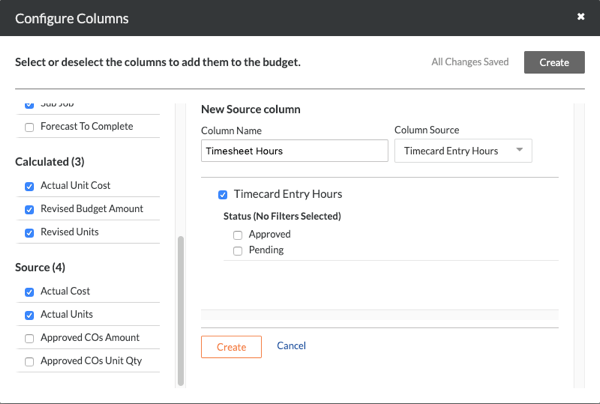
Heures de la feuille horaire
Lors de l’ajout d’une colonne source « Heures de la feuille horaire » à la vue du budget, il est recommandé d’inclure les entrées de pointage dans les statuts « Approuvé » et « En attente ». Toutefois, l’administrateur Procore de votre entreprise peut préférer utiliser un paramètre différent pour le compte de votre entreprise.
Lorsque vous appliquez un nouveau type de coût par défaut à vos pointages existants en cliquant sur le bouton Appliquer auxpointages existants dans l’outil Feuilles horaires, gardez à l’esprit qu’il s’agit d’une action ponctuelle et ne peut être annulée qu’en contactant votre Procore point of contact.
Procédure à partir de la fenêtre Configurer les colonnes...
Paramètres
Cliquez sur Créer et choisissez Source.
Sous « Nouvelle colonne source », procédez comme suit :
Nom de la colonne. Entrez le nom : Heures de la feuille horaire
Source de la colonne. Sélectionnez Heures d’entrée de pointage.
Cochez la case Heures d’entrée de pointage .
Pour refléter les heures d’entrée de pointage approuvées et en attente dans votre vue du budget, laissez les deux cases vides.
Cliquez sur Créer.
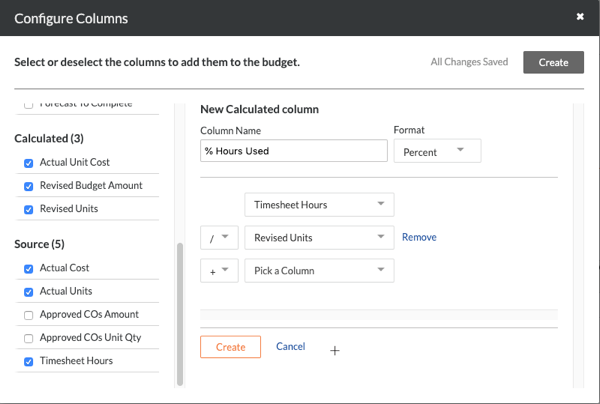
% d’heures utilisées
Procédure à partir de la fenêtre Configurer les colonnes...
Paramètres
Cliquez sur Créer et choisissez Calculé.
Sous « Nouvelle colonne de formule », procédez comme suit :
Nom de la colonne. Saisissez le nom : % d’heures utilisées
Le format. Sélectionnez Pourcentage.
Sélectionnez ces paramètres de calcul comme indiqué dans les listes déroulantes :
Heures de la feuille horaire
Signe de division (/)
Unités révisées
Cliquez sur Créer.
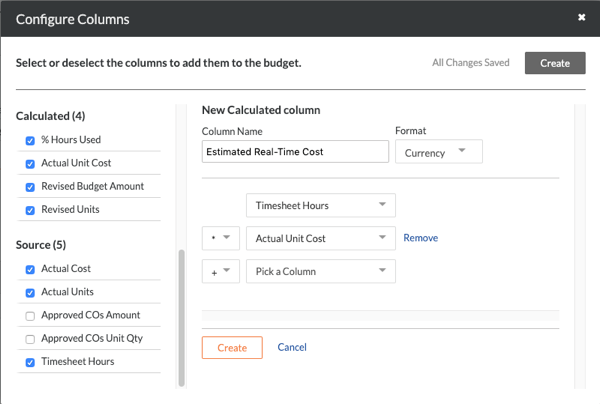
Estimation du coût en temps réel
Procédure à partir de la fenêtre Configurer les colonnes...
Paramètres
Cliquez sur Créer et choisissez Calculé.
Sous « Nouvelle colonne de formule », procédez comme suit :
Nom de la colonne. Entrez le nom : Coût en temps réel estimé
Sélectionnez ces paramètres de calcul comme indiqué dans les listes déroulantes :
Heures de la feuille horaire
Signe de multiplication (*)
Coût unitaire réel
Cliquez sur Créer.
Heures restantes
Note
Pour créer la colonne « Heures restantes », vous devez d’abord créer les colonnes« Unités révisées »et« Heures de la feuille horaire », comme décrit ci-dessus.
Procédure à partir de la fenêtre Configurer les colonnes...
Paramètres
Cliquez sur Créer et choisissez Calculé.
Sous « Nouvelle colonne de formule », procédez comme suit :
Nom de la colonne. Entrez le nom : Heures restantes
Le format. Sélectionnez Numéro.
Sélectionnez ces paramètres de calcul comme indiqué dans les listes déroulantes :
Unités révisées
Signe moins (-)
Heures de la feuille horaire
Cliquez sur Créer.
Masquer les colonnes vides inutilisées de la vue du budget
Si vous avez créé la vue du budget « Productivité de la main-d’œuvre en temps réel » à partir du modèle « Vue vierge de budget », vous pouvez masquer quelques colonnes de cette vue. Il s’agit d’une étape facultative.
Procédure à partir de la fenêtre Configurer les colonnes...
Paramètres
Sous Budget standard, la « Vue vierge de budget » est configurée pour afficher les colonnes suivantes par défaut :
Modifications budgétaires
Code de coût
Type de coût
Division
Montant du budget initial
Sous-projet
(Facultatif) Pour masquer ces colonnes, décochez ces cases.
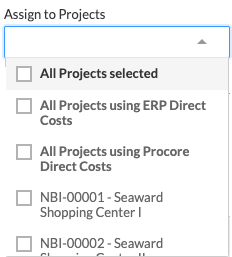
Assigner une vue du budget à un projet Procore
Navigate to the Company Admin tool.
Under Tool Settings, click Budget.
Under Budget Views, click the budget view that you want to add to one or more projects.
Place checkmarks next to boxes of your choice in the Assign to Projects list.
Repeat the steps above for each view that you want to add to your projects.