Ajouter un soumissionnaire et des approbateurs au flux de travail de livrable
Arrière-plan
Lors de la création ou de la modification d’un livrable, vous pouvez ajouter deux (2) types de personnes (alias 'rôles') à un flux de travail de livrable :
Lorsque vous utilisez Procore pour gérer le processus de livrables de votre projet, un soumissionnaire est un terme qui identifie la personne qui a fourni les informations contenues dans un livrable (par exemple, des plans, des documents, etc.) à l'entreprise générale, afin que l'équipe de conception puisse réviser et approuver le livrable. En règle générale, la personne désignée comme ayant le rôle de soumissionnaire pour un livrable est un contact qui travaille pour l'entrepreneur responsable (par exemple, un sous-traitant ou un conducteur de travaux).
Un approbateur est une personne désignée pour approuver un livrable avant que les travaux puissent commencer. En règle générale, un flux de travail de livrable inclut plusieurs approbateurs et membres de l'équipe de conception (par exemple, un architecte, un ingénieur de projet, un ingénieur en structure, etc.). Toutefois, votre flux de travail de livrable particulier peut comprendre d'autres approbateurs.
Éléments à prendre en compte
Autorisations utilisateur requises :
Pour ajouter des utilisateurs au flux de travail du livrable pour un livrable que vous avez créé :
Autorisations de niveau « Lecture seule » ou « Standard » dans l’outil Livrables du projet avec l’autorisation granulaire « Créer un livrable » activée sur votre modèle d’autorisation.
OUDes autorisations de niveau « Standard » dans l’outil Livrables du projet sans qu’un modèle d’autorisation ne vous soit attribué.
Note: Si vous n’avez pas d’autorisations de niveau « Admin » dans l’outil Livrables du projet, vous ne pouvez ajouter au flux de travail du livrable que des utilisateurs disposant d’autorisations de niveau « Admin » dans l’outil Livrables du projet.
Pour ajouter des utilisateurs au flux de travail du livrable pour un livrable que vous n’avez pas créé : Autorisations de niveau « Standard » dans l’outil Livrables du projet et être désigné comme gestionnaire des livrables.
Pour ajouter des utilisateurs au flux de travail du livrable pour n’importe quel livrable : Autorisations de niveau « Admin » dans l’outil Livrables du projet.
Note: Avec des autorisations de niveau « Admin » dans l’outil Livrables du projet, vous pouvez ajouter au flux de travail du livrable tous les utilisateurs disposant d’autorisations de niveau « Standard » ou supérieures dans l’outil Livrables du projet.
Informations complémentaires :
Si votre entreprise prévoit d’ajouter un soumissionnaire d’une autre entreprise au livrable, nous vous recommandons de toujours désigner un gestionnaire des livrables en tant que premier approbateur dans le flux de travail d’approbation séquentielle du livrable. Le Gestionnaire des livrables pourra ainsi veiller à ce que le livrable soit pleinement revu par votre équipe interne avant d’être envoyé aux approbateurs suivants (c’est-à-dire l’équipe de conception) dans le flux de travail du livrable.
Escalier
Appliquer un modèle de flux de travail de livrable à un livrable
Ajouter des utilisateurs au flux de travail de livrable
Appliquer un modèle de flux de travail de livrable à un livrable
A user with 'Admin' level permission to your project's Submittals tool can create one (1) or more submittal workflow templates which you can then to a new submittal when you first create it. This saves data-entry time by preventing you from having to add a new submittal workflow each time you create a submittal.
Under Submittal Workflow, do the following:
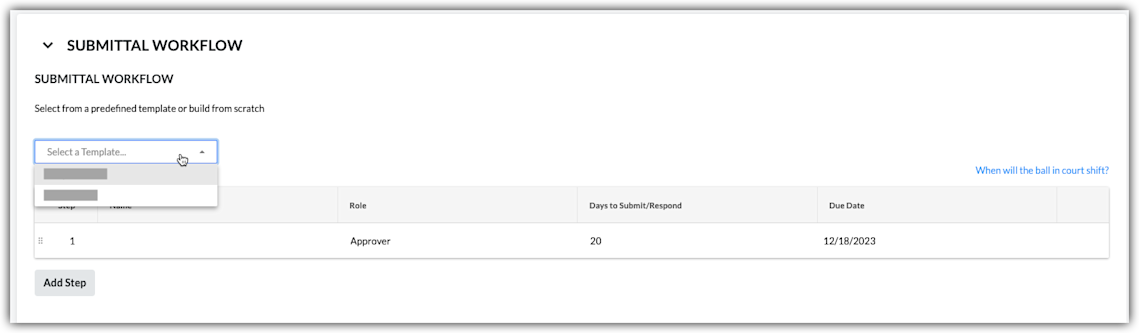
Select a Template. Select a workflow template from the drop-down list.
Notes:This drop-down list is only visible and available to users with 'Admin' level permission on the Submittals tool.
This action applies the person(s) named on the submittal workflow template to your submittal.
To learn how submittal workflow templates are created, see Manage Submittal Workflow Templates.
Continue by modifying the Name, Role, and Days to Submit/Response fields as needed for the submittal. Your changes only affect the workflow on the submittal, your changes do NOT affect the submittal workflow template.
(Optional) Continue with the steps in Add Users to the Submittal Workflow.
Ajouter des utilisateurs au flux de travail de livrable
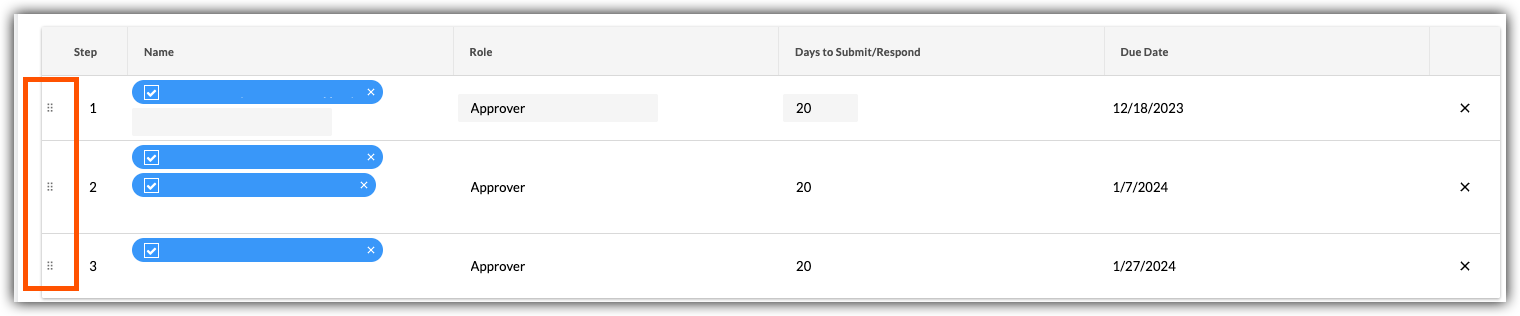
Under Submittal Workflow, do the following for each desired line item in the submittal:
Name. Start typing a project user's name in the Search box. Then select the appropriate user from the list.
If you want to require a response from the user, place a mark in the checkbox next to their name.
If you do NOT want to require a response from the user, remove the mark from the checkbox. Note: If you are adding more than one user to a parallel approval workflow group, the Ball In Court Responsibility will shift to the next workflow group after all of the people marked required in the group submit a response to the submittal.
Role. Select Approver or Submitter from the list. See What is the difference between a submitter and approver in submittals?
Notes:
To be designated as an approver, the person must exist in the Project level Directory tool (see Add a User Account to the Project Directory) and must also be granted 'Admin' or 'Standard' level permissions to the Submittals tool (see Set User Permissions for the Submittals Tool).
If you are a user with 'Standard' level permissions to the Submittals tool, you can only add users with 'Admin' level permissions to the workflow.
If you plan to add a Submitter to the submittal, we recommend that you designate a Submittal Manager as the first approver in the submittal's sequential approval workflow. This gives the Submittal Manager an opportunity to ensure the submittal is thoroughly reviewed by your internal stakeholder before it is sent to the users in the next step on the submittal workflow.
If you are a user with 'Admin' level permissions to the Submittals tool, you can add users with either 'Admin' or 'Standard' level permissions to the workflow. Note: If you want the submittal workflow to use sequential approval, add only one user to each line item in the workflow. If you want a step in the submittal workflow to use parallel approval, add two or more users to a line item.
Due Date. Select a date from the calendar for the submittal response to be due. Note: The 'Due Date' field is automatically populated based on the default number of days specified on the Submittals tool's Configure Settings page. See Configure Settings: Submittals Tool. The due date also respects which days are set as 'working days' for the project. See Set Project Working Days.
Click Add Step.
Repeat these steps to add another user to the workflow.
If you want to change the order of the workflow steps, do the following:
Grab the line item by the vertical grip (⋮⋮).
Use a drag-and-drop operation to move the line item into the desired order.

See Also
Loading related articles...