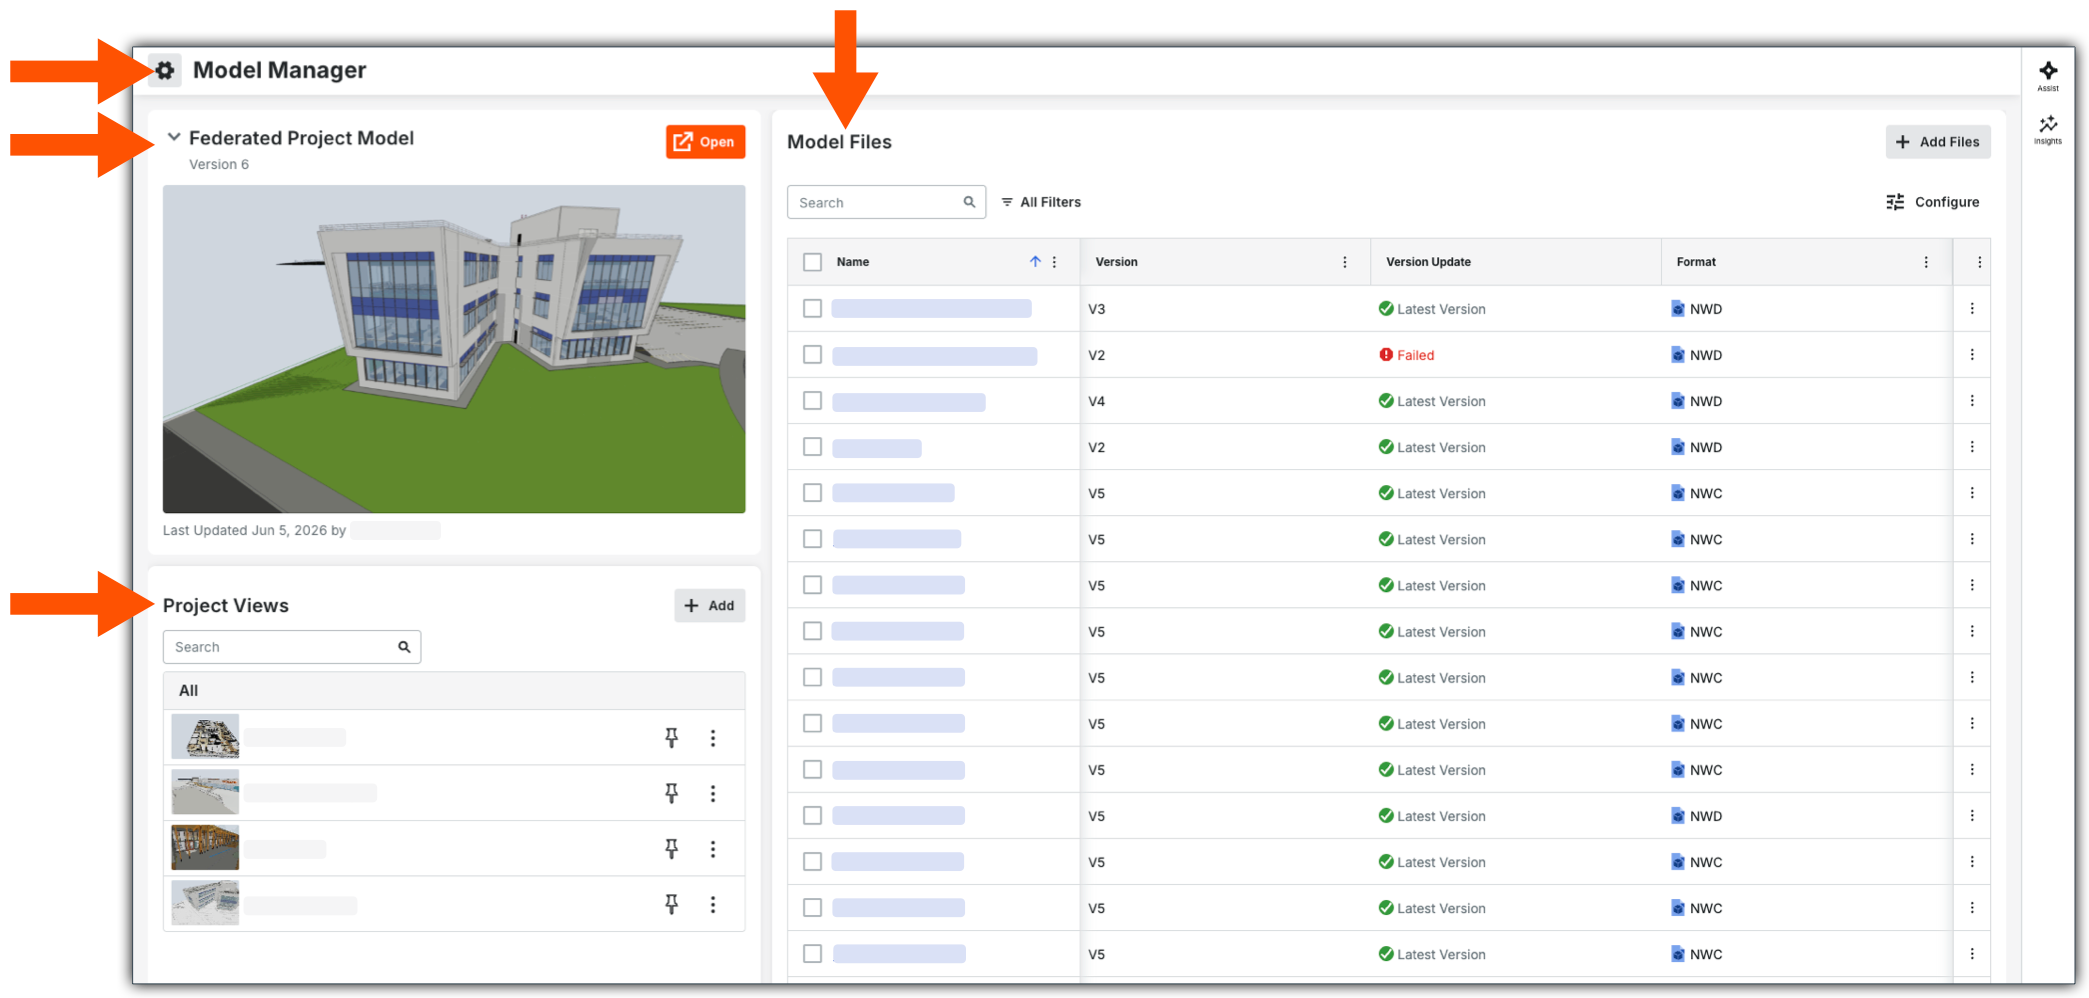
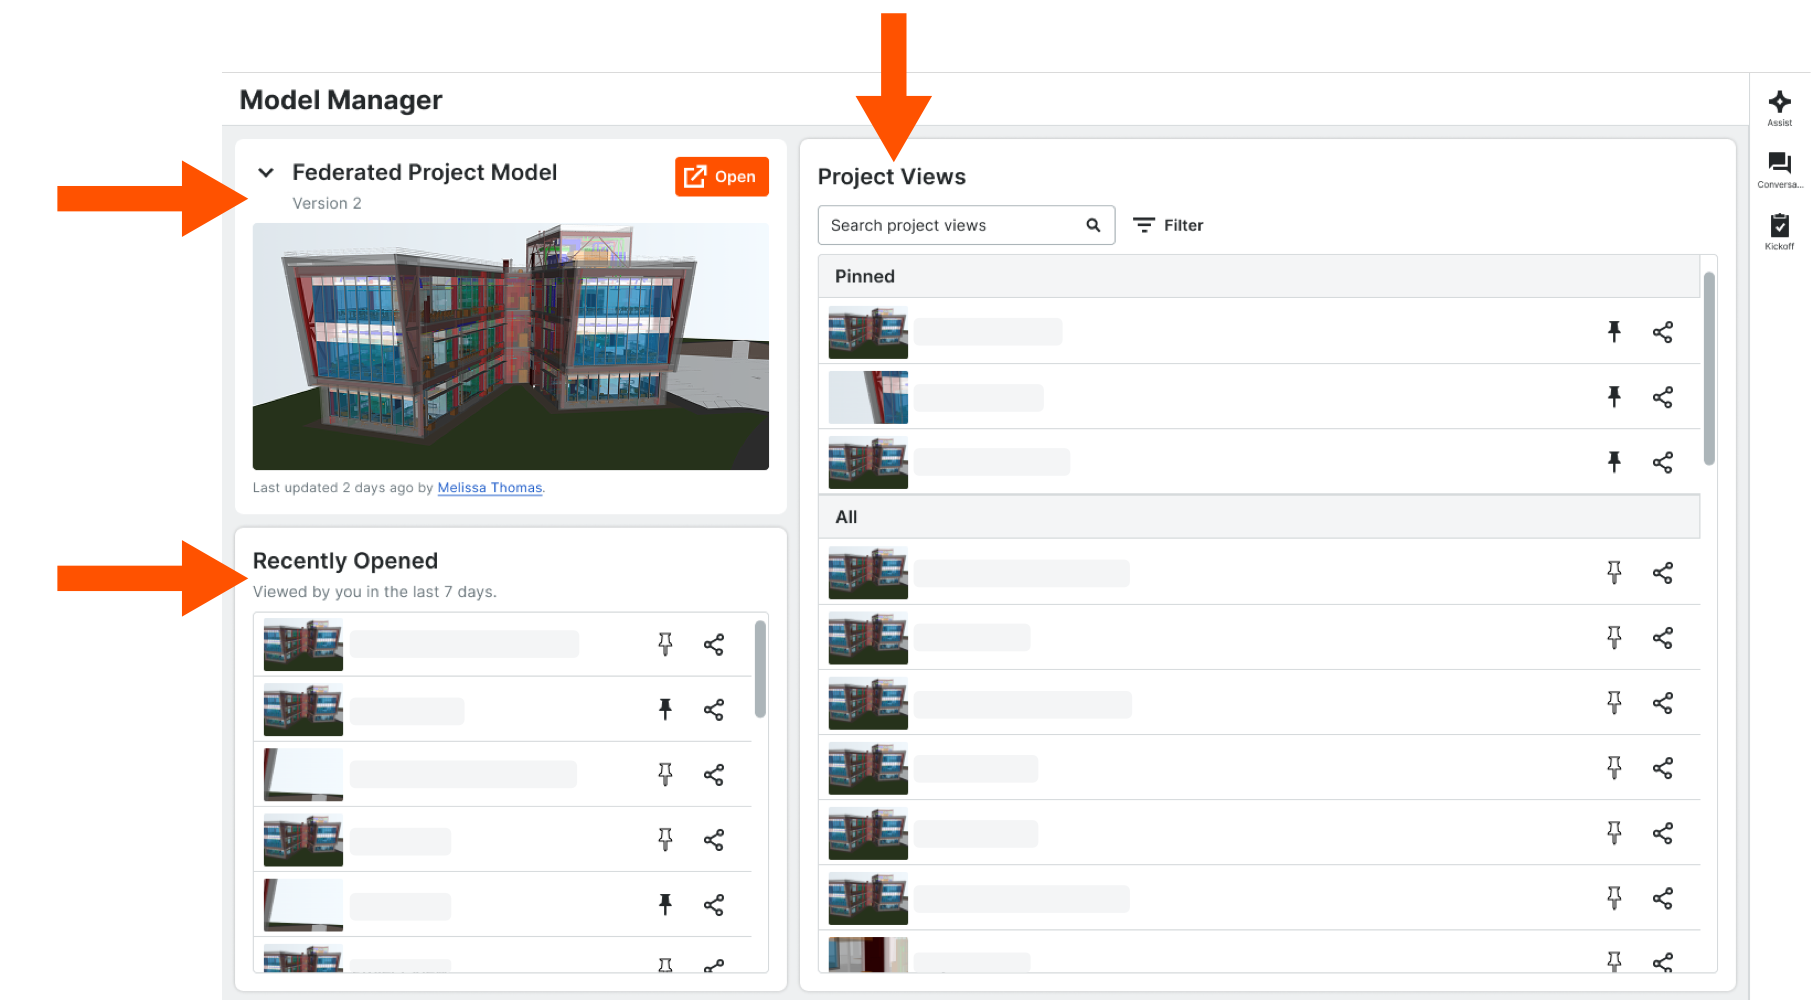
Navigate the Model Manager Landing Page

Procore Model Manager - Beta Access & Feedback

The Model Manager (Beta) features and documentation are subject to change without notice.

  • To learn about the beta program, see the Beta Participant Guide.

  • To access the beta and provide feedback Show/Hide Details

    • How to Access: Participating companies must sign the Procore Beta Agreement. Once signed, your Procore Administrator coordinates with your Procore point of contact to enable Model Manager (Beta) on specific Procore projects.

    • How to Provide Feedback During Beta: Contact your dedicated Beta program lead.

    • How to report critical issues: Report breaking changes to Procore Customer Support. For general feedback or non-critical issues, contact your Beta program lead or Procore point of contact.


Currently, only Admin permissions are available. Procore will add more permission levels later.

The Model Manager (Beta) landing page serves as the central hub for managing your project's Building Information Modeling (BIM) data within Procore. It provides a unified view of the federated project model, individual file versions, and saved project views to streamline communication and coordination.

Things to Consider

Tailored Roles & Views

To ensure a tailored experience, the landing page will offer two distinct views: one for Admins and one for non-Admin users.

About the Admin View

From the Admin view of the landing page, you can click the Gear Icon Settings Gear Grey3 icon to Configure Model Manager Settings. You also have three (3) primary cards: Federated Project Model, Model Files, and Project Views.

This image shows the default Admin view of the Model Manager landing page with pointers to the Configure Settings page and these cards: Federated Project Model, Model Files, and Project views

To learn about the different cards:

  • Federated Project Model (Admin) Show/Hide Details

    Federated Project Model

    The Federated Project Model card serves as your primary gateway to the 3D environment. This model aggregates the 3D discipline files into a single, cohesive view, allowing for comprehensive project coordination. The card provides a high-level snapshot of the model's current status:

    • 3D Environment Access: Click Open to launch the federated project model in the viewer. See Open the Federated Project Model.

    • Visual Preview: Displays a thumbnail of the designated Home viewpoint.

    • Version Control: Shows the latest version of the federated model.

    • Check back for updates

      Metadata: Tracks the date of the most recent change and the user who performed the update.

    The Federated Project Model card in the Model Manager shows the latest federated model, including its version number, a thumbnail preview of the Home viewpoint, and the date and author of the last update. Click the Open button to launch the model in the Web Viewer.
    Learning Resources

  • Model Files (Admin) Show/Hide Details

    Manage your federated project model through the Model Files card. From here, you can add, search for, and open discipline files. You can also filter your view, customize table settings, update versions, and remove files as needed.

    Note

    The columns that appear in the Model Files table depend on the Procore project's chosen document repository: Document Management or Documents.

    The Model Files card in the Model Manager provides access to trade-specific files that make up the federated Project Model. From here, users can add files, manage revisions, set auto-updates while tracking version status, and toggle file privacy between private and shared.
    Learning Resources
    • Setup:

    • Navigate & Find:

      • Early access content

        Search for files in the federated project model Show / Hide Steps

        1. Navigate to the project's Model Manager (Beta) tool.

        2. In the Model Files card, start typing in the Search box.
          This image shows a search for matching files in the Model Files card in the Admin View of the Model Manager landing page.

        Procore filters the table to show only items matching your entry.

      • Early access content

        View file information Show / Hide Steps

        1. Navigate to the project's Model Manager (Beta) tool.

        2. In the Model Files card, view the federated model's list of files.
          This image shows the columns that display be default in the Model Files card that is available in the Admin View of the Model Manager Landing Page.

        The table's data columns are based on the document repository (Document Management or Documents).

      • Early access content

        Apply filters to the Model Files card Show / Hide Steps

        1. Navigate to the project's Model Manager (Beta) tool.

        2. In the Model Files card, click Filters.
          This image shows the Filters icon in the Model Files card, which is located in the Admin View of the Model Files card in the Model Manager landing page.

        3. In the Filters panel, choose from these options:

          • Version. Select one (1) version from the list.

          • Format. Select a file type from the list.

            For a list of supported file types Show/Hide Details

            The Model Manager (Beta) automates the processing of these file formats in the document repository. All supported file formats must be from a supported version of Autodesk® software to ensure successful processing.

            • Automated File Processing: The following 3D formats are supported.

              • Industry Foundation Classes (IFC)

              • AutoCAD® Drawing (DWG)

              • Navisworks® Document (NWD)

              • Revit® (RVT)

            • Manual File Support: The following 2D formats are supported:

              • Portable Document Format (PDF)

              • AutoCAD® Drawing (DWG)

            • Storage & Federation: Once processed, your Federated Project Model is unified and stored in a proprietary Procore format for optimized viewing and cross-team coordination.

          • Revision. Select one (1) revision from the list.
            A Blue bubble shows any active filters. Click Close (X) to remove filters.
            This image shows an open Filters panel with an arrow showing users how to select a filter to apply to a data table.

        4. Click Close (X) to quit the Filters panel.

        Note

        The Model Files card will now display your filtered results, and the button label will update to More Filters. To remove a filter, click Clear (X) on the blue filter above the table.

    • Management:

  • Project Views (Admin) Show/Hide Details

    Project Views

    Admins use this card to add, open, manage, search for, and filter saved project views. Hover your mouse cursor over the thumbnails to blow up the thumbnail. Click the Pin icon to create a Pinned Items list for faster navigation to critical project areas, such as specific floor levels or structural systems.

    The card provides a high-level snapshot of the model's current status:

    • 3D Environment Access: Click a project view in the list to open it.

    • Search: Enter a keyword or phrase to find a project view.

    • Visual Preview: Displays a thumbnail of the project view.

    • Pinning. Add project views to your Pinned list.

    This image shows the Project Views card in the Admin view of Model Manager Dashboard
    Learning Resources
    • Setup:

    • Navigation:

    • Collaboration

      • Check back for updates

        Share a project view Show / Hide Steps

        Check Back for Updates

        While intended for General Availability (GA), this feature's final release, functionality, and timing remain subject to change prior to commercial launch.

        Use these steps to share a project view.

        1. Navigate to the project's Model Manager (Beta) tool.

        2. In the Project Views card, find the view to share.

        3. Choose an option:

          • Click the Share icon.

          • Click More (:) and choose the Share menu option.

About the Non-Admin View

Check back for updates

Non-Admin View Show/Hide Details

Check Back for Updates

While intended for General Availability (GA), this feature's final release, functionality, and timing remain subject to change prior to commercial launch.