Add Viewpoints to Project Views

Procore Model Manager - Beta Access & Feedback

The Model Manager (Beta) features and documentation are subject to change without notice. (Note: At the launch of the Beta, only 'Admin' level permissions are available. Additional permissions will be phased in during the product lifecycle).

To access the beta and provide feedback Show/Hide Details

  • How to Access: Participating companies must sign the Procore Beta Agreement. Once signed, your Procore Administrator coordinates with your Procore point of contact to enable Model Manager (Beta) on specific Procore projects.

  • How to Provide Feedback During Beta: Contact your dedicated Beta program lead.

  • How to report critical issues: Report breaking changes to Procore Customer Support. For general feedback or non-critical issues, contact your Beta program lead or Procore point of contact.

In the Next-Gen Viewer, project views allow tool Admins to organize and save specific perspectives of a 3D model, making it easier for your team to navigate to critical areas quickly. By managing viewpoints within these views, you ensure that collaborators always have access to the most relevant visual data without needing to manually recreate complex camera angles or section cuts.

Tip

What's the difference between a viewpoint and a project view? In Procore, a viewpoint acts as a spatial bookmark for a specific camera angle. While you can create these in Autodesk® and import them with your file uploads, a project view offers more control. It combines the viewpoint (where to look) with specific data filters and layer settings (what to see), ensuring field teams always have the visual clarity they need.

Things to Consider

  • Required User Permissions (Note: At the launch of the Beta, only 'Admin' level permissions are available. Additional permissions will be phased in during the product lifecycle).

Steps

Use these steps to create new viewpoints and add existing viewpoints to project views.

  1. Navigate to the Model Manager (Beta) tool.

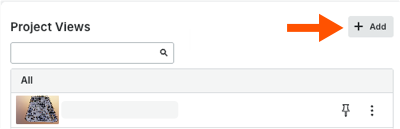
  2. In the Project Views card, click Add.
    This image shows the Add button in the Project Views card of the Model Manager tool, which is only available to tool Admins.

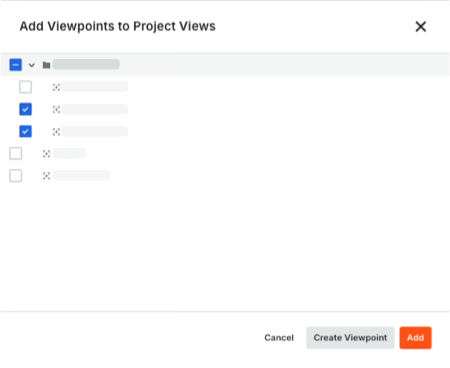
  3. In the Add Viewpoints to Project Views window, you have these options:

    1. Create a new viewpoint. Click the Create Viewpoint to open the federated project model in the document viewer with the Viewpoints window active.

    2. Add an existing viewpoint. Mark one or more checkboxes for the viewpoints to add and click Add. A green success banner notifies you when successfully added to the Project Views card.
      This image shows the Add Viewpoints to Project Views window with two viewpoints selected and the Create Viewpoint and Add buttons active.

  4. Additional options for managing viewpoints:

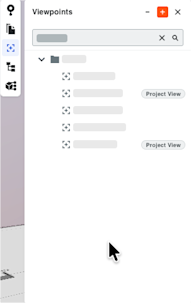
    1. Search Viewpoints. Start typing the name of a existing viewpoint in the Search Viewpoints box. If an existing project view exists, the Project View pill appears by the viewpoint in the list.

    2. Show/Hide Viewpoints. Click the Minus (-) icon to hide the viewpoints in the list. Click it again to show the viewpoints in the list.

    3. Create Viewpoint. Click the Plus (+) icon and choose Create Viewpoint.

    4. Create Folder. Click the Plus (+) icon and choose Create Folder.
      This image shows the Viewpoints window in the Model Manager tool's viewer.

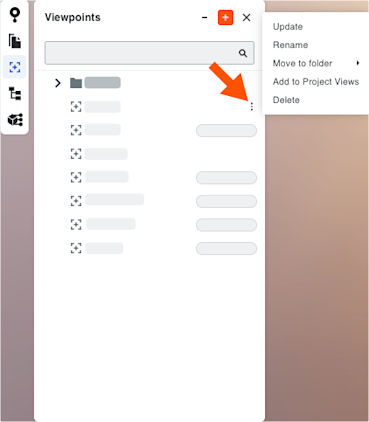
    5. More (⋮). Click the More (⋮) and choose an option:

      • Update. Update an existing viewpoint.

      • Rename. Type a new name for the viewpoint.

      • Move to Folder. Move the selected viewpoint to the folder you want.

      • Add to Project Views/Remove from Project Views. Add the selected viewpoint to a project view or remove an existing project view from the list.

      • Delete. Permanently remove the selected project view.
        This image shows the More (⋮) menu in the Viewpoints window of the Model Manager viewer.

  5. When finished, click Close. Procore saves your change automatically in the Project Views card.