Modify a Schedule
The intuitive editing features in Procore Scheduling allows you to graphically manipulate the Gantt chart to adjust durations and link task dependencies via drag-and-drop, complemented by direct cell editing and bulk options for quick data modifications.
Add a Task Show /Hide Steps
To add a new task, follow the steps:
Select an existing task where you want to add a new one and click Add new task.
OR
Select the task you wish to use as a reference point and press Cmd+Return (Mac) or Ctrl+Enter (Windows) to add a new task below your selected task.Right-click on an existing task row in the grid and select Add Task Above, Add Task Below, or Add Sub-task.
Edit a Task Show /Hide Steps
You can modify task details in several ways:
Click directly into any cell within a task row (e.g., the 'Name' column, 'Start' date, 'Duration', 'Calendar', 'Constraints') and type your desired changes.
Press Enter or click outside the cell to save the change.
Within the screen, edit predecessors and successors, select the desired link type (Finish to Start, Start to Start, etc., and add leads and lags.
Save your changes.
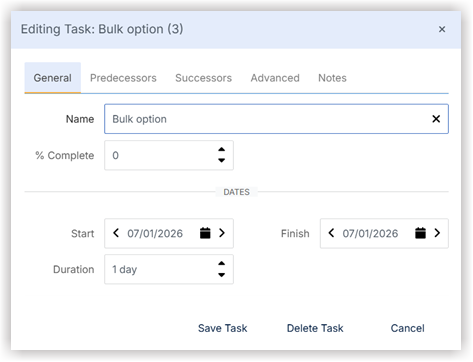
Select cancel to undo the changes you made. Make your changes and click Save Task.
For General tab, the following are the editable fields.
Task Name
% Complete
Start/Finish Dates
Duration
Status
Resources
Predecessors/Successors
Similarly for Advanced, Predecessors and Successors, you can enter required details and edit them and save the changes.
Use the Task Edit Menu Show /Hide Steps
There are two options to open the Editing Task menu:
Right-click on a ask row in the grill and select Edit Task.
OR
Double-click on a task's colored bar or the diamond shape in the Gantt chart area.
Enter the details for the section you desire to edit.
Click Save.

Graphical Gantt Chart Editing Show /Hide Steps
To change an activity's duration, drag the Finish edge of the Gantt bar outward or inward.
When manually moving an activity or dragging an edge, hold the Control key (on PC) or the Command key (on Mac) while dragging to pin the successors, preventing downstream work from automatically moving forward according to scheduling logic.
Pick up the activity bar and move it to manually schedule it to a different date. When you do this, the system automatically inserts a "start now earlier" constraint on that activity.
To connect activities, drag and drop arrows between the Gantt bars. The sequence of the drag determines the dependency type (e.g., dragging from the finish of the predecessor to the start of the successor creates a Finish to Start link).
Update the activity progress (percent complete) either by dragging the front edge of the Gantt bar or by entering a numerical value in the activity modal.
Note
There are four types of dependencies you can create:
Start to Start
Start to Finish
Finish to Start
Finish to Finish
The order in which you select your endpoints affects the appearance of your dependencies.

Delete a Task Show /Hide Steps
Select the task by clicking on the task row you wish to delete.
Right-click on the selected task(s) and from the context menu, select Delete Task(s).
Click Delete to proceed.
Bulk Edit Options Show /Hide Steps
Click on a task row and then hold down the Ctrl (Cmd on Mac) key as you click each task you would like to edit.
The rows you select will be highlighted.
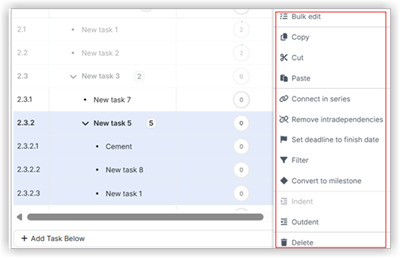
Release the Ctrl key, then right-click to open a menu of options.
Click Bulk Edit.
Enter the desired new value into the cell.
Click enter to apply the change to all selected activities.

Copy, Cut, and Paste Show /Hide Steps
To copy, cut or paste an activity, right click on the task to see the menu for these functionalities.
Remove Intradependencies Show /Hide Steps
Click on a task row and then hold down the Ctrl (Cmd on Mac) key as you click each task you would like to remove intradependencies from.
The rows you selected will be highlighted.
Release the Ctrl key, then right click to open the a menu of options.
Click Remove interdependencies.
Manage Deadlines Show /Hide Steps
Select a single activity or a group of activities. Right-click the selection and choose Set deadline to finish date.
Small flags will appear next to each activity, marking the original finish date. The original dates are logged in the Deadlines column.
Ensure the Deadline Variance column is visible. This column displays the variance between the current finish date and the locked deadline date.
Use the filter feature on the Deadline Variance column (e.g., filter for values greater than zero) to quickly show activities that are currently slipping (late).
Click the deadline value in the Deadlines column and input a new date to change the deadline.
Click X next to the deadline value in the Deadlines column to remove it.
Select Multiple Activities for Group Activities Show /Hide Steps
In scheduling, non-contiguous activity rows refer to the ability to select multiple activity rows that are not adjacent to each other for group actions. This functionality is useful for performing bulk operations on selected activities, such as editing, copying, or deleting them, saving time.
Select non-contiguous rows by holding down the Ctrl (Cmd on Mac) key while clicking on the desired rows.
Click once on the row of the very first activity you want to include in your selection.
Press and hold down the Shift key on your keyboard.
While holding Shift, click once on the row of the last activity in the block you wish to select.
All activity rows from your first click to your last click (inclusive) will be highlighted.
Adjust Activity and Hierarchy Orders Show /Hide Steps
This procedure outlines how to organize your schedule by creating a hierarchy and reordering activities. Changing activity hierarchy (Indent/Outdent) establishes parent-child relationships, allowing activities to roll up under main tasks.
Right-click on the activity row that you want to indent or outdent. The selected activity will move one level to the right, becoming a sub-activity of the activity directly above it.
Repeat the step to outdent an activity.
