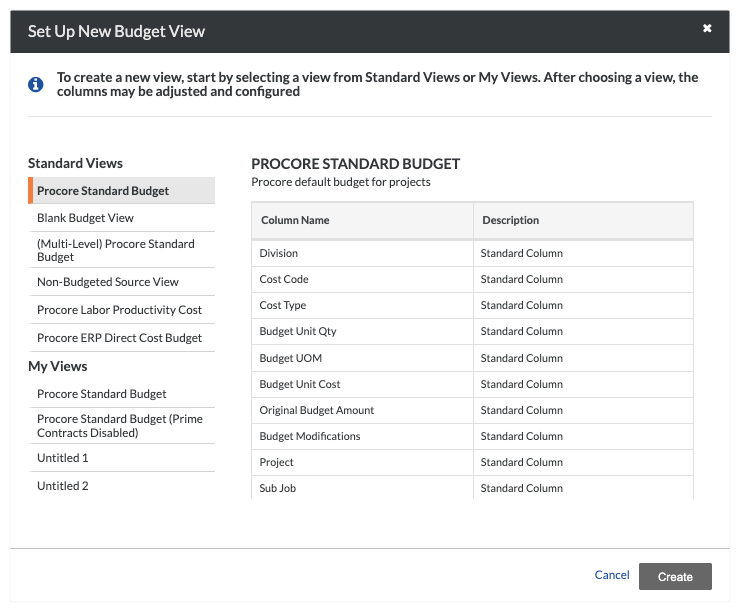
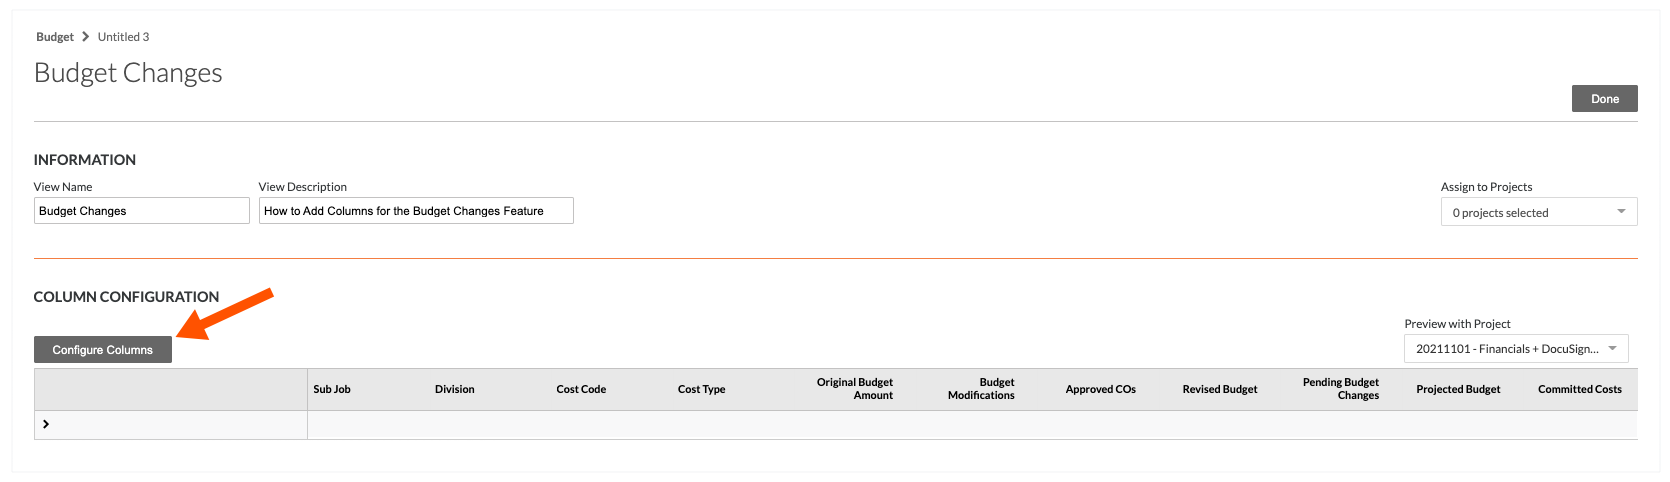
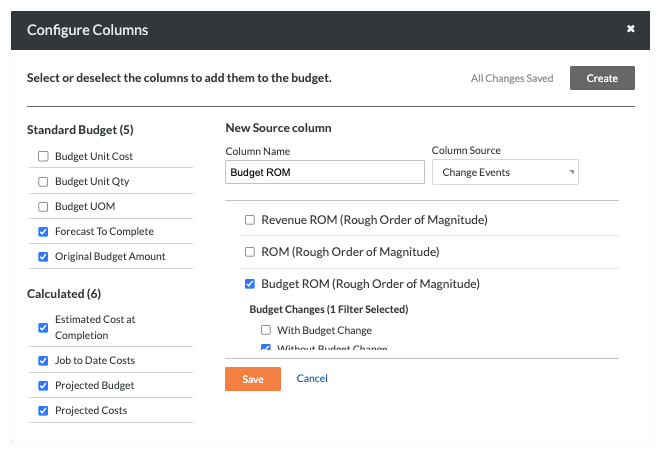
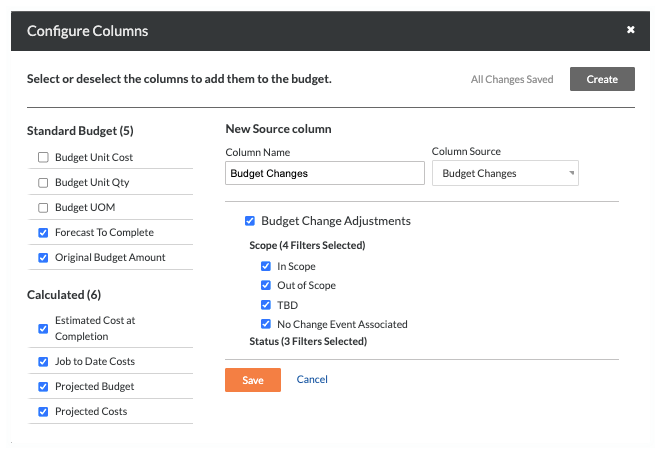
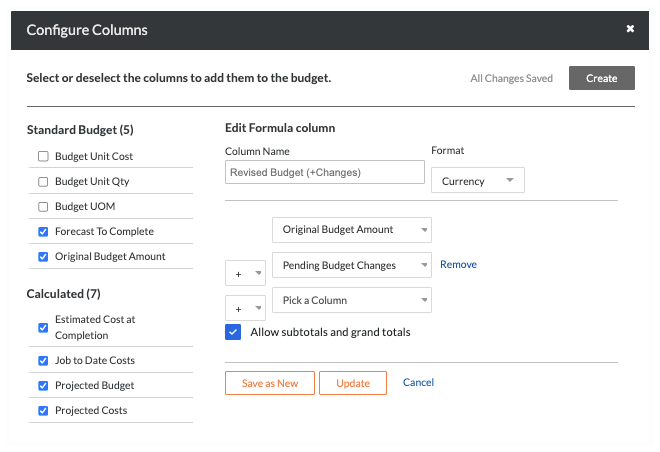
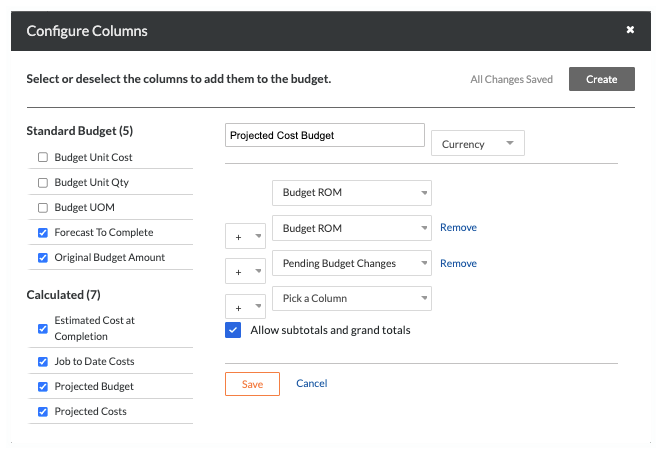
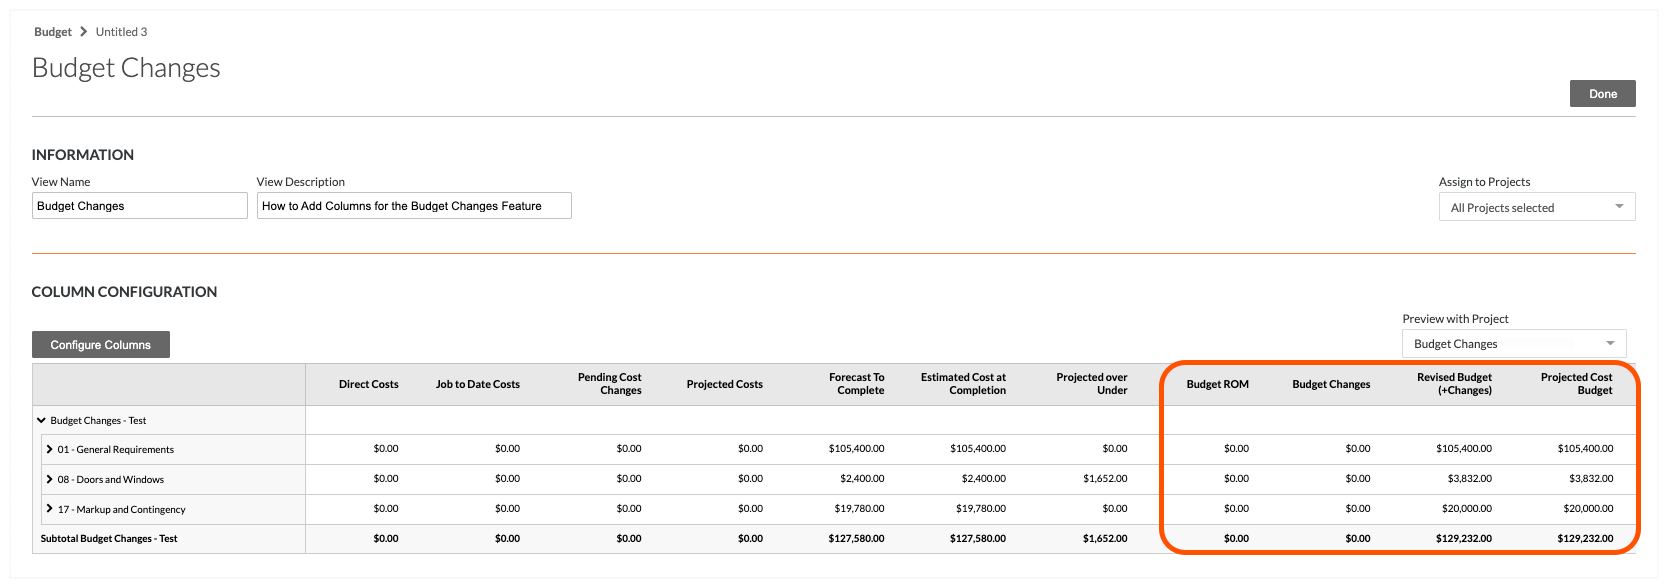
Ajouter les colonnes de la fonctionnalité « Modifications budgétaires » à une vue du budget

 Phased Release

The new Budget Changes feature is designed to replace the existing budget modifications feature. Once you migrate to Budget Changes, you will no longer have access to the budget modifications feature. If you have any questions before your company starts the migration, contact your Procore point of contact. To learn more about the timeline for migration, see: Common Questions.

Arrière-plan

La fonctionnalité « Modifications budgétaires » de Procore offre aux chefs de projet un meilleur contrôle et une meilleure compréhension des changements qui ont un impact sur votre budget. Qu’il s’agisse d’une augmentation, d’une diminution ou d’un changement budgétaire net nul (0), cette fonctionnalité élimine le besoin de créer un poste budgétaire distinct dans Procore. Il vous permet également de refléter le coût et les revenus réels de votre changement dans le budget d’un projet.

Éléments à prendre en compte

  • Autorisations utilisateur requises :

    • Autorisations de niveau « Admin » dans l’outil Admin au niveau entreprise.

  • Informations complémentaires :

Conditions préalables

Escalier

  • Étape 1 : ajouter ou modifier une vue du budget

  • Étape 2 : ajouter les colonnes source pour la fonctionnalité de modifications budgétaires

  • Étape 3 : modifier les colonnes calculées pour la fonctionnalité Modifications budgétaires

  • Étape 4 : prévisualiser la vue du budget

  • Étape 5 : Assigner la vue du budget à vos projets

Étape 1 : ajouter ou modifier une vue du budget

When adding the columns detailed in this article, you have these choices:

After choosing the preferred option for your budget view, add all of the recommended columns using the steps detailed below.

Example

For the next steps, we created a new budget view based on the Procore Standard Budget view, which is at the top of the list under 'Standard Views'.

create-procore-standard-budget.png

We also named our new view 'Budget Changes'. However, you can name your budget view as you want. When you are ready to continue, click the Configure Columns button. Then proceed by adding the recommended source and calculated columns.

configure-columns-budget-changes.png

Étape 2 : ajouter les colonnes source pour la fonctionnalité de modifications budgétaires

Vous commencerez par ajouter les colonnes source recommandées comme suit :

  • Ajouter la colonne source « ODG approximatif du budget ».

  • Ajouter la colonne source « Modifications budgétaires ».

Ajouter la colonne source « ODG approximatif du budget ».

Dans la fenêtre « Configurer les colonnes », suivez ces étapes pour ajouter une nouvelle colonne source nommée « ODG approximatif du budget ». Cette colonne permet à votre équipe de prévoir l’impact potentiel qu’un changement pourrait avoir sur votre budget. En fonction des paramètres de l’ODG approximatif du budget dans la page Configurer les paramètres de l’outil Événements de changement, vous pouvez configurer cette colonne pour refléter la valeur de l’ordre de grandeur approximatif de votre budget en tant que coût ou revenu. Pour en savoir plus, voir Configurer les paramètres : événements de changement et Qu’est-ce que la colonne « ODG approximatif du budget » dans l’outil Budget de Procore ?

Steps from the Configure Columns window in the Company Admin tool…

Settings

  1. Choose one of these options:

    • Click Create Source Column in the center of the window.
      OR

    • Click the Create button and choose Source from the drop-down list.

  2. In the Column Name field, type: Budget ROM

  3. From the Column Source drop-down list, select Change Events.

  4. Mark the Budget ROM (Rough Order of Magnitude) checkbox.

     Note

    In the following steps, the Procore-recommended settings for the checkboxes to select are marked with an asterisk (*). However, you can tailor your settings to suit your environment.

  5. Under Budget Changes, mark the desired checkboxes:

    • With Budget Change
      This option includes budget change amounts in the 'Budget ROM' column.

    • Without Budget Change *
      This option excludes budget change amounts from the 'Budget ROM' column.

  6. Under Scope, mark all of the desired checkboxes:

    • In Scope *

    • Out of Scope *

    • TBD *

    • No Scope Associated *

  7. Under Change Event Status, mark all of the desired checkboxes:

    • Open *

    • Closed *

    • Pending *

    • Void

  8. Click Save.
    Procore adds the new column to the Source list on the left.

source-column-budget-rom.png

Ajouter la colonne source « Modifications budgétaires ».

Dans la fenêtre « Configurer les colonnes », suivez ces étapes pour ajouter une nouvelle colonne source nommée « Modifications budgétaires ».

Steps from the Configure Columns window in the Company Admin tool…

Settings

  1. Choose one of these options:

    • Click Create Source Column in the center of the window.
      OR

    • Click the Create button and choose Source from the drop-down list.

  2. In the Column Name field, type: Budget Changes

  3. From the Column Source drop-down list, select Budget Changes.

  4. Mark the Budget Change Adjustments check box. A Budget Change Adjustment represents a formal change to your budget.

     Note

    In the following steps, the Procore-recommended settings for the checkboxes to select are marked with an asterisk (*). However, you can tailor your settings to suit your environment.

  5. Under Scope, mark all of the desired checkboxes:

    • In Scope *

    • Out of Scope *

    • TBD *

    • No Scope Associated *

  6. Under Status, mark all of the desired checkboxes:

    • Draft *

    • Under Review *

    • Approved *

    • Void

  7. Click Save.
    This adds the new column to the Source list on the left.

source-column-budget-changes.png

Étape 3 : modifier les colonnes calculées pour la fonctionnalité Modifications budgétaires

Vous allez ensuite modifier les colonnes calculées existantes (ou en ajouter de nouvelles) pour inclure les nouvelles colonnes source dans les formules des colonnes calculées.

  • Ajouter ou modifier la colonne calculée « Budget révisé »

  • Ajouter la colonne calculée « Budget des coûts prévus ».

Ajouter ou modifier la colonne calculée « Budget révisé »

Dans la fenêtre « Configurer les colonnes », suivez ces étapes pour modifier la colonne « Budget révisé » existante pour la fonction de modifications budgétaires. L’ajout de cette colonne permet à votre équipe de projet de voir l’impact du changement sur votre budget.

Steps from the Configure Columns window in the Company Admin tool…

Settings

  1. Choose one of these options:

    • Click Create Calculated Column in the center of the window.
      OR

    • Click the Create button and choose Calculated from the drop-down list.

  2. Under 'Calculated' on the left, highlight the Revised Budget column to reveal the 'Show Formula' section.

  3. Click Edit.

  4. In the Column Name field, choose from the options:

    • Keep the existing column name: Revised Budget
      OR

    • Create a new column name: Revised Budget (+Changes)

  5. In the Format drop-down list, make sure Currency is selected.

  6. Keep Original Budget Amount selected in the top drop-down list.

  7. Click the Remove links.

  8. Select these calculation settings as shown in the drop-down lists:

    • Original Budget Amount

    • Plus (+) sign

    • Pending Budget Changes

  9. Optional. Keep the mark in the Allow Subtotals and Grand Totals check box.

  10. Depending on your choice in step 4 above:

  • Click Update. This updates the formula for the calculated column in the budget view.
    OR

  • Click Save as New. This adds a new calculated column to the budget view.

calculated-column-revised-budget.png

Ajouter la colonne calculée « Budget des coûts prévus ».

Dans la fenêtre « Configurer les colonnes », suivez ces étapes pour ajouter une colonne calculée nommée « Budget des coûts du projet ». L’ajout de cette colonne vous permet d’inclure les modifications budgétaires afin que votre équipe puisse suivre le coût prévu jusqu’à l’achèvement du projet dans l’outil Budget du projet.

Steps from the Configure Columns window in the Company Admin tool…

Settings

  1. Choose one of these options:

    • Click Create Calculated Column in the center of the window.
      OR

    • Click the Create button and choose Calculated from the drop-down list.

  2. Under 'Calculated' on the left, highlight the Revised Budget column to reveal the 'Show Formula' section.

  3. Click Edit.

  4. In the Column Name field, type: Projected Cost Budget

  5. In the Format drop-down list, make sure Currency is selected.

  6. Keep Original Budget Amount selected in the top drop-down list.

  7. Click the Remove links.

  8. Select these calculation settings as shown in the drop-down lists:

    • Original Budget Amount

    • Plus (+) sign

    • Budget ROM

    • Plus (+) sign

    • Pending Budget Changes

  9. Optional. Keep the mark in the Allow Subtotals and Grand Totals check box.

  10. Depending on your choice in step 4 above:

  • Click Update. This updates the formula for the calculated column in the budget view.
    OR

  • Click Save as New. This adds a new calculated column to the budget view.

projected-cost-budget-calculated-column.png

Étape 4 : prévisualiser la vue du budget

Ensuite, vous pouvez prévisualiser vos nouvelles colonnes dans la zone « Configuration des colonnes » et en sélectionnant différents projets dans la liste déroulante « Prévisualiser avec le projet ». Les nouvelles colonnes apparaissent sur le côté droit du budget. Enfin, vous pouvez affecter la vue du budget à un ou plusieurs projets Procore du compte de votre entreprise à l’aide des options de la liste déroulante « Assigner aux projets ».

Example

Below is an example of the new columns that you can add to a Procore budget view, after it has been assigned to a project.

preview-column-configuration.png

Étape 5 : Assigner la vue du budget à vos projets

Lorsque vous êtes prêt à procéder, assignez la vue du budget à un, plusieurs ou tous les projets. Il suffit de sélectionner les options dans la liste « Assigner aux projets ».

assign-budget-changes-view-to-project.png

Prochaines étapes

See Also

Loading related articles...