Use the Navigation Sphere
Procore Model Manager - Beta Access & Feedback
The Model Manager (Beta) tool is exclusively available to registered beta participants. It is not available through Procore Explore. To learn more, see Beta Participant Guide.
The Model Manager (Beta) tool is exclusively available to registered beta participants. It is not available through Procore Explore. To learn more, see Beta Participant Guide.
The Navigation Sphere allows you to manipulate the 3D orientation of a model by clicking its faces (such as Top, Front, or Right), corners, or edges. This action snaps the camera to a specific perspective. The Navigation Sphere is the primary tool for perspective management and works great with Orthographic mode. You can also click and drag the sphere to reposition it within the viewer.

Additional Information:
The Navigation Sphere is visible by default.
You can click and drag the navigation sphere to move it where you want.
Follow these steps to control the navigation sphere.
Show or hide in viewer Show / Hide Steps
Navigate to the Model Manager (Beta) tool.
Open a model.
In the right toolbar, click Settings .
In the Settings window under Show in Viewer:
Move the element toggle to the Right (ON) to make it visible. This is the default setting.
Move it to the Left (OFF) to hide it from the workspace. 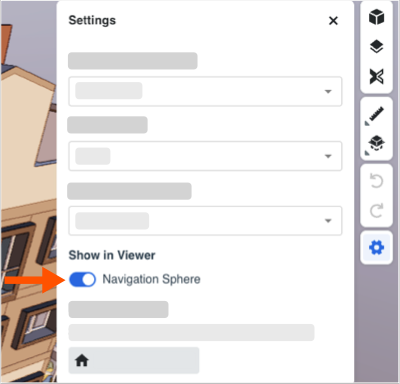
Click X to close the settings window. Changes save automatically.
Snap to standard views Show / Hide Steps
Follow these steps to snap to different views with the navigation sphere:
Navigate to the Model Manager (Beta) tool.
Open a model.
Click a point on the navigation sphere to snap to a view. ![]()
Snap to... | Click... | Best Used When... | Available in the Viewer in these Procore Project Tools |
|---|---|---|---|
Standard Views | Top, Bottom, Left, Right, Front, and Back | You need to see a "flat" elevation or plan view. | Assets |
Isometric Views | The "corners" of the navigation sphere | You want a clear 3D view that shows three sides at once. | Assets |
Cardinal Directions | North, South, East, West | You are orienting the model based on site coordinates or "Project North" | Assets |
Use the sphere in orthographic mode Show / Hide Steps
Follow these steps to switch to orthographic mode and use the navigation sphere.
Click the Perspective icon in the right toolbar to switch Orthographic mode ON.
Choose from these options to snap the camera to a:![]()
Cardinal Direction. Click North, South, East, West to rotate the camera to that orientation.
Face. Click Top, Front, Right, Left, or Bottom to snap the camera to a flat elevation or plan view.
Isometric View. Click a corner of the sphere to view the model from an angled perspective.
Use your Trackpad or Mouse Wheel to adjust the zoom level.