Dupliquer un livrable
Éléments à prendre en compte
Autorisations utilisateur requises :
Pour créer un doublon pour un livrable que vous avez créé :
Autorisations de niveau « Lecture seule » ou « Standard » dans l’outil Livrables du projet avec l’autorisation granulaire « Créer un livrable » activée sur votre modèle d’autorisation.
Des autorisations de niveau « Standard » dans l’outil Livrables du projet sans qu’un modèle d’autorisation ne vous soit attribué.
Pour créer un doublon d’un livrable : Autorisations de niveau « Admin » dans l’outil Livrables du projet.
Informations complémentaires :
Les livrables ne peuvent être dupliqués qu’au sein d’un même projet.
Les livrables ne peuvent pas être dupliqués par lot.
Escalier
Accédez à l’outil Livrables du projet.
In the Submittals log, click View next to the submittal.
Click the vertical ellipsis
 , then click Duplicate Submittal. This opens the 'New Submittal' page.
 Faites défiler jusqu’à la zone « Informations générales » et notez que toutes les informations générales du livrable dupliqué sont héritées.
Révisez les informations de livrable suivantes, si nécessaire :
Titre. Le nom descriptif qui résume le mieux les informations contenues dans le document soumis.
Section Spécifications. Indique la section correspondante du cahier des charges du projet. Voir D'où proviennent les sélections de la liste déroulante « Sections de spécification » dans l'outil Soumissions ?
Reçu de. Le contact de l'entrepreneur responsable qui a fourni les informations de soumission à l'équipe de projet.
Dossier de soumission . Le dossier de soumission qui contient la soumission. Dans Procore, l'ajout de documents à un dossier est facultatif. La décision d'ajouter des documents à un dossier de soumission est basée sur les exigences de votre projet, lesquelles sont déterminées par l'équipe de direction de votre entreprise ou de votre projet. Pour les instructions, voir Créer un dossier de soumission.
Statut. État actuel de la soumission. Seul un utilisateur disposant des autorisations de niveau « Administrateur » pour l'outil Soumissions peut modifier le statut d'une soumission. Voir Quels sont les statuts de soumission par défaut dans Procore ? et Qu'est-ce qu'une soumission « projet » ?
Code de coût. Le code de coût pour la soumission. Les codes de coûts sont gérés dans le segment « Code de coût » de la structure de répartition du travail de Procore.
Taper. Le type d'information associé à la soumission. Les sélections de type par défaut dans Procore incluent : Document, Demande de paiement, Paie, Plans, Impressions, Informations sur le produit, Manuel du produit, Échantillon, Dessin d’atelier, Spécification et Autre. Voir Créer des types de soumission personnalisés.
Emplacement. L'emplacement du dépôt sur le lieu de travail. Il peut s'agir d'un emplacement existant figurant dans la liste des emplacements ou d'un emplacement hiérarchisé. Voir Ajouter des emplacements hiérarchisés à un projet.
Privé. Indique les paramètres de confidentialité de la soumission. Lorsqu'une soumission est marquée comme « Privée », elle n'est visible que par les utilisateurs disposant d'autorisations de niveau « Administrateur » sur l'outil Soumissions, les utilisateurs du flux de travail des soumissions et les membres de la liste de distribution de la soumission. Les utilisateurs avec le Autorisation granulaire « Afficher les soumissions privées associées aux utilisateurs de la même entreprise » Les utilisateurs disposant des autorisations nécessaires peuvent également consulter une soumission marquée « Privée » si un autre utilisateur de leur entreprise est associé à cette soumission. Voir Marquer une soumission comme privée.
Description. Détails informatifs, notes et/ou actions décrivant la soumission.
Pièces jointes. Joignez tous les fichiers pertinents. Vous avez les options suivantes :
Cliquez sur Joindre un ou plusieurs fichiers , puis choisissez l'option appropriée dans le menu contextuel qui apparaît.
OUUtilisez la fonction glisser-déposer pour déplacer les fichiers de votre ordinateur vers la zone grise « Glisser-déposer les fichiers » .
Flux de travail de soumission. Les personnes chargées de finaliser le processus de soumission. Dans Procore, le flux de travail de soumission comprend deux rôles : un soumetteur et les approbateurs qui sont responsables de l’exécution/de la finalisation du processus d’approbation. En règle générale, les approbateurs sont des membres de l'équipe de conception.
Liste de distribution. Les personnes qui recevront des notifications par e-mail de Procore à mesure que la soumission progresse dans le flux de travail de soumission. Si votre équipe projet a créé des listes de distribution dans le répertoire du projet, vous pouvez les sélectionner ici. Voir Ajouter un groupe de distribution à l'annuaire Procore).
Articles connexes. Tous les éléments connexes qui ont été ajoutés à la soumission (c.-à-d. dessins, documents, plans, etc.). Voir Ajouter un élément connexe à une soumission.
Champs personnalisés . Si votre entreprise a ajouté des champs de texte personnalisés pour l'outil de soumission, saisissez les données requises telles que spécifiées par votre équipe de projet dans ces champs. Voir Configurer les paramètres avancés : Outil de soumission.
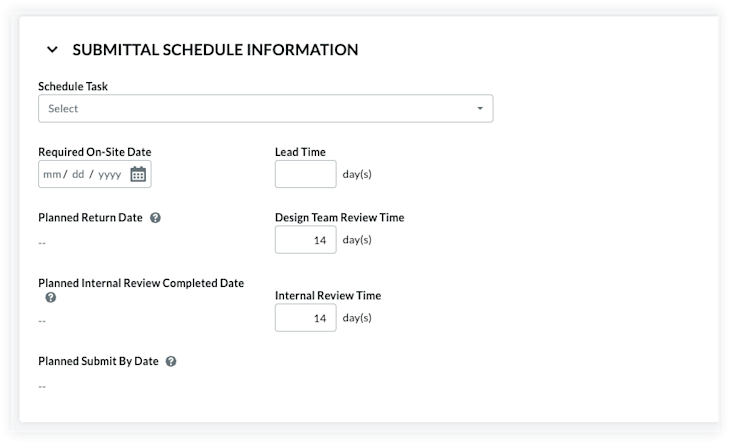
Calculate Submittal Schedule Information (If Enabled)
Submittal Schedule Calculations is an optional feature that you can enable. See Enable Submittal Schedule Calculations. When enabled, the Submittals tool will analyze your entries in the 'Required On-Site Date', 'Lead Time', 'Design Team Review Time', and 'Internal Review Time' fields to provide suggestions for the Submitter and Approver 'Due Date' on the submittal workflow. It also automatically populates the 'Planned Return Date', 'Planned Internal Review Completed Date', and 'Planned Submit By Date' fields.
Follow the steps in Create a Submittal. This reveals the New Submittal page.
Scroll down to the Submittal Schedule Information area.
Set the following information:
Schedule Task. The schedule task associated with the submittal being created. A schedule must be uploaded to the project first. See Upload a Project Schedule File to Procore's Web Application.
- Note: If you enter 7, the system subtracts '7' calendar days from the Planned Return Date to automatically populate the date entry for the Planned Internal Review Completed Date.
Temps de révision par l'équipe de conception. Le nombre de jours alloués à l'équipe de conception pour l'examen du dossier soumis.
- Note: If you enter 10, the system subtracts '10' calendar days from the Required On-Site Date to automatically populate the date entry for the Planned Return Date.
Délai de mise en œuvre. Nombre de jours calendaires prévus pour la réception du matériel/des services nécessaires à la soumission.
Date de présence sur site requise. Date à laquelle les matériaux relatifs aux travaux détaillés dans le dossier de soumission doivent être livrés et disponibles sur le chantier.
- Note: If you enter 5, the system subtracts '5' calendar days from the Planned Internal Review Completed Date to automatically populate the date entry for the Planned Submit by Date.
Temps d'examen interne. Le nombre de jours calendaires dont votre équipe de conception a besoin pour s'assurer que le dossier soumis est correctement examiné.
This illustration shows you an example of these entries and calculations.
back to steps
Update the Delivery Information
Anticipated Delivery Date
View the date displaying in the Anticipated Delivery Date. This is the date between the 'Lead Time' and when the submittal was distributed, and it will not populate upon the creation of the submittal. This date is calculated by Procore once the submittal has been distributed. See Distribute a Submittal.Schedule Task
If you have enabled the Schedule tool on the project and integrated an Asta Powerproject, Microsoft Project, or Oracle Primavera schedule with Procore, you are permitted to select a project task from the Schedule Task drop-down list when you have a user account that has been granted 'Read-Only' level permission or higher on the Schedule tool. This is for reference only.Confirmed Delivery Date
Select the date the subcontractor or supplier confirmed the freight would arrive using the Confirmed Delivery Date calendar.Actual Delivery Date
Select the date the material arrived on site using the Actual Delivery Date calendar. Typically, this value is updated by the project superintendent.
back to steps
Apply a Submittal Workflow Template
A user with 'Admin' level permission to your project's Submittals tool can create one (1) or more submittal workflow templates which you can then to a new submittal when you first create it. This saves data-entry time by preventing you from having to add a new submittal workflow each time you create a submittal.
Under Submittal Workflow, do the following:
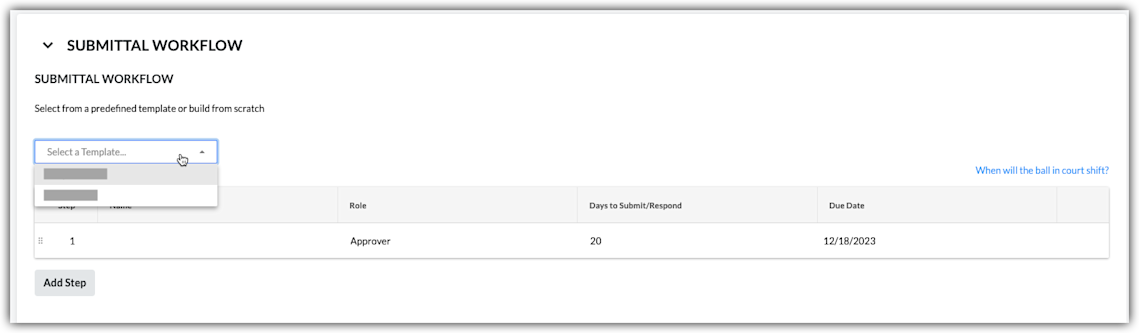
Select a Template. Select a workflow template from the drop-down list.
Notes:This drop-down list is only visible and available to users with 'Admin' level permission on the Submittals tool.
This action applies the person(s) named on the submittal workflow template to your submittal.
To learn how submittal workflow templates are created, see Manage Submittal Workflow Templates.
Continue by modifying the Name, Role, and Days to Submit/Response fields as needed for the submittal. Your changes only affect the workflow on the submittal, your changes do NOT affect the submittal workflow template.
(Optional) Continue with the steps in Add Users to the Submittal Workflow.
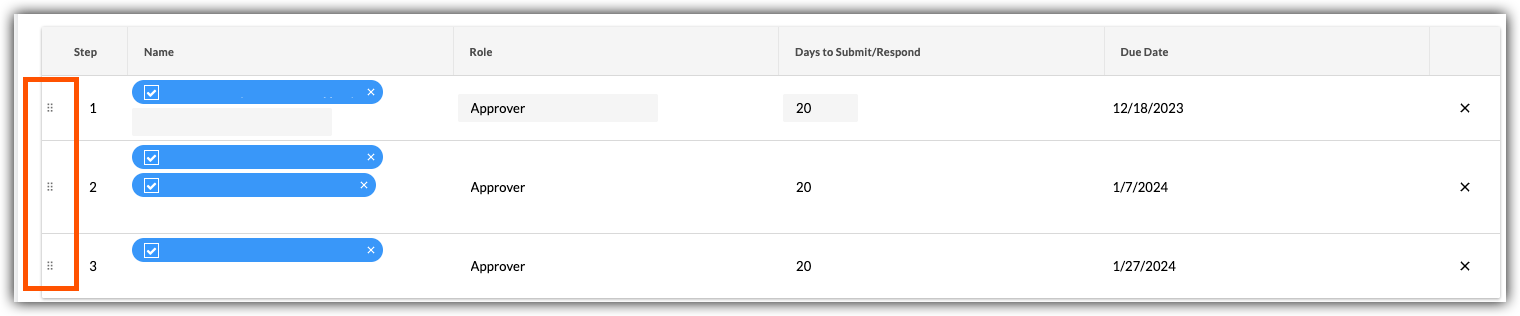
Add Users to the Submittal Workflow
Under Submittal Workflow, do the following for each desired line item in the submittal:
Name. Start typing a project user's name in the Search box. Then select the appropriate user from the list.* If you want to require a response from the user, place a mark in the checkbox next to their name.
OR* If you do NOT want to require a response from the user, remove the mark from the checkbox.
Note: If you are adding more than one user to a parallel approval workflow group, the Ball In Court Responsibility will shift to the next workflow group after all of the people marked required in the group submit a response to the submittal.Role. Select Approver or Submitter from the list. See What is the difference between a submitter and approver in submittals?
Notes:* To be designated as an approver, the person must exist in the Project level Directory tool (see Add a User Account to the Project Directory) and must also be granted 'Admin' or 'Standard' level permissions to the Submittals tool (see Set User Permissions for the Submittals Tool).* If you are a user with 'Standard' level permissions to the Submittals tool, you can only add users with 'Admin' level permissions to the workflow.* If you plan to add a Submitter to the submittal, we recommend that you designate a Submittal Manager as the first approver in the submittal's sequential approval workflow. This gives the Submittal Manager an opportunity to ensure the submittal is thoroughly reviewed by your internal stakeholder before it is sent to the users in the next step on the submittal workflow.* If you are a user with 'Admin' level permissions to the Submittals tool, you can add users with either 'Admin' or 'Standard' level permissions to the workflow.
Note: If you want the submittal workflow to use sequential approval, add only one user to each line item in the workflow. If you want a step in the submittal workflow to use parallel approval, add two or more users to a line item.Due Date. Select a date from the calendar for the submittal response to be due.
Note: The 'Due Date' field is automatically populated based on the default number of days specified on the Submittals tool's Configure Settings page. See Configure Settings: Submittals Tool. The due date also respects which days are set as 'working days' for the project. See Set Project Working Days.
Click Add Step.
Repeat these steps to add another user to the workflow.
If you want to change the order of the workflow steps, do the following:
Grab the line item by the vertical grip (⋮⋮).
Use a drag-and-drop operation to move the line item into the desired order.
Update and Send the Submittal for Review
When finished with the steps above, choose one of these options:
To save your changes without sending an email to members of the submittal workflow, distribution list members, and submittal manager, click Create.
ORTo save your changes and to send an email notification to alert the members of the submittal workflow and to alert the members of the distribution list, click Create & Send Emails.
See Also
Loading related articles...