Add Section Planes

Deployment Status & Regional Availability

Model Manager, Procore’s next-generation replacement for the Models tool, officially launches in General Availability across the UK and Ireland (UKI) on October 13, 2026, alongside a global Beta for all other regions. Procore Mobile App (iOS/Android) support is also live in Beta as Procore continues to transform 3D model workflows. Stay tuned for additional features in future releases.

For platform deployment status & regional availability Show/Hide

The Model Manager and the Models tool can be active on the same project at once. Administrators are not required to disable the Models tool.

Platform

Deployment Status/Region

Learn More

Web

  • General Availability: United Kingdom & Ireland (UKI) on October 13, 2026

  • Beta: All other regions

iOS

  • Beta: All regions

Android

  • Beta: All regions

Model Manager Beta: Access & Guidelines

  • Registration: Participating companies must sign the Procore Beta Agreement. Once signed, your Procore Administrator will coordinate with your Procore point of contact to enable Model Manager on specific projects. It is not available in Procore Explore.

  • Support & Feedback: Please report critical or breaking issues directly to Procore Customer Support. For general feedback, feature requests, and non-critical issues, contact your dedicated Beta program lead or Procore point of contact.

  • Beta Notice: This feature and its supporting documentation are in active development. Beta services are provided strictly "as is" for evaluation purposes, carry no standard warranties or liability, and are subject to change or discontinuation without notice. For full terms, please refer to the Procore Subscription Services Agreement.

Section planes let you cut through a model to view internal details or specific cross-sections of a project. This helps you better understand complex spatial relationships and inspect areas that are otherwise hidden from view.

Things to Consider

  • Required User Permissions

  • Additional Information:

    • Maximum Limit: You can add a maximum of six (6) planes per session. If you exceed this limit, a notification message informs you. In the future, section boxes will be available and should be used instead.

Prerequisites

Steps

  1. Navigate to the project's Model Manager tool.

  2. View a model.

  3. Choose from these options to place the section plane:

    • To place at your cursor location, right-click any object in the 3D space and choose Add Section Plane from the context menu.

    • To use the right toolbar and choose a location, click Section Tools This image shows the Section Tools icon in the right toolbar of the viewer in the Model Manager tool. . Next, move your cursor over a model object. A dynamic preview appears on the surface. Click to place the plane.
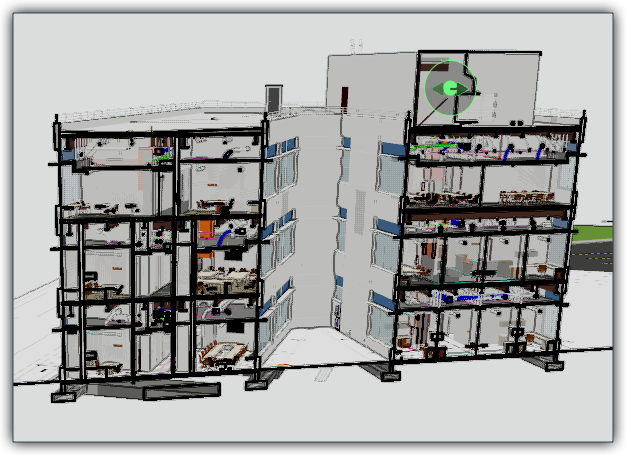
  4. Once placed, click and drag the arrow-shaped drag handles to move the plane into position.
    Shows the drag handles that appear after placing a section plane in the Model Manager.

    Info

    Note the following when positioning the plane:

    • The profile cut's outline thins while moving through sliced objects to reveal the cross-section.

    • The drag handles remain visible and do not occlude the geometry.

    • When dragging stops, the profile cut's outline thickens.

    • If you move your cursor away from the drag handle, click it to recenter the camera back to your cut.

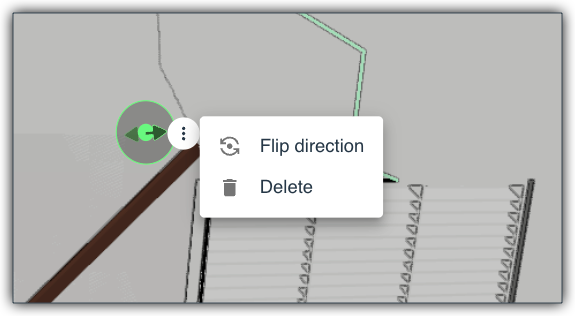
  5. (Optional) Manage the handle further by click More (⋮) and choosing an option from the context menu.
    Shows the More context menu when positioning a section plane in the Model Manager

    • Flip Direction. Flips the plane's clipping direction to show the opposite side of the model.

    • Delete. Removes the selected plane from the current session.

  6. Choose one of these options:

    1. To save the plane, click Save and Exit This shows the Save and Exit button in the right toolbar in the viewer in the Model Manager tool or press ENTER.

    2. To discard the plane, click Clear and Exit This image shows the Exit Mode icon in the Right Toolbar of the Viewer in the Model Manager tool. or press ESC.


Windows is a registered trademark of Microsoft Corporation in the United States and other countries. Google Chrome, Android, and Google Play are trademarks of Google LLC. iPhone, iPad, and App Store are trademarks or service marks of Apple Inc., registered in the U.S. and other countries and regions. iOS is a trademark or registered trademark of Cisco in the U.S. and other countries and is used under license by Apple Inc. Autodesk, AutoCAD, Civil 3D, Navisworks, and Revit are registered trademarks or trademarks of Autodesk, Inc., and/or its subsidiaries and/or affiliates in the USA and other countries. SpaceMouse is a registered trademark of 3Dconnexion. All other trademarks are the property of their respective owners.