Configure Next-Gen Viewer Settings

Deployment Status & Regional Availability

Model Manager, Procore’s next-generation replacement for the Models tool, officially launches in General Availability across the UK and Ireland (UKI) on October 13, 2026, alongside a global Beta for all other regions. Procore Mobile App (iOS/Android) support is also live in Beta as Procore continues to transform 3D model workflows. Stay tuned for additional features in future releases.
For platform deployment status & regional availability Show/Hide

The Model Manager and the Models tool can be active on the same project at once. Administrators are not required to disable the Models tool.

Platform

Deployment Status/Region

Learn More

Web

  • General Availability: United Kingdom & Ireland (UKI) on October 13, 2026

  • Beta: All other regions

iOS

  • Beta: All regions

Android

  • Beta: All regions

Model Manager Beta: Access & Guidelines

  • Registration: Participating companies must sign the Procore Beta Agreement. Once signed, your Procore Administrator will coordinate with your Procore point of contact to enable Model Manager on specific projects. It is not available in Procore Explore.

  • Support & Feedback: Please report critical or breaking issues directly to Procore Customer Support. For general feedback, feature requests, and non-critical issues, contact your dedicated Beta program lead or Procore point of contact.

  • Beta Notice: This feature and its supporting documentation are in active development. Beta services are provided strictly "as is" for evaluation purposes, carry no standard warranties or liability, and are subject to change or discontinuation without notice. For full terms, please refer to the Procore Subscription Services Agreement.

The Next-Gen Viewer in the Model Manager tool provides a high-fidelity 3D environment for coordinating project designs. By establishing a standard Home view and optimizing performance resolution based on your hardware, you can ensure that all collaborators start from the same perspective and that your federated project model remains responsive during complex inspections.

Things to Consider

Prerequisites

Steps

  1. Navigate to one of the project tools supporting the Next-Gen Viewer: Assets, Documents, Document Management, or Model Manager.

  2. View a model.

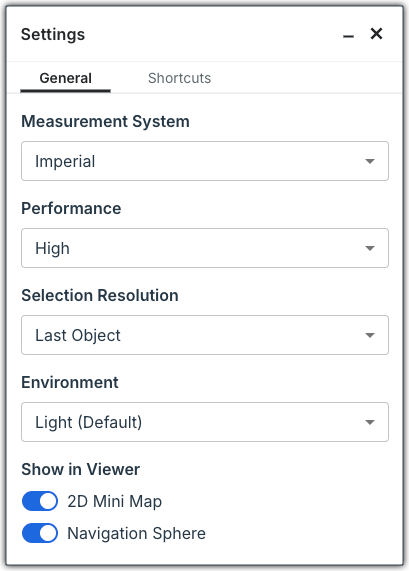
  3. Click Settings in the top-right to open the General tab of the Settings window.
    This image shows the Next-Gen Viewer settings, which you can configure at any time in the Model Manager tool.

  4. Choose a Measurement System. For details, see Select a Measurement System:

    • Imperial. The traditional system used primarily in the United States, measuring length in inches, feet, yards, and miles.

    • Metric (meters). The global standard base for unit length using everyday, human-scale measurements like building dimensions, room sizes, and outdoor distances.

    • Metric (millimeters). A global standard for engineering, manufacturing, and product design that allows extreme precision using whole numbers instead of decimals for fractions.

  5. Select a Performance mode:

    • Low. Lowest resolution and details.

    • Medium. Optimized for fluid motion, less focus on details.

    • High. Optimized for sharper visuals, less focus on speed.

    • Ultra. Maximum resolution and details.

      Note

      By default, the system optimizes performance resolution as your model loads. You can manually adjust this setting if you're working on a complex project or need to override the default setting.

  6. Find Selection Resolution and choose your preferred level. For details, see Set the Selection Resolution.

    • First Object. Selects the highest-level object below the layer note. Best for checking high-level properties, or when you want to select a whole piece of equipment.

    • Last Object. Selects the lowest-level object (geometry element). Best for granular level conflict analysis, identifying specific materials, or when you want to see the properties of a sub-component. This is the default setting.

  7. Select a theme from the Environment list to change the background lighting and how light falls on objects in the 3D space.

  8. Use the Show in Viewer toggles to turn elements ON and OFF, including the 2D Minimap and the Navigation Sphere:

    • Move the toggle to the Right (ON) to show it in the workspace.

    • Move it to the Left (OFF) to hide it from the workspace.

  9. Click the Shortcuts tab to find a keyboard shortcut. For more information, see Keyboard & Mouse or How do I find a list of keyboard shortcuts for the Next-Gen Viewer?


Windows is a registered trademark of Microsoft Corporation in the United States and other countries. Google Chrome, Android, and Google Play are trademarks of Google LLC. iPhone, iPad, and App Store are trademarks or service marks of Apple Inc., registered in the U.S. and other countries and regions. iOS is a trademark or registered trademark of Cisco in the U.S. and other countries and is used under license by Apple Inc. Autodesk, AutoCAD, Civil 3D, Navisworks, and Revit are registered trademarks or trademarks of Autodesk, Inc., and/or its subsidiaries and/or affiliates in the USA and other countries. SpaceMouse is a registered trademark of 3Dconnexion. All other trademarks are the property of their respective owners.