概述

Deployment Status & Regional Availability

Model Manager, Procore’s next-generation replacement for the Models tool, officially launches in General Availability across the UK and Ireland (UKI) on October 13, 2026, alongside a global Beta for all other regions. Procore Mobile App (iOS/Android) support is also live in Beta as Procore continues to transform 3D model workflows. Stay tuned for additional features in future releases.

For platform deployment status & regional availability Show/Hide

The Model Manager and the Models tool can be active on the same project at once. Administrators are not required to disable the Models tool.

Platform

Deployment Status/Region

Learn More

Web

  • General Availability: United Kingdom & Ireland (UKI) on October 13, 2026

  • Beta: All other regions

iOS

  • Beta: All regions

Android

  • Beta: All regions

Model Manager Beta: Access & Guidelines

  • Registration: Participating companies must sign the Procore Beta Agreement. Once signed, your Procore Administrator will coordinate with your Procore point of contact to enable Model Manager on specific projects. It is not available in Procore Explore.

  • Support & Feedback: Please report critical or breaking issues directly to Procore Customer Support. For general feedback, feature requests, and non-critical issues, contact your dedicated Beta program lead or Procore point of contact.

  • Beta Notice: This feature and its supporting documentation are in active development. Beta services are provided strictly "as is" for evaluation purposes, carry no standard warranties or liability, and are subject to change or discontinuation without notice. For full terms, please refer to the Procore Subscription Services Agreement.

Pre-Release Documentation

This article documents a planned feature that is not yet available. Release timing is not guaranteed, and functionality described here may change before launch.

Organizing saved search sets into folders helps your team quickly locate exact information within a project model. The library allows for unlimited folder nesting, enabling you to build a custom hierarchy tailored to your specific workflow. Users with Admin permissions can easily maintain this library using quick-action context menus and bulk actions to streamline model updates.

Things to Consider

  • Required User Permissions:

    • 'Admin' level permissions on the Model Manager tool.

  • Additional Information:

    • Moving folders and search sets does not alter element-level data or affect visibility.

    • Renaming a folder updates the label displayed in the Search Sets panel, but does not affect the underlying rule definitions, predicate logic, or GUIDs.

    • Deleting a folder removes the folder name and any associated search sets from the project model only; the file remains securely in the project's document repository.

Prerequisites

  • Append at least one (1) active Navisworks® Design file (NWD) with search set data to the project model. See .

  • Import Search Sets

Steps

  1. Navigate to the project's Model Manager tool.

  2. View a model.

  3. Click This image shows the Search Groups icon in the Next-Gen Viewer of the Model Manager tool. Search Sets.

  4. In the Search Sets panel, select the applicable action to modify your folder or search set:

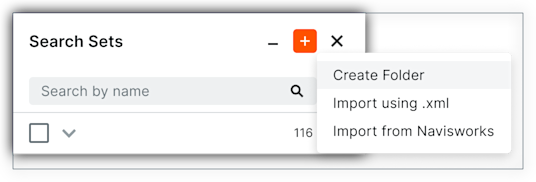
    • Create a new folder at the root level: Click the Plus (+) icon and choose Create Folder at the top of the panel and then name your folder. The new folder is at the bottom of the list. This image shows the Create Folder menu option which is accessed by clicking the Plus (+) button in the Search Sets panel of the Next-Gen Viewer in the Model Manager tool.

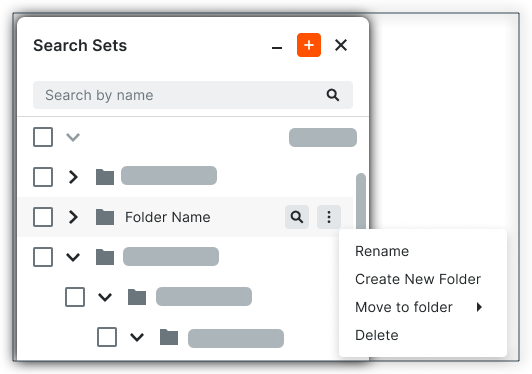
    • Create a new subfolder: Hover over an existing folder and then click the More (⋮) icon and choose Create New Folder from the menu and then name your new folder. This creates a new child folder inside the parent. This image shows the More menu that appears in when users click a Folder in the Search Sets panel in the Next-Gen Viewer of the Model Manager tool.

    • Move an existing folder or search set to a new folder: Hover over an existing folder and then click the More (⋮) icon. Next, choose Move to Folder and then New Folder from the menu. Finally, name your new folder. This creates new folder and nests the folder you selected inside it. You can also perform this action on individual search sets.

    • Move an existing folder or search set to an existing folder: Hover over an existing folder and then click the More (⋮) icon. Next, choose Move to Folder and then Existing Folder from the menu. When the Move to Existing Folder window appears, select the folder and click the Move button.

    • Rename a folder: Hover over an existing folder and then click the More (⋮) icon. Next, choose Rename and edit the name of the folder.

    • Delete a folder: Hover over an existing folder and then click the More (⋮) icon. Next, choose Delete. Be aware that this action removes the selected item from project model. A confirmation message appears and you must click Delete to confirm the action.


Windows is a registered trademark of Microsoft Corporation in the United States and other countries. Google Chrome, Android, and Google Play are trademarks of Google LLC. iPhone, iPad, and App Store are trademarks or service marks of Apple Inc., registered in the U.S. and other countries and regions. iOS is a trademark or registered trademark of Cisco in the U.S. and other countries and is used under license by Apple Inc. Autodesk, AutoCAD, Civil 3D, Navisworks, and Revit are registered trademarks or trademarks of Autodesk, Inc., and/or its subsidiaries and/or affiliates in the USA and other countries. SpaceMouse is a registered trademark of 3Dconnexion. All other trademarks are the property of their respective owners.