Créer un ordre de changement potentiel de l’engagement

Contexte

Lorsqu’un changement du périmètre des travaux ou du montant du contrat d’engagement initial survient au cours d’un projet de construction, le processus de gestion des changements commence. Vous pouvez créer un OCP si l’Administrateur Procore de votre entreprise configure l’outil Engagements avec le paramètre de configuration d’ordre de changement à deux (2) ou trois (3) niveaux. Voir Quels sont les différents paramètres de niveau d’ordre de changement dans Finances ?

Things to Consider

Conditions préalables

Steps

  • Create a Potential Change Order

  • Add a Schedule of Values to a Potential Change Order

Create a Potential Change Order

  1. Navigate to the project's Commitments tool.

  2. Locate the commitment contract to work with. Then click its Number link.

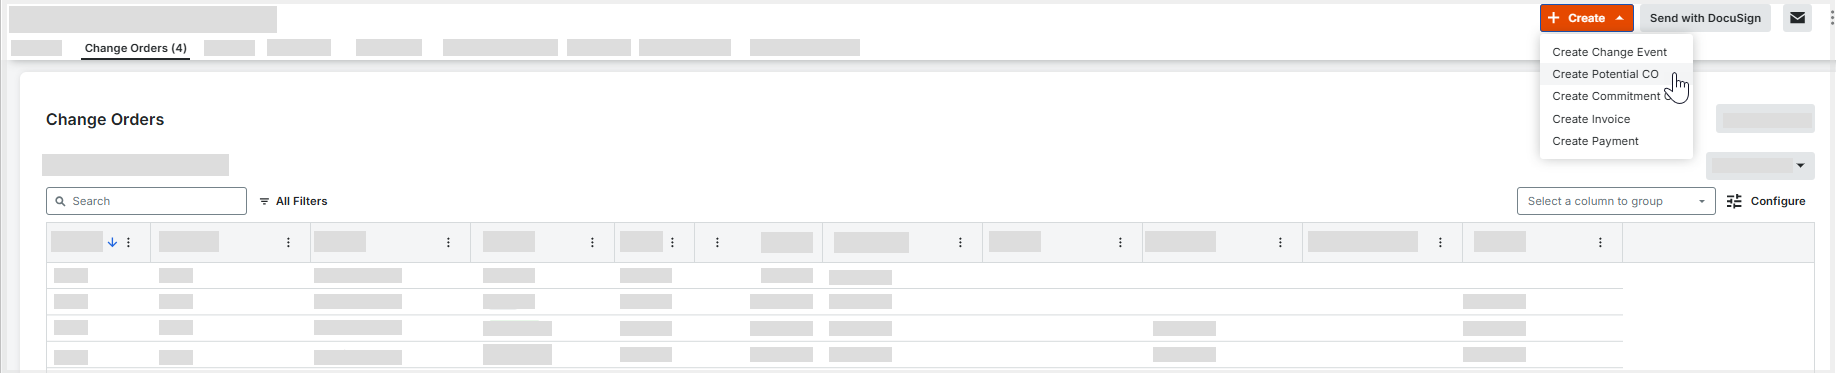
  3. Click the Change Orders tab.

  4. Click Create Potential CO.
    Create Potential Change Order From Prime Contract

  5. Complete the following fields:

    • Sign with DocuSign®
      If you have enabled the Procore + DocuSign® integration (see Enable or Disable the DocuSign® Integration on a Procore Project), a checkmark appears in this box by default. If you do NOT want to collect signatures with DocuSign®, remove the mark.

       Pointe

      Comment collecter des signatures avec DocuSign ? Une fois la saisie des données de l’élément terminée, Procore recommande de changer le statut de l’élément en « Envoyé pour signature » avant de cliquer sur le bouton Compléter avec DocuSign pour lancer l’application DocuSign®. Si vous ne vous êtes pas déjà connecté, vous serez invité à vous connecter à DocuSign®. Une fois que vous êtes connecté, vous pouvez préparer l’enveloppe DocuSign_ ®_ pour les signatures. Une fois le processus de signature terminé, Procore change automatiquement le statut de l’élément en « Approuvé » et marque l’élément comme « Exécuté ». Pour en savoir plus, consultez DocuSign®.

    • Number
      Accept the default number, enter a new number, or create a custom numbering scheme.

       Pointe

      Comment les numéros sont-ils attribués ? Pour savoir comment Procore attribue les numéros et comprendre vos options de numérotation personnalisée, voir Puis-je personnaliser le système de numérotation des objets financiers dans Procore ?

    • Date Created
      Shows the creation date and time. This value cannot be changed.

    • Revision
      Shows the revision number. The first version is zero (0), subsequent revisions are assigned in sequential order. A PCO might have several revisions, depending on its reviewer/approver feedback.

    • Created By
      Shows the Procore user who created the PCO. This value cannot be changed.

    • Contract Company
      Shows the name of the company responsible for performing the work on the contract.

    • Contract
      If you have been assigned access permissions to the Commitments tool, click this link to open the contract.

    • Title
      Enter a title for the PCO in this box.

    • Status
      Select the current state of the PCO. To learn more, see What are the default statuses for change orders in Procore?

    • Commitment Change Order
      Choose one (1) option button.

       Remarque

      Ce paramètre n’est requis que lorsque l’outil Engagements utilise le paramètre de configuration d’ordre de changement à 3 niveaux. Voir Quels sont les différents paramètres de niveau d’ordre de changement dans Finances ?

      • Aucune. Un OCP peut être lié à une DOC ultérieurement.

      • Ajouter à l’existant. Liez l’OCP à une DOC existante.

      • Créer un nouveau. Créez une nouvelle DOC. Vous avez également la possibilité de créer un nouvel ordre de changement en même temps.

    • Change Reason
      Select the reason for the PCO, either Client Request, Design Development, Allowance, Existing Condition, Back Charge, or any additional options created for your specific environment by your company's Procore Administrator. See Set the Default Change Management Configurations.

    • Private
      Mark this checkbox if you only want the PCO to be visible to users with 'Admin' permissions on the Commitments tool.

    • Accounting Method
      This field inherits the accounting method that was specified in the commitment contract. See How do I set the accounting method for a contract or funding?

    • Description
      Enter a more detailed description of the reason for the PCO.

    • Request Received From
      Select the Procore user for whom you are submitting the PCO.

    • Schedule Impact
      If known, provide an estimate for the additional number of days required to complete work when the PCO is approved.

       En version bêta

      Note aux utilisateurs participant au programme bêta de version limitée « Achèvement estimé par le sous-traitant ». Lorsqu’un utilisateur place un ordre de changement avec le statut « Approuvé » et qu’il inclut une valeur dans le champ « Impact sur le planning » de l’ordre de changement, Procore met automatiquement à jour le champ « Date d’achèvement estimée » du contrat d’engagement du nombre de jours saisis.

    • Location
      Use this drop-down list to select a location related to the PCO. You can select an existing location or Add a Multi-tiered Location to an Item.

    • Reference
      Add any other important tools, materials, drawings, or documents to use as a reference for the PCO.

    • Field Change
      Check this box if the PCO requires a field change.

    • Paid in Full
      Check this box to indicate you have received payment for this change.

    • Attachments
      Select and add any relevant documents.

  6. Click Create & Enter SOV.

Add a Schedule of Values to a Potential Change Order

When there are costs associated with a PCO, you must add line items to the SOV.

  1. In the Schedule of Values tab, click Add Line.

     Remarques

  2. For contracts using the Amount Based accounting method:

    • Change Event Line Item
      If you have change events enabled, you can select a change event line item if the commitment needs to be linked to a change event.

    • Budget Code
      Select a budget code from the list or click Create Budget Code to create a new one. See What is a budget code in Procore's WBS?

    • Description
      Enter a description for the line item. For example, type: Monthly Service Fee

    • Amount
      Enter the amount of the cost.

    • Billed to Date
      The system automatically calculates the amount billed on the commitment up to the current date.

    • Amount Remaining
      Enter the amount that has NOT been billed to the current date.

    • Tax Code
      Enter a tax code to use for this line item. This field only appears if you have enabled the tax codes feature. See How can I use tax codes on a project?

  3. For contracts using the Unit/Quantity Based accounting method:

  4. Click Save.
    A GREEN banner appears to indicate that the Schedule of Values is saved.

     Important

    Si vous avez attribué un code budgétaire qui n’est actuellement pas représenté dans votre budget ou si vous laissez le champ code budgétaire vide, un message de confirmation apparaît. Pour continuer, vous devez cliquer sur OK pour accuser réception du message. Cette action ajoute le(s) poste(s) correspondant(s) au budget de votre projet en tant que postes non budgétés.

Cliquez sur Étape suivante.

Voir aussi

Chargement des articles connexes...