Manage Rows & Columns
Manage Filters
Manage Table Settings
Configure Columns
Manage Columns
Adjust Column Width
Sort Columns
Group Columns
Column Grouping Options
Additional Grouping Options
Overflow Menu
Group by Project
Pin Column
Autosize this Column
Autosize All Columns
Reset Columns
Manage Filters
To learn how to work with filters, see Search for and Apply Filters on the Subcontractor Invoices Tab.
Manage Table Settings
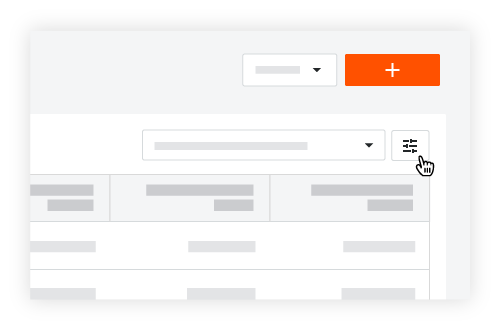
You can show/hide columns using the Table Settings options in the Payments tool. First, click the Table Settings ![]() icon on the top-right side of the data table. This reveals the Table Settings pane on the right side of the web page. To close the pane, click the 'x' in the top-right corner.
icon on the top-right side of the data table. This reveals the Table Settings pane on the right side of the web page. To close the pane, click the 'x' in the top-right corner.
Configure Columns
To choose the columns to show and hide, click the Table Settings ![]() icon on the top-right side of the table. This reveals the Table Settings pane on the right side of the web page. Under the Configure Columns area, move the toggle to the right to turn the column display ON. Procore's default setting is to show all available columns. To learn about the available columns in each tab, see About the Company Payments Tool.
icon on the top-right side of the table. This reveals the Table Settings pane on the right side of the web page. Under the Configure Columns area, move the toggle to the right to turn the column display ON. Procore's default setting is to show all available columns. To learn about the available columns in each tab, see About the Company Payments Tool.
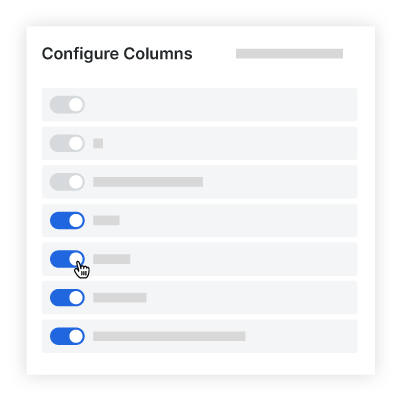
Other options in the Table Settings area include:
To hide a specific column, move the toggle to the left.
To show a specific column, move the toggle to the right.
To show all of the available columns, click the Show All link.
To close the panel, click the Close (x) icon.
Manage Columns
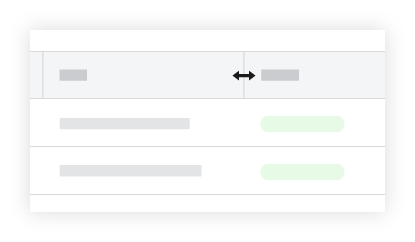
Adjust Column Width
To adjust the width of a single column, hover your cursor over the right border of a column heading until the resize handle ![]() icon appears. Then drag the handle to the left or right to set the desired column width. If you press the SHIFT key while holding down the resize handle, a blue outline appears over the active column to help you see your column adjustment.
icon appears. Then drag the handle to the left or right to set the desired column width. If you press the SHIFT key while holding down the resize handle, a blue outline appears over the active column to help you see your column adjustment.
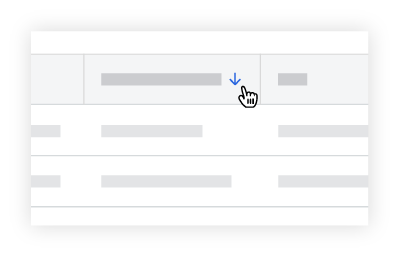
Sort Columns
To sort the table's data by a specific column, click any column heading to reveal a BLUE arrow to adjust the sort order of the contracts table.
Icône | Ordre de tri | Informations complémentaires |
|---|---|---|
| Ascendant | Pour réinitialiser vos colonnes, passez votre curseur sur le côté droit d’un en-tête de colonne jusqu’à ce que l’ellipse verticale Apparaît. Choisissez ensuite Réinitialiser les colonnes dans le menu déroulant. |
| Descendant |
Group Columns
Some columns let you group your table's data. Columns that can be grouped contain a grouping option in the Overflow Menu.
Column Grouping Options
The options in the Select a Column to Group drop-down list lets you apply these grouping options to your table.
Nom de la colonne | Option de regroupement de colonnes | Détails |
|---|---|---|
Statut de la facture | Regroupe les factures selon les statuts disponibles | Pour en savoir plus sur les statuts disponibles, consultez « Quels sont les statuts par défaut des factures Procore ? » |
Compagnie | Regroupe les factures par entreprise | Cette option correspond à l’option « Entreprise sous-traitante » définie sur les engagements associés aux factures de votre entreprise. |
Projet | Regroupe les factures par projet | Cette option correspond au champ « Nom » sous « Informations sur le projet » dans l’onglet Général des paramètres du projet dans l’outil Admin de chaque projet. Voir Changer le nom d’un projet Procore. |
Période de facturation | Regroupe les factures par période de facturation | Cette option correspond aux périodes de facturation des projets Procore de votre entreprise. Les périodes de facturation sont créées dans l’outil Facturation au niveau projet. Voir Gérer les périodes de facturation. |
Contrat | Regroupe les factures par contrat d’engagement | Cette option correspond aux bons de commande et aux contrats de sous-traitance créés dans l’outil Engagements au niveau Projet. |
Additional Grouping Options
After you apply your grouping options, a drop-down menu appears above the table. This menu lets you add, remove, arrange, and reset your table's groupings.
To change the row group order, grab a group label by its Reorder Grip
 and drag it into the desired position.
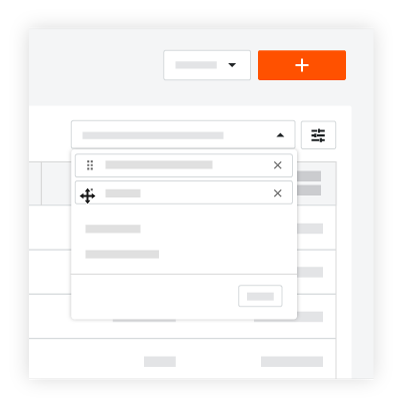
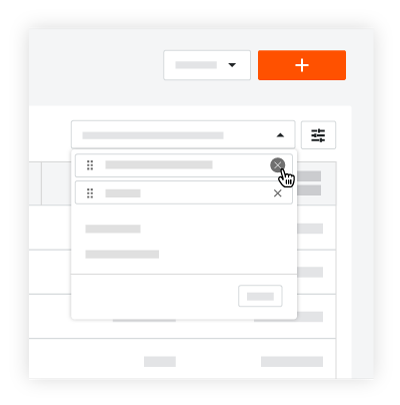
To remove a single option, click the 'x' next to the option to remove.
To apply an available grouping option, click an option highlighted in GRAY.
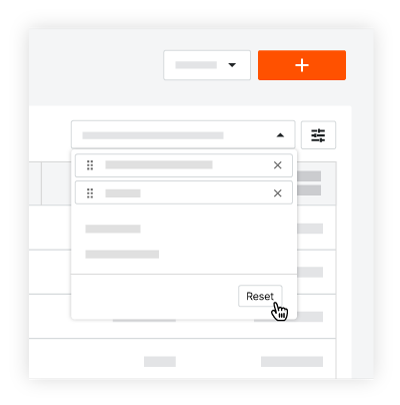
To restore the default settings, click Reset in the drop-down menu.
Overflow Menu
To open a drop-down menu with additional column options, click the vertical ellipsis ![]() to reveal an Overflow menu with the options detailed below.
to reveal an Overflow menu with the options detailed below.
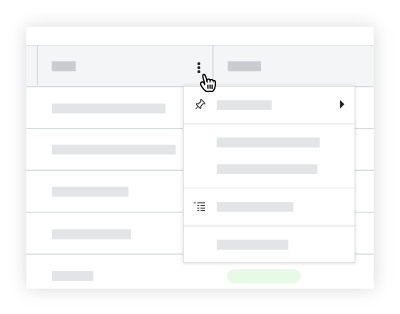
The Overflow menu includes these options:
Group by Project
Pin Column
Autosize this Column
Autosize All Columns
Sort By This Column
Reset Columns
Group by Project
To keep data columns in the table organized by Procore project, select the Group by Project option
Pin Column
To keep data columns in the table from moving when you scroll, you can pin a column to freeze it in place. To do this, hover your cursor over the right side of a column heading unit the vertical ellipsis ![]() appears. Next, click the vertical ellipsis
appears. Next, click the vertical ellipsis ![]() and choose Pin Column. Then choose one of these options:
and choose Pin Column. Then choose one of these options:
To pin a column on the left side of the table, choose Pin Left.
To pin a column on the left side of the table, choose Pin Right.
Pointe
Procore épingle les colonnes à gauche ou à droite de la page dans l’ordre dans lequel vous les avez épinglées.
Vous pouvez réorganiser vos colonnes épinglées en faisant glisser et en déposant une colonne à la position souhaitée.
Vous pouvez épingler des colonnes à gauche et à droite du tableau.
To remove all pins, choose No Pin.
Autosize this Column
To automatically set the width of a column to match its contents, click the vertical ellipsis ![]() and select the Autosize This Column option from the drop-down menu.
and select the Autosize This Column option from the drop-down menu.
Autosize All Columns
To automatically set the width of all columns in the table to best match the contents, click the vertical ellipsis ![]() and select the Autosize All Columns option from the drop-down menu.
and select the Autosize All Columns option from the drop-down menu.
Sort By This Column
To automatically set the sort order of the column, click the vertical ellipsis ![]() and select Sort By This Column. Then choose one of these options:
and select Sort By This Column. Then choose one of these options:
To sort the table by the selected column listing entries in ascending order, choose Sort Column Ascending.
To sort the table by the selected column and list entries in descending order, choose Sort Column Descending.
To remove the ascending/descending sort order, choose Column Not Sorted.
Reset Columns
To reset the table's columns to Procore's default settings, hover your cursor over the right side of a column heading until the vertical ellipsis ![]() appears. Then click the vertical ellipsis
appears. Then click the vertical ellipsis ![]() and select the Reset Columns option from the drop-down menu. This resets all of your column settings to the default settings.
and select the Reset Columns option from the drop-down menu. This resets all of your column settings to the default settings.